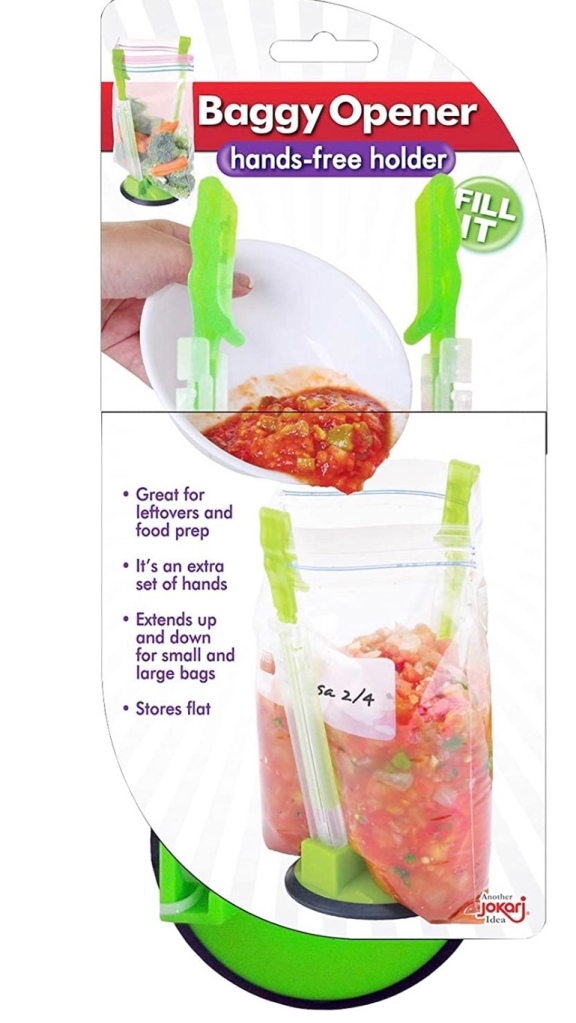
This is a totally unsponsored endorsement for a product I love and couldn’t do without. As we come into holiday season with the inevitable pre-prepping of ingredients for the big meals, post meal clean-up, storage, and divvying up of the coveted #leftovers, there’s always need of help to hold those storage bags open. Well, I stumbled upon the perfect solution a couple of years ago and this has become my favorite hostess, white elephant, and stocking stuffer gift ever since. Trust me, once you use it you’ll wonder how you ever did without it!
Feast your eyes upon the Jokari adjustable baggy rack stand. This miracle assistant firmly holds open every size zip bag, from snack size to gallon, without losing grip while you fill it!
This folds down flat for easy storage in a drawer, so it’s not another awkward gadget that takes up space in your cupboards. Two of these cost about $12 on Amazon and, to me, it’s money more than well spent! There are lower priced knock-offs available, but, for me, and the guaranteed cleanliness of my kitchen the sturdiness of these bag racks provide, I swear by the original.
Are you on Facebook? You might be interested in the things I may not devote an entire blog post to: food news, recipes, food facts, nutritional information, photos and other things that make my mouth water. If so, visit my This Girl Loves To Eat community at: https://www.facebook.com/ThisGirlLovesHerFood
I saw this video on #TikTok and got inspired to use the method but slim down the ingredients used to make it #KetoFriendly and not just low fat, like the original intended. Thanks, Nikita Fair for the inspiration!
1 Pound Chicken Breast, cut into 4 equal pieces
1/4 Cup Franks Red Hot Buffalo Sauce
1 Cup Cottage Cheese
1 TBLS Ranch Seasoning (Homemade or Store Bought)
Paprika
Garlic Salt
Ground Pepper
1 Cup Shredded Cheddar Cheese
4 Mission Carb Balance Flour Tortillas
Sprinkle the chicken breasts with the garlic salt, pepper, and paprika and cook at 375°F in the air fryer for 10-12 minutes until internal temperature reaches 160°F. Remove chicken, cover with foil and set aside while you prepare the sauce.
In mini (or full size) blender jar, combine cottage cheese, buffalo sauce, and ranch seasoning and blend on medium-high until smooth.
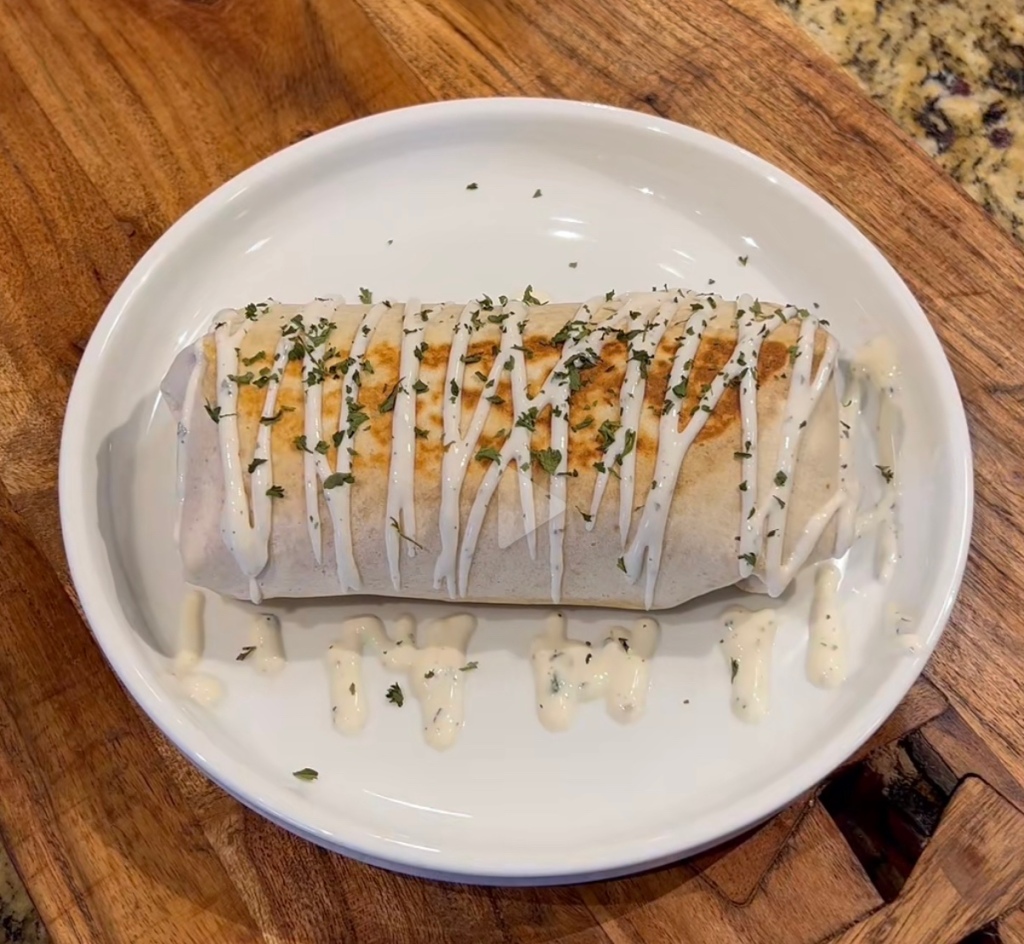
Uncover chicken and chop into about 1/2” chunks. Combine with sauce and cheese. Divide chicken mixture equally onto the 4 tortillas. Fold the tortillas and place seam side down on a hot sauté pan. Brown burrito on both sides and wrap in foil to keep warm if not serving immediately. Can be stored in refrigerator or freezer and warmed back up.
Nutrition information: 541 Calories 27.5 g Fat 5.5 g Carbs 61.5 g Protein
Are you on Facebook? You might be interested in the things I may not devote an entire blog post to: food news, recipes, food facts, nutritional information, photos and other things that make my mouth water. If so, visit my This Girl Loves To Eat community at: https://www.facebook.com/ThisGirlLovesHerFood
Are you on Facebook? You might be interested in the things I may not devote an entire blog post to: food news, recipes, food facts, nutritional information, photos and other things that make my mouth water. If so, visit my This Girl Loves To Eat community at: https://www.facebook.com/ThisGirlLovesHerFood
Gatherings are easier with quick, #MakeAhead, appetizers. #AntipastoBites can be made the day before and kept, in a sealed container, in the refrigerator until you’re ready to serve. The flavors are better when closer to room temperature, so, get them out 15-30 minutes before serving.
1/2 c. Extra-virgin olive oil, plus 3 Tablespoons, divided
9 oz. Fresh cheese tortellini
Kosher salt
Freshly ground black pepper
2 tbsp. Balsamic vinegar
8 oz. Mozzarella balls (in deli case near specialty cheeses)
1/2 tsp. Italian seasoning
1/4 tsp. Red pepper flakes
4 oz. Sliced salami (or Prosciutto, Pepperoni, Sopressata, etc.)
1/4 lb. Roasted red peppers, chopped into bite-sized pieces
1 Bunch fresh basil
14 oz. Artichoke hearts (drain & chop into bite-sized pieces)
1/4 lb. Green olives (Can substitute black if you prefer)
In a large pot of boiling water, add 1 tablespoon oil. Cook tortellini according to package directions until al dente. Drain and transfer to large bowl.
Season cooked tortellini with salt and pepper. Add balsamic vinegar and 2 TBLS olive oil and mix to combine. Set aside.
Marinate mozzarella: In a small bowl, add mozzarella balls, Italian seasoning, red pepper flakes, and remaining 1/4 cup olive oil. Mix to combine and set aside.
Assemble skewers by layering one piece each mozzarella, salami, roasted red pepper, tortellini, basil, artichoke heart, and green olives.
Are you on Facebook? You might be interested in the things I may not devote an entire blog post to: food news, recipes, food facts, nutritional information, photos and other things that make my mouth water. If so, visit my This Girl Loves To Eat community at: https://www.facebook.com/ThisGirlLovesHerFood
These muffins are great to keep in the refrigerator all week for #GrabAndGo breakfasts. They freeze well too.
Keto Banana Mini Bundt Muffins
1/2 Cup Unsalted Butter, room temperature
2/3 Cup Truvia (best for baked goods)
1/4 Cup Packed Brown Sugar Substitute (Sukrin)
1 tsp Vanilla
2 Large Eggs
3/4 Cup Ripe, Mashed Banana
1 1/2 Cups Superfine Almond Flour
3/4 tsp Baking Soda
1/2 tsp Salt
1/2 tsp Cinnamon
1/4 tsp Nutmeg
Preheat oven to 350 degrees.
Grease mini Bundt pan with a swipe of butter or cooking spray
Cream butter and sugar until fluffy.
Add eggs one at a time, beating well after each.
Stir in banana.
Sift dry ingredients into banana mixture.
Mix until dry ingredients just incorporated.
Spoon into pan.
Bake at 350 degrees for 20-25 minutes.
I like these with a little spread of #KetoFriendly cream cheese!
Are you on Facebook? You might be interested in the things I may not devote an entire blog post to: food news, recipes, food facts, nutritional information, photos and other things that make my mouth water. If so, visit my This Girl Loves To Eat community at:https://www.facebook.com/ThisGirlLovesHerFood
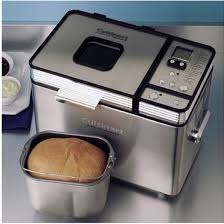
One of the biggest complaints I, and many others, have about Keto Bread is that it tends to taste too eggy. I’ve been on a mission to eliminate that and discovered that, with my new bread machine, I can bake #KetoFriendly, #EggFree, loaves of bread.
Of course, buying a new bread machine means yet another tool I need to find a home for in my #StorageChallengedKitchen. But #ThisGirlLovesToEat, so I’ll find a corner somewhere. 😉
My machine is a Cuisinart Convection Breadmaker and does have a low-carb setting, so that is a bonus.
Keto Bread Machine White Bread
2+1/2 tsp Bread Machine Instant Yeast
1 + 1/3 Cup 90º F Tap Water
2 TBLS Sugar
1/4 Cup Neutral Oil (Vegetable or Canola) – unless you want the flavor in your bread, then you can use Olive Oil (I like to use a blend of Olive-Avocado Oil)
3 tsp Vital Wheat Gluten
3 Cups/300 g (weigh it if you can) Carbalose® Lo-Carb Flour (I have used Bob’s Paleo Flour as well)
Salt or other seasonings as desired (I always add a bit of salt)
Using a paper towel, lightly oil the inside of your bread machine pan and the kneading paddle. Plug in your bread machine (but do not preheat), add your yeast, sugar and warm water to the pan and close the machine lid. Set a timer for 12 minutes to allow your yeast to activate (start bubbling).
As soon as your yeast is nice and foamy, add (in this order) your oil, the wheat gluten, any spices you are using, and the flour.
Close your lid and set the machine to Low Carb setting (if it has one) or bake at basic mode for a 1.5 pound loaf.
**Tip: To keep your loaf from having a hole in the middle, when the rise cycle starts, remove the paddle and center your loaf back in the pan without handling it too much.
Allow loaf to cool in the pan then slice into 12 slices.
Nutrition Information Per Slice (with Canola Oil)
Calories 120
Protein 8.25 g
Carbs 4.83 g
Fat 7.42 g
Are you onFacebook?You might be interested in the things I may not devote an entire blog post to: food news, recipes, food facts, nutritional information, photos and other things that make my mouth water. If so, visit my This Girl Loves To Eat community at:https://www.facebook.com/ThisGirlLovesHerFood
Realizing that #leftoverwine is an oxymoron, the occasion did present when a high quality bottle was opened at the end of a multi-bottle evening and not finished, then said bottle was put into the wine cellar and forgotten for a week past it’s drinking window. Shit!
Time to make some red wine vinegar! I left the bottle, corked, in the dark, cool cellar for an additional month then set to starting my kitchen #chemistryexperiment.
Vintage Red Wine Vinegar
Up to 750 ml leftover Red Wine of any variety – in this case, I used: 3/4 bottle Eighty Four Wines 2013 Malbec out of Napa, CA + about 1/4 bottle Bodega Y Vinedos Catena 2019 Malbec out of Argentina
1/2 cup (118 ml) Raw, Unfiltered, Unpasteurized Vinegar, or a Vinegar Mother – I used Bragg Organic Raw-Unfiltered Apple Cider Vinegar With the Mother
Pour the wine into a dry, sanitized, wide-mouthed, sealable (canning) jar that holds at least a quart. If the wine contains sulfites (it will say so on the back of the bottle), stir in the hydrogen peroxide and let the wine sit for about a minute to neutralize them. Stir in the water with a wooden spoon.
Stir in the raw vinegar well to oxygenate the wine.
Cover the jar with either tightly-woven, quadrupled cheesecloth or a piece of muslin, even a thick paper towel, securing with rubber band/string/a screw on metal canning band, or, like I used, 😉 a zip tie to keep fruit flies out. You can cover it with a paper coffee filter for extra protection from fruit flies if desired. The jar needs to breathe (vent its Carbon dioxide) so do not, under any circumstances, put the metal inner jar canning lid or glass clamped vacuum lid on to seal.
Place your jar on the counter, out of direct light, or in a cupboard, where the temperature stays between 65° and 75°F. The longer you leave it alone to fully develop it’s acidity, especially if you have blended more than one type of wine, the better. Ideally, leave it alone a minimum of one month before checking your acidity level. Your ph should be 4.0 or below.
Bottle half of the vinegar, in a pressure resistant bottle, leaving headspace and replace with the same amount of wine for another batch. Or, you can bottle it all, storing the mother (1/2 C) for another batch or to share with a friend to make her own.
Amazon carries many suitable bottles for storing vinegar
The vinegar can be used immediately (stored in the refrigerator if you like the flavor as it is) or aged longer in your cupboard or on the cool counter top to allow it to mellow further and the flavors to develop more fully.
Troubleshooting: Most fermenting problems with vinegar come from trying to ferment in temperatures that are too warm for the fermentation process. Try to keep your jars in a room that’s between 55 and 75°F.
Surface growth: If you see anything “scummy” starting to grow on your vinegar while it’s fermenting, scoop off the surface growth. If it smells fine, it is fine.
Over-Fermenting: If your vinegar develops an awful smell (like rotting garbage), toss it out. If it smells a little funky (like vinegar), it’s probably fine.
Mold Growth: If you’re having problems with mold growing on the vinegar (not simply white scum on the top), toss out the vinegar. Next time, make sure your vinegar is fermenting in a room that’s not above 75 degrees, and is in a place with good airflow.
Are you onFacebook? You might be interested in the things I may not devote an entire blog post to: food news, recipes, food facts, nutritional information, photos and other things that make my mouth water. If so, visit my This Girl Loves To Eat community at: https://www.facebook.com/ThisGirlLovesHerFood
I came across this article from the New York Post and was struck by just how true it is here on the West Coast too! Are you feeling the same about higher prices & smaller wine pours where you are?
Article written by Beth Landman, “You’re Not crazy, wine pours are shrinking” appeared June 23, 2022 in the New York Post
When international investor Brian Hogan took an important client to a favorite Midtown restaurant last month, he hoped to impress him. His guest ordered a Chablis by the glass rather than the bottle, and the sommelier poured it with due deference.
But, when the usually mild-mannered client looked down at his glass, he was shocked by the minuscule size of the serving. He summoned the manager and asked him to bring over a measuring cup.
“He thought the pour was ridiculous and offensive,” Hogan said. “When he measured, it turned out to be only 4 ounces.” The manager quickly delivered more wine to the glass, along with a profuse apology.
Inflation has hit the bottle. All over the city, from taverns to fine restaurants, diners are doing double takes as they receive reduced pours of wine at increased prices. A standard bottle of wine contains 25.4 ounces — meaning a generous 6-ounce pour will yield four glasses, a standard 5-ounce glass will deliver five and a measly 4 ounces will eke out six. Diners say they’re increasingly being served paltry pours, and industry insiders confirm their suspicions.
“I worked for Danny Meyer and we always gave 6 ounces,” said a sommelier at a popular new downtown restaurant. “When I got here I was quickly corrected and instructed to pour only 5.”
A somm at another Manhattan hot spot confided that “During COVID, we were told to make sure we got five glasses out of a bottle, rather than the four we were used to getting.”
A spokesperson for Meyer’s Union Square Hospitality Group confirmed that his restaurants still pour 6 ounces. At Isabelle’s Osteria and Barbounia in the Flatiron, they’re also sticking to 6 ounces.
“All our wine costs went up … but we felt that customers will forgive you if you overcook their meat a bit, but will not forgive you if you skimp,” said Vladimir Kolotyan, a partner in both restaurants. “So we added one dollar to some of the glass prices and left some the same, but never touched the size.”
The stingy servings are creating awkward situations.
An Upper West Side entertainment attorney had some explaining to do to his ex-wife after she saw a bill from his dinner with their young adult children.
“She was disturbed by the number of wine glasses consumed, but I explained to her that we actually drank the same amount of alcohol we usually do; we just had to order more glasses,” said the man, who asked to remain anonymous for personal reasons.
Even those in the wine industry, while sympathetic to restaurant’s rising costs, are disturbed by the trend.
“I’m willing to pay for quality and I feel shortchanged when I receive a small pour,’’ said Mark Fang, a 41-year-old wine blogger and certified sommelier who lives in Hell’s Kitchen. He recently dined at Marea and ordered an $18 glass of Grüner Veltliner that he estimated was a mere 4 ounces.
“Normally I get only one glass of wine, but this time the pour was so small it didn’t last past the appetizer,” he said. “I like to enjoy wine with my entree, so I ordered a second glass … [in general] I know what bottles cost, and that hurts.”
“I’m blown away by how small the pours are.’’
Karen Harris
(A spokesperson for Marea’s Altamarea restaurant group said: “The standard operating procedure for pouring a glass of wine at Marea is 5 ounces. We do acknowledge that there is an occasional margin of error to take into account.”)
Karen Harris, 59, who lives on the Upper East Side and is an account executive for a wine importer and distributor, said that her entire portfolio has increased in price for the first time in four years. Still, she’s stunned by shrinking servings.
“I go to some places and think, ‘Are they serious?’” she said. “I’m blown away by how small the pours are.’’
Many restaurateurs insist that part of the problem is the trend towards using larger, better stemware that dwarfs the appearance of the wine.
A standard bottle of wine contains 25.4 ounces — meaning a generous 6-ounce pour will yield 4 glasses, a standard 5-ounce glass will deliver 5 and a measly 4 ounces will eke out 6. Above, a 6-ounce pour (left) and a 4-ounce pour. Brian Zak/NY Post
Maximilian Riedel, CEO and president of glassware company Riedel, thinks COVID isolation is also to blame. “This is an issue of perception,’’ he told The Post. “For the past two years, we have all [been] helping ourselves to what’s in [our] cellars. Now that we are returning to in-person dining, a server’s measured pour likely appears more restrained.’’ To ensure servers hit their mark, Riedel glasses have a subtle indicator in the curve of the glass at what the company sees as the ideal pour: 5 ounces.
But some restaurateurs insist that 5 ounces isn’t enough for their demanding clientele.
“I hear that in the city they are lowering servings and jacking up prices,’’ said Zach Erdem, owner of Southampton hot spots 75 Main and Blu Mar. “Here, if you give people 5 ounces, they will scream at you!’’
Are you onFacebook? You might be interested in the things I may not devote an entire blog post to: food news, recipes, food facts, nutritional information, photos and other things that make my mouth water. If so, visit my This Girl Loves To Eat community at: https://www.facebook.com/ThisGirlLovesHerFood
Leave millions of people in isolation, with time to fill, an internet full of ideas + the ability to get anything you need to bring weird ideas to life shipped to you, and what do you get?
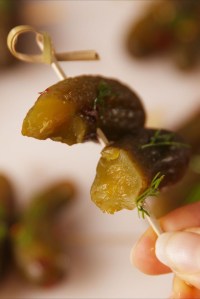
Apparently a whole lot of drunk people eating pickles! I’ve seen whiskey pickles, tequila pickles, Old Bay and vodka pickles, beer and pickles, apple infused vodka pickles, and even candied pickle pops made with vodka & Kool-Aid. I’m not a trendy, #TikTok kind of girl, but I’m up for a challenge, the boys are coming over for Father’s Day & I can’t wait to give this a try so I can see their faces when they take their first bites.
Drunken Pickles
2 C Small Pickles or Gherkins
1 C Pickle Juice
1 C Good Bourbon – I like Makers Mark
5 Sprigs of Dill
A Few Dashes of Hot Sauce – I like Frank’s Red Hot
If You like a little more kick, add a few shakes Red Pepper Flakes
4” Cocktail Skewers
In a medium bowl, combine pickles with pickle juice, whiskey, dill and hot sauce. Refrigerate for at least an hour. I plan to leave them overnight.
Drain and skewer pickles. Serve.
Recipe courtesy of Lena Abraham, Senior Food Editor, Delish Magazine, June 30, 2017; Photo credit: Chelsea Lupkin
Are you onFacebook? You might be interested in the things I may not devote an entire blog post to: food news, recipes, food facts, nutritional information, photos and other things that make my mouth water. If so, visit my This Girl Loves To Eat community at: https://www.facebook.com/ThisGirlLovesHerFood
It’s time to ditch the #Covid15, so back to cooking at home instead of Doordashing dinners I go!
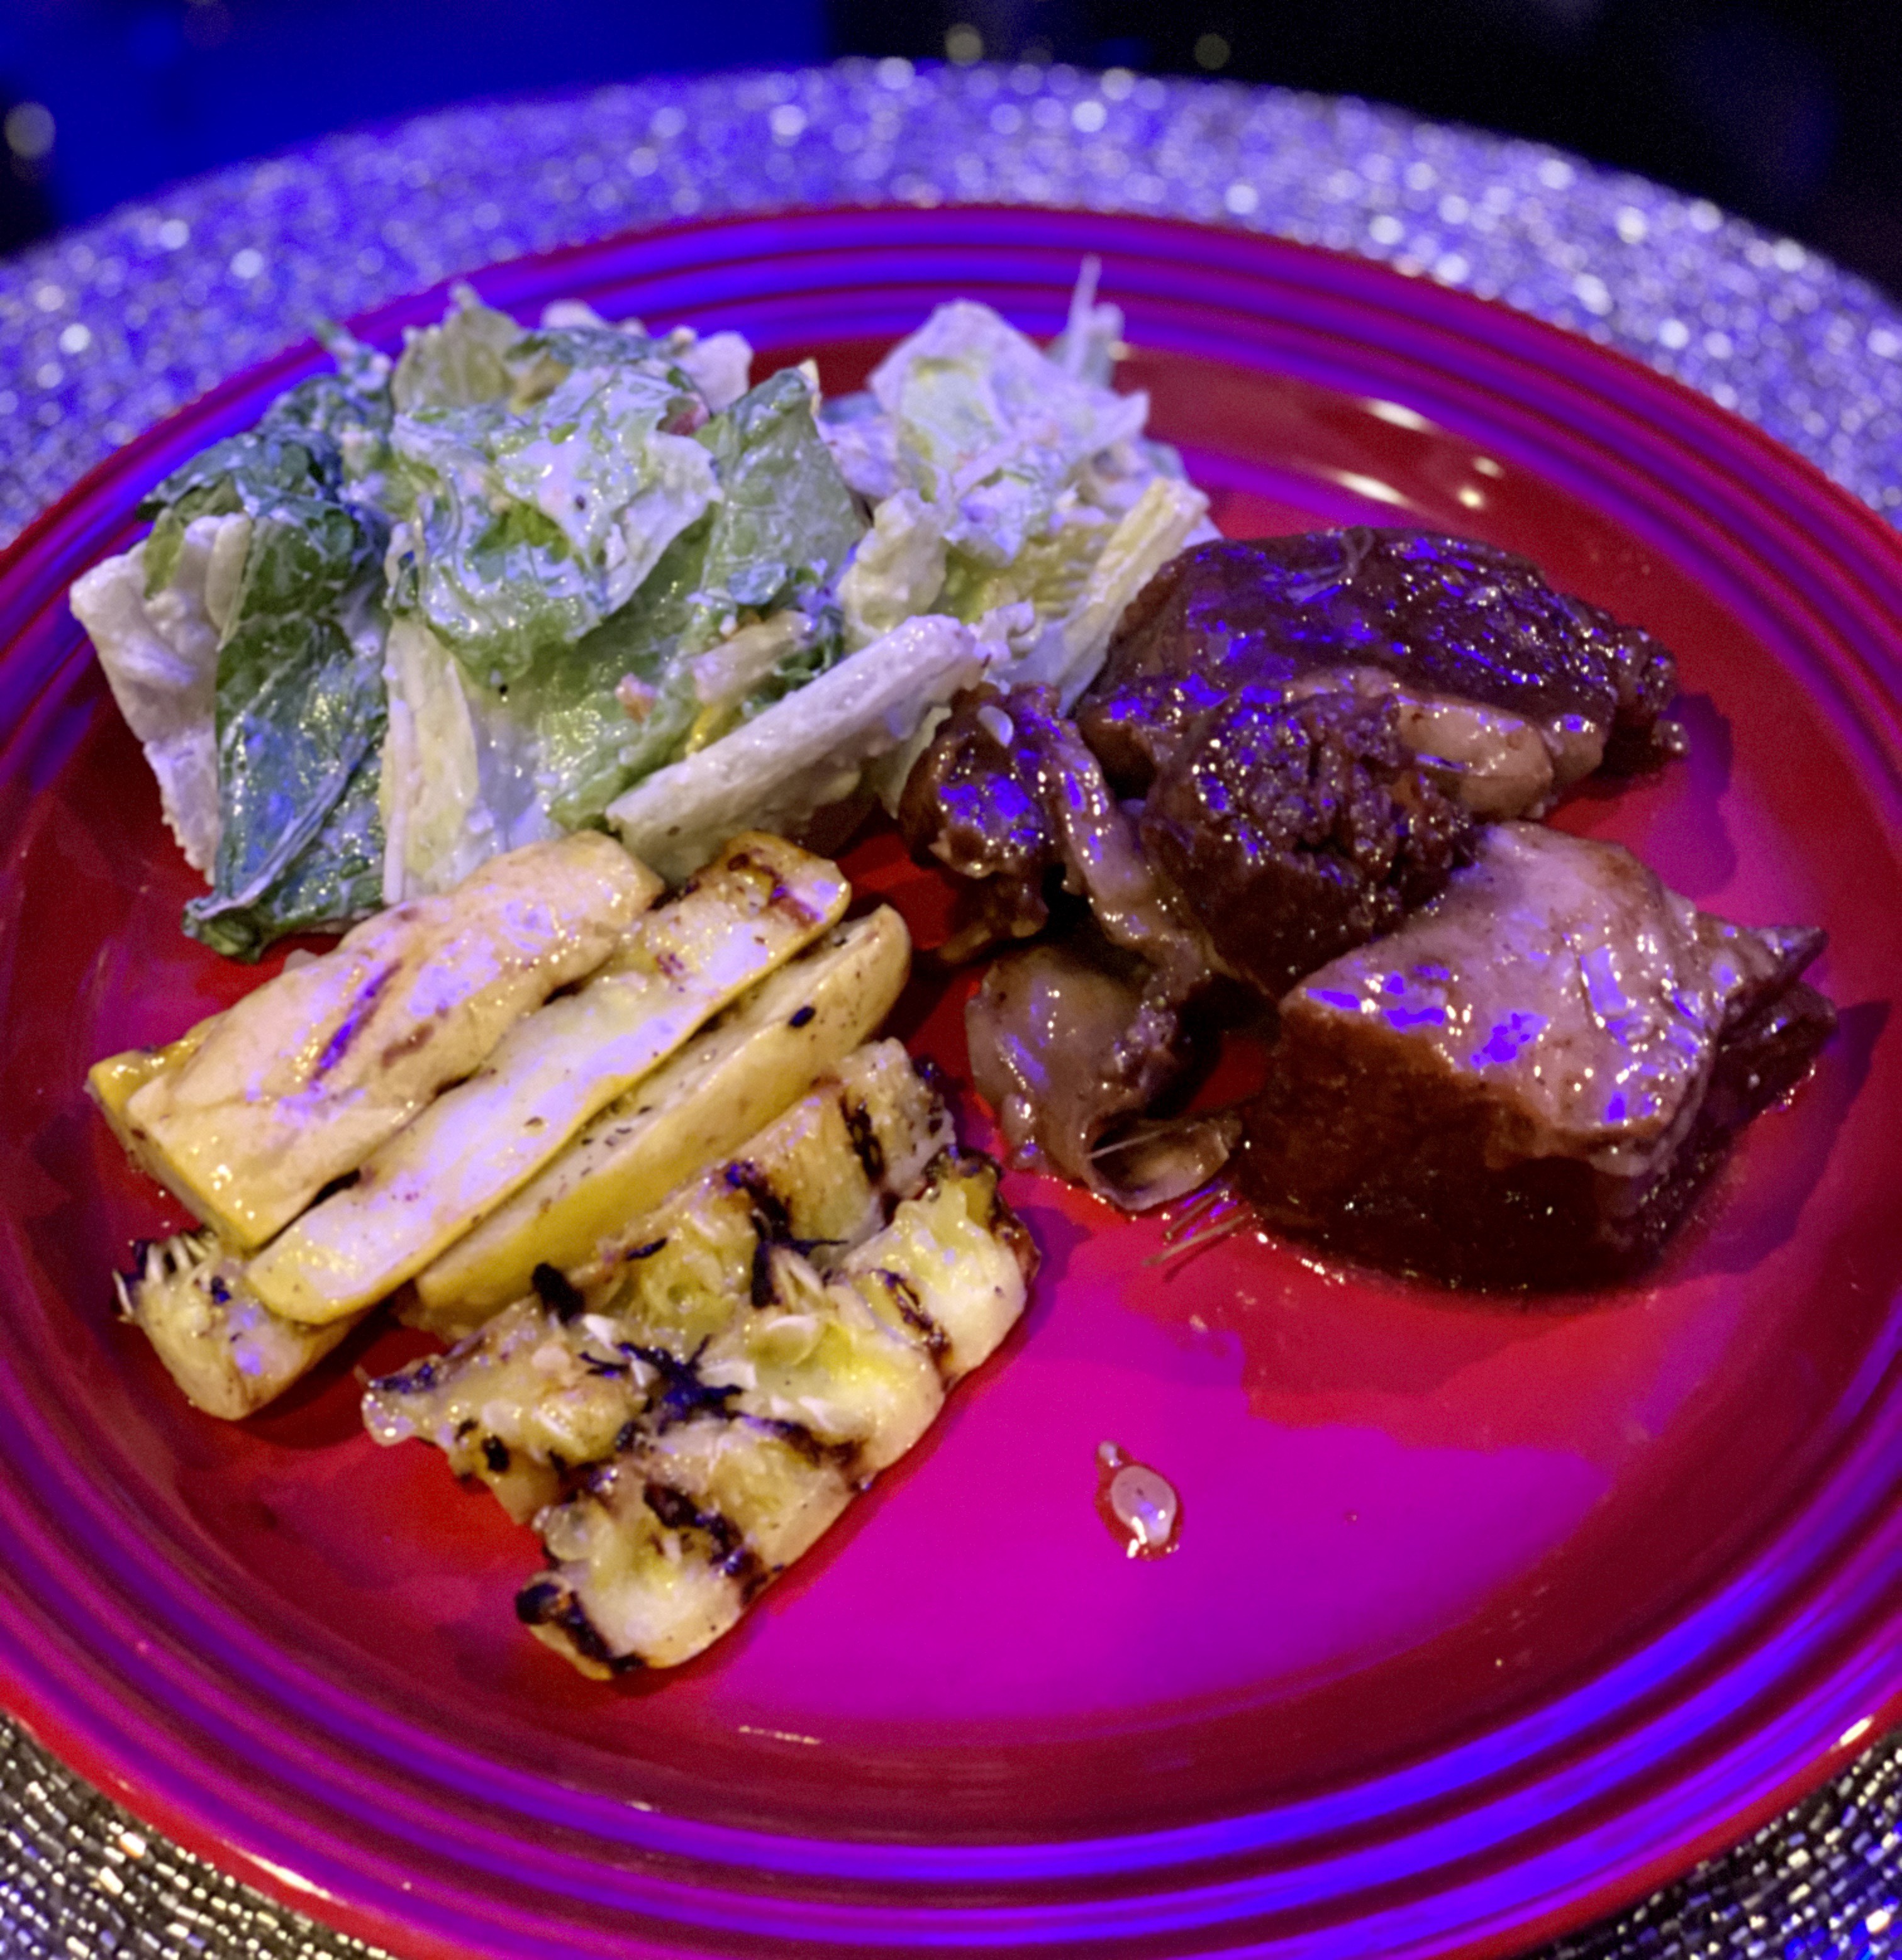
These short ribs pressure cook to a fork tender, falling off the bone, delicious finish in under an hour and are great with a simple salad and cauliflower mash. I used ground Chipotle, but you can use any pepper spice you prefer. I prefer it smokier with the bourbon.
Bourbon Short Ribs
2 1/2 Pounds Bone-in Short Ribs (About 6)
Salt & Pepper
Olive Oil
1 Medium Onion, Chopped
1/2 Cup Bourbon
1 TBLS Paprika
2 tsp Ground Cayenne, Adobo, or Chipotle (1 tsp if you want it milder)
3 TBLS Granulated Sugar (you can use a sugar substitute if you’re strictly counting every carb)
1TBLS Cornstarch + 1 TBLS Cold Water mixed together
Cooking Directions:
Fill a large bowl or pot with cold water. Immerse the short ribs, and rinse the ribs in the cold water to wash off excess blood and bone dust.
Drain and pat dry the short ribs with paper towels. Generously sprinkle salt & pepper on all the ribs, on both sides.
Switch on the Instant Pot to the saute setting on high. When the instant pot is hot, pour in about 2 tbsp of oil. When the oil is hot, place about 3 – 4 short ribs in the instant pot to caramelize or to sear. It’s important not to overcrowd the bottom in order to get nice caramelization on your short ribs. Sear the short ribs on all sides, about 2 – 3 minutes per side. Place the caramelized short ribs on a plate.
Repeat with the rest of the short ribs.
Place the onion in the pot, and add the boubon. De-glaze the bottom of the instant pot to make sure that all of the caramelized bits on the bottom are mixed with the bourbon (de-glazing is an important step, so don’t skip it). Add the paprika, cayenne pepper, sugar, balsamic vinegar, garlic, and thyme.
Bring just to a boil, then turn off your instant pot.
Place the short ribs, fat side down, back in the instant pot.
Pour the consommé over the short ribs. Close the instant pot. Choose the manual pressure function and set it to high. Cook the short ribs for 45 minutes, followed by a 10 – 15 minute natural release.
Gently remove the short ribs on to bowl, and turn the saute function back on to thicken the liquid in the instant pot.
Dissolve the cornstarch in the water and add it to the sauce in the instant pot. Mix it in and bring it to a simmer until the liquid has thickened. Taste and season the liquid with more salt, pepper, or balsamic vinegar, if needed. Turm the Instant Pot off and put the short ribs back into the instant pot to coat with the sauce.
Serve over your cauliflower mash (I grilled some summer squash) with the sauce. #ThisGirlLovesToEat


 It’s time to ditch the #Covid15, so back to cooking at home instead of Doordashing dinners I go!


