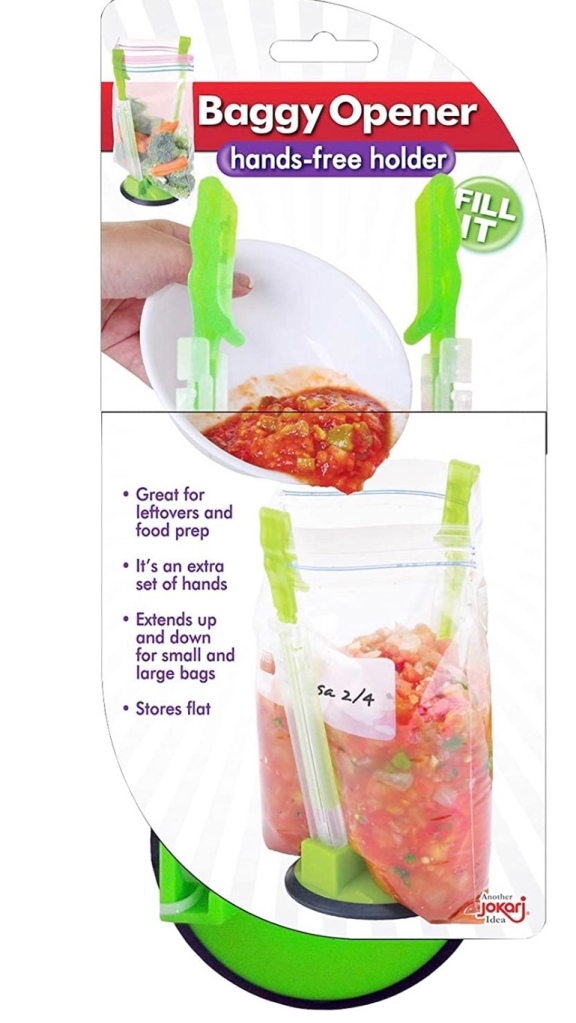
This is a totally unsponsored endorsement for a product I love and couldn’t do without. As we come into holiday season with the inevitable pre-prepping of ingredients for the big meals, post meal clean-up, storage, and divvying up of the coveted #leftovers, there’s always need of help to hold those storage bags open. Well, I stumbled upon the perfect solution a couple of years ago and this has become my favorite hostess, white elephant, and stocking stuffer gift ever since. Trust me, once you use it you’ll wonder how you ever did without it!
Feast your eyes upon the Jokari adjustable baggy rack stand. This miracle assistant firmly holds open every size zip bag, from snack size to gallon, without losing grip while you fill it!
This folds down flat for easy storage in a drawer, so it’s not another awkward gadget that takes up space in your cupboards. Two of these cost about $12 on Amazon and, to me, it’s money more than well spent! There are lower priced knock-offs available, but, for me, and the guaranteed cleanliness of my kitchen the sturdiness of these bag racks provide, I swear by the original.
Are you on Facebook? You might be interested in the things I may not devote an entire blog post to: food news, recipes, food facts, nutritional information, photos and other things that make my mouth water. If so, visit my This Girl Loves To Eat community at: https://www.facebook.com/ThisGirlLovesHerFood
I wasn’t raised in a Jewish family so wasn’t ever given the chance to experience some of the best, most flavorful, dishes that, thankfully, I was able to enjoy when I began visiting #TheRollAndRye deli in Culver City, CA with my father-in-law. Latkes, sweet noodle kugel, and matzo ball soup, if you haven’t had them made by a good Jewish cook, are treats you need to taste to appreciate!
When I married into the family I, not his Jewish daughter or granddaughter, was gifted with his Mother’s 80+ year old Jewish cookbook with his single request that I make noodle kugel for him. #DoneDeal
Fearing I couldn’t duplicate the soups he loved so well, until I came across this recipe in #Delish Magazine, I never attempted matzo ball soup. The lightness of the matzo balls makes them better than any I’ve ever tried.
1.Soup: In a very large pot over medium heat, heat oil. Cook onion, carrots, celery, turnip, and parsnip, stirring occasionally, until vegetables are fragrant, about 2 minutes. Place chicken on top of vegetables and toss so chicken gets slightly covered in veggies and oil. Add broth and enough water to just cover chicken. Add dill and parsley; season with salt and pepper. Bring to a boil, then reduce heat to medium-low and simmer, partially covered, 2 hours.
2. Remove chicken (shred for soup or reserve for another use). Reserve a few carrot pieces (to be sliced and added to soup later), then strain broth into a large bowl or measuring cup; season with salt and pepper. Discard remaining vegetables and herbs.
3.Matzo balls: In a medium bowl, beat eggs. Add fat and seltzer and mix well to combine. Add matzo meal, salt, and pepper and mix well, ensuring all matzo meal is incorporated into egg mixture. Refrigerate at least 30 minutes. 4. Meanwhile, bring a large pot of water to a boil. Using a cookie scoop (for medium matzo balls) or ice cream scoop (for large matzo balls), form mixture into balls, smoothing by rolling between slightly wet hands. Drop each ball into boiling water. (They will sink initially but rise as they cook.) Cook until centers of balls are fully cooked through, 25 to 35 minutes. They’ll look dense and dark yellow in the center if they’re not done.
5. Add matzo balls to soup, or place into serving bowls and top with soup. Top with chicken (if using), reserved carrots, and dill.
TIP** Double the recipe and make a second batch of #MatzoBalls to freeze. After cooking the matzo balls, place them on a parchment-lined baking sheet and freeze. Once frozen, you can transfer to a resealable plastic bag. To prepare, drop frozen balls into boiling broth and cook until heated through.
TIP 2** Matzo balls are sponges for flavor: They soak up whatever is around them. All the more reason to make sure the stock they’re sitting in is as good as possible.
Recipe courtesy of JOANNA SALTZ – Delish Magazine, April 2022
Are you on Facebook? You might be interested in the things I may not devote an entire blog post to: food news, recipes, food facts, nutritional information, photos and other things that make my mouth water. If so, visit my This Girl Loves To Eat community at: https://www.facebook.com/ThisGirlLovesHerFood
In this season of food gifts and party leftovers, this article, previously published by My Recipes, is particularly important and worth sharing & re-sharing. #ThisGirlLovesToEat
“We’ve all let something languish in the fridge a bit longer than we realized. It’s not unreasonable to look at a single patch of mold on a strawberry and wonder if the whole lot has to be tossed. But what about a block of cheese with a quarter-sized fuzzy spot? Is that safe to trim and eat? Or does it have to go, too?
Fortunately, this handy guide from the U.S. Department of Agriculture can have the final say on what stays and what goes when you spot mold on your food.
4 Moldy Foods You Can Eat:
Hard salami or dry-cured country ham
It’s A-OK for hard salamis to have a thin white coating on the outside of the meat. This mold is put there on purpose: to produce flavor and protect the cured meat from bacteria. It’s safe to consume, as is any mold that grows on dry-cured country ham. Large slabs of the super salty pork are often used in restaurants as part decor, part conversation starter (and also a tangy topper to everything from pasta to avocado toast). If you buy one of these delicacies, don’t fear a little mold growth on the crust. Scrub it off (be sure to dry the ham well) before eating.
Cheeses made with mold
The moldinblue, Gorgonzola, Stilton, Brie, and Camembert is to be expected. After all, these cheeses are injected with mold before they ripen—that’s why they’re so funky and delicious. But not all molds are made to eat, so you can’t assume all molds on cheese get the approval. Hard cheeses, like Gorgonzola and Stilton, aren’t harmed by a little extra mold. Cut the spot away—half an inch to one inch all the way around—and enjoy. Softer cheeses, like Brie and Camembert, have to go if you spot mold growing on them. The fingerlike organisms of mold can reach deep into these softer cheeses and may develop into toxic substances.
Hard cheeses
Even cheeses that aren’t made with mold veins are safe to eat if you spot a speck of mold growing on them. Cheddar, for example, just requires you to trim an inch around the moldy spot (some experts argue you only need a half-inch buffer; do what feels safest for you) and toss that before diving in. Be sure to use a clean knife, and keep the blade away from the mold to prevent cross-contamination. When you’re finished slicing for your sandwich or burger, be sure to rewrap the cheese in a fresh covering so you don’t reinfect with mold spores.
Firm fruits and vegetables
Tough vegetables and fruit, like carrots, potatoes, and turnips can take the mold in stride. The mold threads have a hard time penetrating deep into these dense plant foods. Trim off an inch around the mold, and eat or cook as you planned. Softer fruits and vegetables, like cherries, strawberries, and corn, should be tossed. Mold can easily spread to nearby areas, even if you can’t see the spores with your naked eye.
When can molds be toxic?
All molds can cause allergic reactions and respiratory problems. That doesn’t mean they’re toxic. However, in the right conditions, some molds can turn into mycotoxins, poisonous substances that can make people physically sick. These substances are produced by certain molds that are most commonly found in grain and nut crops. However, they’ve also been known to show up in apples, grape juice, celery, and other fresh produce. That’s why, when in doubt, throw the moldy foods out.
Which moldy foods should I always toss?
The USDA says these foods are no good when you spot mold. Their high moisture content or porous nature makes them prime for rapid mold development. Don’t risk getting sick just to finish up Tuesday night’s pot roast. Toss it, and fry up a grilled cheese instead.
Foods you should always toss:
Luncheon meats, bacon, and hot dogs
Cooked leftover meat and poultry
Cooked casseroles
Cooked grains and pasta
Soft cheeses, like cottage cheese, chevre, cream cheese, and Neufchatel
Yogurt and sour cream
Jams and jellies — Mycotoxins can spread in these foods easily, so it’s not enough to scoop out a mold part and keep going deeper into the jar.l
Soft fruits and vegetables — They’re porous, which means mold can spread rapidly, even if you can’t spot the spores.
Baked goods and bread
Peanut butter, legumes, and nuts — Any foods processed without preservatives are at a high risk of developing mold spores. Be extra cautious and keep them stored appropriately.”
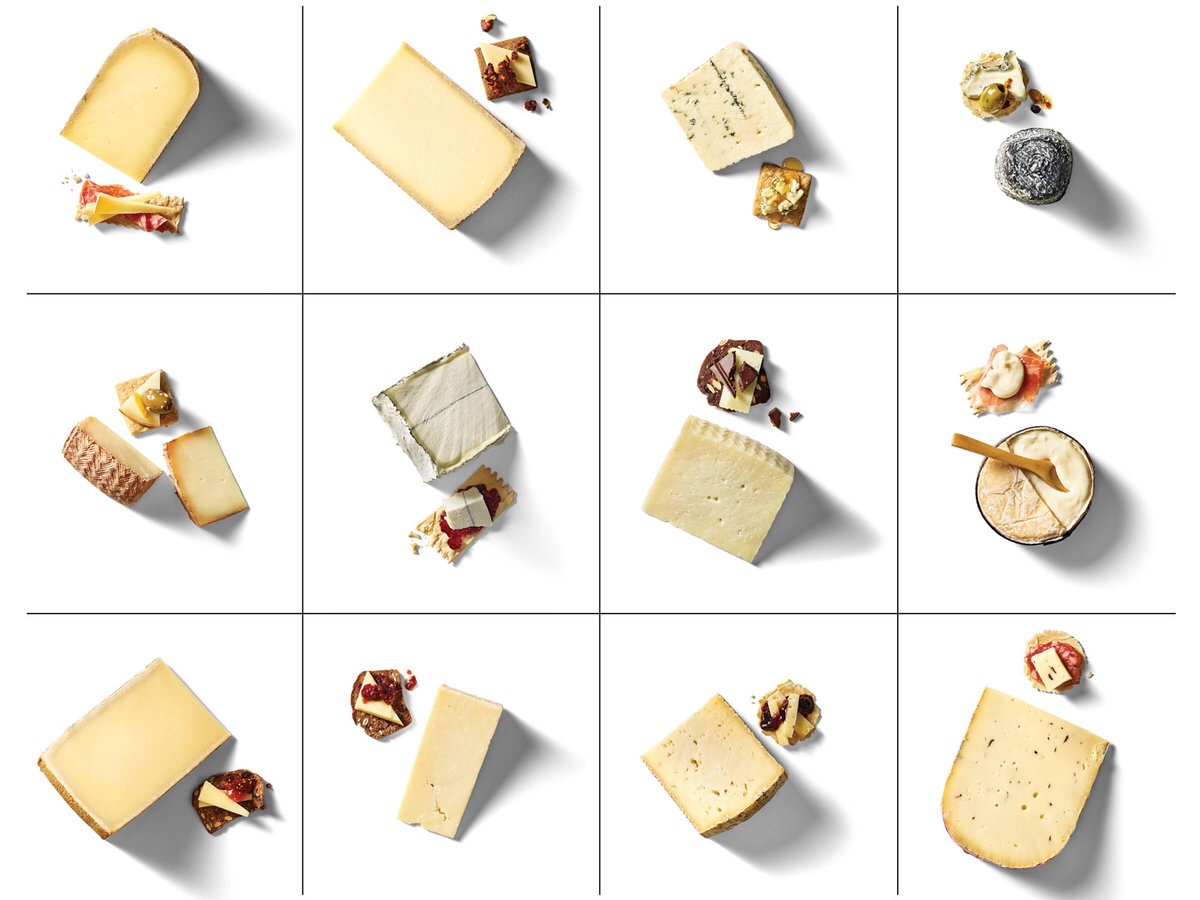
Each day from December 12 to 23, Whole Foods’ will make a different one of its “highest-quality cheeses available at a generous discount, from artisans like 2019–20 World Cheese Award–winner Rogue Creamery.” That discount: 50 percent off—with an additional 10 percent offif you’re a Prime member. This is reason enough to renew my #AmazonPrime membership! #ThisGirlLovesToEat
Here’s a cheat-sheet of the 2019 sale lineup – bonus, Whole Foods loves to let you sample:
Dec. 12: Roth Pavino
“Rich, earthy, medium-firm Alpine cheese with notes of sweet hazelnut. Exclusive to Whole Foods Market.”
Dec. 13: Istara P’tit Basque
“Aged a minimum of 70 days, this creamy and smooth sheep milk cheese has a mild, nutty flavor with a subtle, sweet finish.”
Dec. 14: Uplands Cheese Pleasant Ridge Reserve
“A cow’s milk Alpine-style cheese modeled after favorites like Le Gruyère and Beaufort, with flavors ranging from milky to nutty and grassy. The Pleasant Ridge Reserve is America’s most awarded cheese.”
Dec. 15: Neal’s Yard Dairy Keen’s Cheddar
“This cheese is dense yet creamy with complex flavors ranging from fruity to sweet butterscotch. Each wheel has been hand selected by our experts.”
Dec. 16: Cypress Grove Humboldt Fog
“A goat’s milk soft-ripened American original with a beautiful ribbon of edible ash through the center. Floral, herbaceous overtones, buttermilk and fresh cream flavors.”
Dec. 17: Emmi Cave Aged Le Gruyère
“A firm, almost crumbly Alpine cheese. Robust, deeply flavored, with tangy fruit notes and classic nuttiness.”
Dec. 18: Sweet Grass Dairy Thomasville Tomme
“Raw cow’s milk, handcrafted cheese with a semi-firm texture. Rich, earthy flavors with a finish of light salt, grass and tangy cream.”
Dec. 19: Mitica Cordobes
“Made with Castellana and Merino sheep milk from Spain. Rich and buttery flavors balanced by bright acidity and nutty undertones. Exclusive to Whole Foods Market.”
Dec. 20: Rogue Creamery Oregon Blue
“Aged at least 90 days in Roquefort modeled caves, this organic cheese has briny, earthy flavors with notes of sweet cream and huckleberry. Rogue Creamery recently made history by producing the first American cheese ever to win top honors at the World Cheese Awards in Bergamo, Italy.”
Dec. 21: Klare Melk Truffle Gouda
“Rich, flavorful, semi-firm cheese. Velvety notes of sweet cream and butter, generously laced with earthy truffles.”
Dec. 22: Cellars at Jasper Hill Harbison with Prosecco
“Soft-ripened, buttery, woodsy and sweet with balanced tones of mustard. A wash in Presto prosecco brings out bright citrus flavors. Exclusive to Whole Foods Market.”
Dec. 23: MonS Mary dans les Étoiles
“Stunning, ash-coated geo-rind goat cheese. Creamy and grassy, finished with light citrus notes. Exclusive to Whole Foods Market.”
There’s no way to avoid it, if you’re baking or making candy: you are going to need light corn syrup at some point to get a good result. After a few trials (and errors), I finally came up with a corn syrup recipe that is close enough to maintain the integrity of the recipes without adding any weird after tastes or textures!
Low-Carb Light Corn Syrup
3/4 Cup Water
1/2 Cup Truvia
3/4 tsp Vanilla
Pinch of Salt
3/4 tsp Xantham Gum
In a small saucepan over medium heat, mix the water and Truvia. Bring to a low boil and stir in the Vanilla. Reduce Heat to low.
Spoon out 1 TBLS of the hot Truvia mixture and, in a small bowl, stir in the Xantham Gum. It will be quite thick and sticky. It’s ok if it’s not entirely smooth.
Stirring continuously, add the Xantham gum mixture to the saucepan. Return the heat to medium and bring the mixture back to a low boil. Cook for one minute until the mixture starts to thicken. Remove from heat.
Pour the corn syrup thru a fine mesh strainer, pressing the corn syrup thru while leaving any unincorporated Xantham gum solids in the strainer.
Allow to cool slightly before using. As this cools further it can become crystallized, although mine did not. Mine just thickened into a jelly like consistency. If either happens, just put it in the microwave for 10 – 15 seconds and stir it again before you’re ready to use it. Makes about 1/2 Cup and doesn’t keep real long, so plan to make it when you will be likely to use it up. #ThisGirlLovesToEat
Are you on Facebook?You might be interested in the things I may not devote an entire blog post to: food news, recipes, food facts, nutritional information, photos and other things that make my mouth water. If so, visit my This Girl Loves To Eat community at:https://www.facebook.com/ThisGirlLovesHerFood
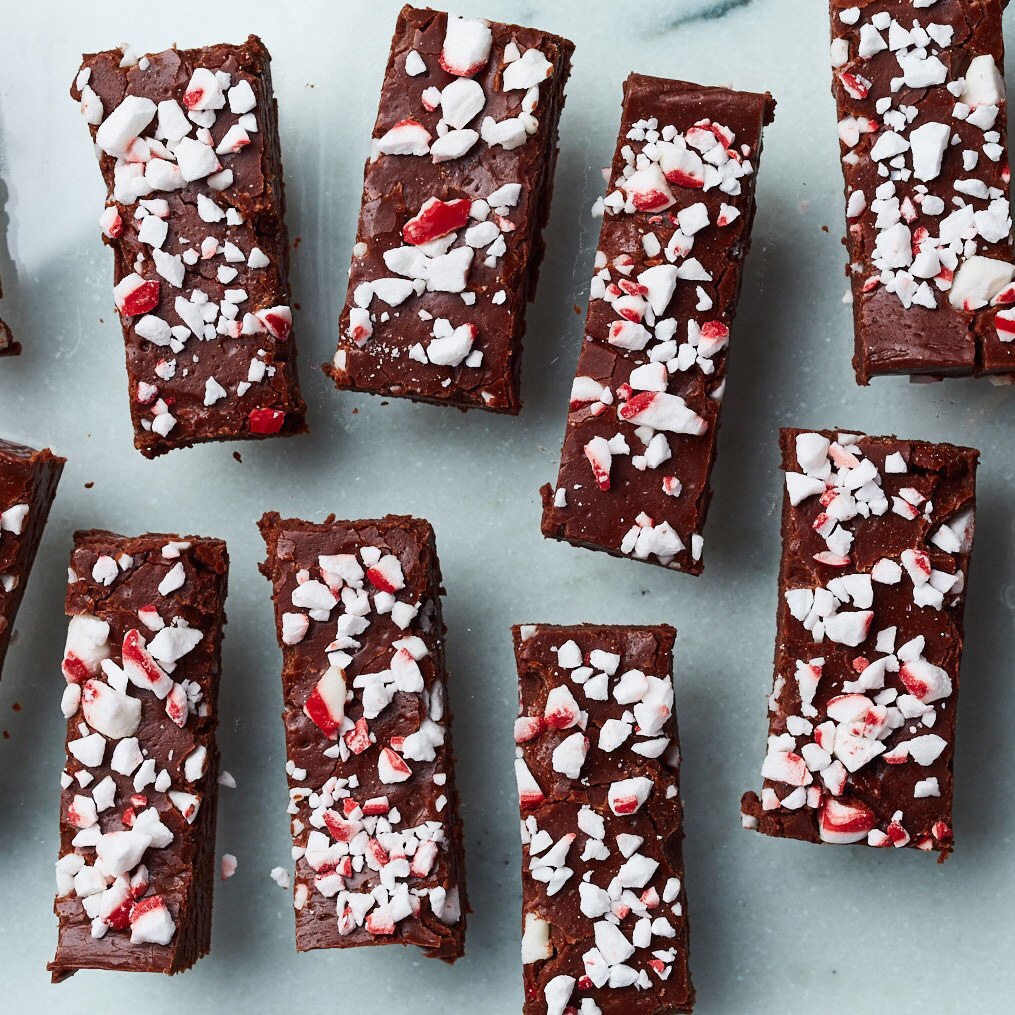
One of my favorite things about the December holiday season is the permission we all seem to give ourselves to indulge in every hearty, rich, gooey, decadent dish and treat we can before the calendar changes over welcoming a new year. Calories, fat, and carbs don’t count in December, right? 😂😂
Some treats I make year after year, but I’m always looking for new ways to indulge my love for all things food. This year I tripped across a 2016 recipe from Bon Appétit that has two of my favorite holiday ingredients: chocolate and peppermint. It’s one that’s joining the annual must haves list for sure! #ThisGirlLovesToEat
Chocolate Peppermint Fudge
Nonstick vegetable oil spray
2¼ cups sugar
1 cup heavy cream
3 tablespoons light corn syrup
½ teaspoon kosher salt
6 ounces unsweetened chocolate, chopped
4 tablespoons butter, cut into pieces
2 teaspoons vanilla extract
1 teaspoon peppermint flavoring or extract or ¼ teaspoon peppermint oil
Line an 8×8″ baking dish with foil, pressing into edges. Lightly coat with nonstick spray. Heat sugar, cream, corn syrup, salt, and 2 Tbsp. water in a medium saucepan over medium, stirring, until sugar dissolves. Add chocolate and stir until melted and mixture is smooth, then bring to a boil. Fit saucepan with candy thermometer and increase heat to medium-high. Cook, brushing down sides of saucepan with a wet pastry brush as needed to dissolve sugar crystals, until thermometer registers 238°.
Immediately pour mixture into a large bowl (do not scrape bottom or sides of pot). Dot top of mixture with butter; do not stir. Rinse thermometer, removing any sugar crystals, pat dry, and fit on bowl. Let mixture sit until thermometer registers 110°, 30–45 minutes.
Remove thermometer. Add vanilla extract and peppermint flavoring to mixture and beat with a hand mixer on high speed until mixture is light and thick like frosting and has lost its high gloss (will still have a slight sheen), about 4 minutes.
Scrape into prepared pan; smooth surface, then top with peppermint candies, pressing gently into surface. Cover with plastic and let fudge sit at room temperature until set, at least 4 hours.
Using foil, remove fudge from pan, peel away foil, and cut fudge into a 6×6 grid to make 36 squares.
Do Ahead:Fudge can be made 3 days ahead. Keep stored at room temperature.
Tips: 1) Crush the candies in a zip bag using a rubber mallet or rolling pin, and 2) A hand mixer is better than a stand mixer for this recipe.
If you feel like the dishes have barely been done following Thanksgiving dinner when discussions and planning for December holiday parties and dinners begins, you could be right. For those of us who love to entertain and treat our friends and family to fine meals, there are never enough days to plan the perfect meal. This appetizer, from the December 2019 issue of #EatingWellMagazine, is rich and flavorful while also being surprisingly low in calories, fat, and carbohydrates! #ThisGirLovesToEat
Crab Wontons with Brie
4 ounces Lump Crab Meat, drained & picked over
4 ounces diced Brie Cheese
1/4 Cup Mayonnaise
2 TBLS Minced Jalapeno
2 TBLS Minced Chives
1/4 tsp Ground Black Pepper
1/8 tsp Salt
24 Wonton Wrappers
Place a rimmed baking sheet in the oven; preheat to 350°F.
Combine crabmeat, Brie, mayonnaise, jalapeño, chives, pepper and salt in a medium bowl. Scoop about 2 teaspoons of the crab mixture into the center of each wonton wrapper. Use your finger or a pastry brush to moisten the edges of the wrapper with water. Carefully lift two opposite points up until they touch. Gently pinch together to seal. Fold the remaining two points up toward the center just to close the opening. Pinch the edges together to seal into a four-pointed star.
Carefully transfer the wontons to the hot baking sheet. Generously coat them with cooking spray. Bake until golden brown, 16 to 18 minutes.
To make ahead: Assemble wontons (Step 2) up to 8 hours ahead. Cover and refrigerate.
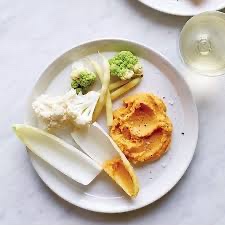
You know you need something to let people snack on before the big meal, but you don’t want them to be too full to eat the meal you’ve been slaving over for days…
This recipe, from November 2015’s Food & Wine Magazine, takes the edge off but won’t ruin anyone’s dinner! #ThisGirlLovesToEat
Two 15-ounce cans of chickpeas, drained and rinsed
1 cup pumpkin puree
1/4 cup fresh lemon juice
2 small garlic cloves
1/4 teaspoon cayenne
Kosher salt
Pepper
Pita chips or crudités, for serving
How to Make It
In a food processor (I used my Vitamix), combine the chickpeas with the pumpkin, lemon juice, garlic, cayenne and 1/3 cup of water and puree until smooth. Season the hummus with salt and pepper and serve with pita chips or crudités.
Make Ahead
The pumpkin hummus can be refrigerated for up to 3 days.
The frantic shopping and prep is done and this girl is doing Tomahawks instead of Tom Turkey at her house. Now it’s time to sit back with a celebratory cocktail! #ThisGirlLovesToEat
Stoli shared the perfect choice via Twitter.
Stoli Turkey Day Martini
1.5 parts Stoli Ohranj vodka
1 part Organic Cranberry Juice
0.5 parts Fresh Lemon Juice
0.5 parts Maple Syrup
Prosecco (Approx 0.5 parts to top off with)
Shake all of the parts, strain into your martini (or saucer champagne) glass, and garnish with a sugared cranberry & twist of lime. Cheers!
When my father-in-law found out I enjoyed cooking, one of the first things he gave me was his Mother’s Jewish Cookbook. He then opened it to much used page that had a recipe for a traditional #SweetLokshenKugel. I was behind the 8 ball for a couple of reasons on this one: I am not Jewish, so many of the words used in the, 70 + year old cookbook were, quite literally, foreign to me and, without the benefit of a picture accompanying the recipe, I was clueless as to what the recipe was actually for. Dad did clue me in that it was for a noodle kugel that his Mother used to make, but beyond that he was pretty much useless. 😉 Once I #googled some of the words for the kosher ingredients and, what turned out to to be brand names, I was able to modernize the recipe and create something that he loved and requested for many years.
Sweet Noodle Kugel
16 oz Wide egg noodles
1 Cup Sugar (I now substitute 1/2 Cup Truvia)
1 Stick Butter, melted
1 Large Egg
1 Medium Granny Smith Apple, grated
8 oz Golden Raisins
1 – 20 oz Can Crushed Pineapple (mine came in heavy syrup)
1-2 tsp Ground Cinnamon
1/4 tsp Ground Nutmeg
1 tsp Vanilla
Preheat the oven to 350° F. Grease a 13 x 9 inch baking dish with butter and set aside.
Boil the noodles for 10 minutes. Drain and put into a large mixing bowl or return to the pan you cooked them in. Add the butter to the noodles and toss to combine.
Combine the Sugar (or Truvia), Egg, Grated Apple, Crushed Pineapple (undrained), Raisins, Vanilla, Ground Nutmeg and Cinnamon, stirring well.
Add the combined ingredients to the noodles and toss until well distributed throughout.
Pour the noodle mixture into the prepared baking pan and bake for 45 minutes to an hour, just until tips of the noodles on top begin to brown. Cool and cut into 16 – 20 equal pieces. Can be served warm or room temperature.
Nutrition Information (for 16 servings using Truvia)
205 Calories
6.5 g Fat
26.62 g Carbohydrates
4.75 g Protein
If you’re interested in the things I may not devote an entire blog post to, like: health articles, my favorite recipes, fun drinks, food facts, nutritional information, restaurant reviews, gadget reviews, photos and other things that make my mouth water, I have a community page on Facebook: https://www.facebook.com/ThisGirlLovesHerFood


 One of my favorite things about the December holiday season is the permission we all seem to give ourselves to indulge in every hearty, rich, gooey, decadent dish and treat we can before the calendar changes over welcoming a new year. Calories, fat, and carbs don’t count in December, right? 😂😂


 You know you need something to let people snack on before the big meal, but you don’t want them to be too full to eat the meal you’ve been slaving over for days…


