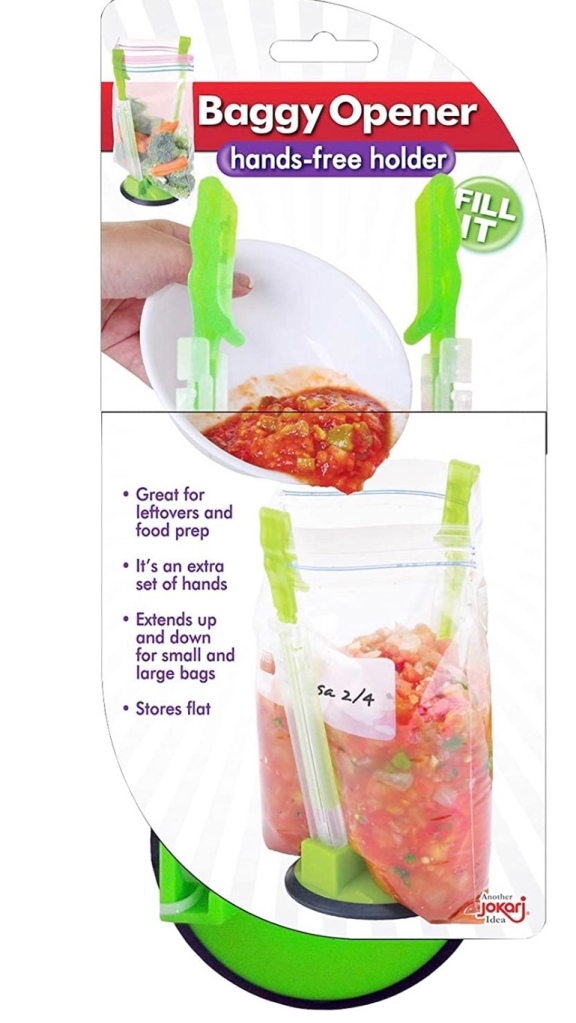
This is a totally unsponsored endorsement for a product I love and couldn’t do without. As we come into holiday season with the inevitable pre-prepping of ingredients for the big meals, post meal clean-up, storage, and divvying up of the coveted #leftovers, there’s always need of help to hold those storage bags open. Well, I stumbled upon the perfect solution a couple of years ago and this has become my favorite hostess, white elephant, and stocking stuffer gift ever since. Trust me, once you use it you’ll wonder how you ever did without it!
Feast your eyes upon the Jokari adjustable baggy rack stand. This miracle assistant firmly holds open every size zip bag, from snack size to gallon, without losing grip while you fill it!
This folds down flat for easy storage in a drawer, so it’s not another awkward gadget that takes up space in your cupboards. Two of these cost about $12 on Amazon and, to me, it’s money more than well spent! There are lower priced knock-offs available, but, for me, and the guaranteed cleanliness of my kitchen the sturdiness of these bag racks provide, I swear by the original.
Are you on Facebook? You might be interested in the things I may not devote an entire blog post to: food news, recipes, food facts, nutritional information, photos and other things that make my mouth water. If so, visit my This Girl Loves To Eat community at: https://www.facebook.com/ThisGirlLovesHerFood
Realizing that #leftoverwine is an oxymoron, the occasion did present when a high quality bottle was opened at the end of a multi-bottle evening and not finished, then said bottle was put into the wine cellar and forgotten for a week past it’s drinking window. Shit!
Time to make some red wine vinegar! I left the bottle, corked, in the dark, cool cellar for an additional month then set to starting my kitchen #chemistryexperiment.
Vintage Red Wine Vinegar
Up to 750 ml leftover Red Wine of any variety – in this case, I used: 3/4 bottle Eighty Four Wines 2013 Malbec out of Napa, CA + about 1/4 bottle Bodega Y Vinedos Catena 2019 Malbec out of Argentina
1/2 cup (118 ml) Raw, Unfiltered, Unpasteurized Vinegar, or a Vinegar Mother – I used Bragg Organic Raw-Unfiltered Apple Cider Vinegar With the Mother
Pour the wine into a dry, sanitized, wide-mouthed, sealable (canning) jar that holds at least a quart. If the wine contains sulfites (it will say so on the back of the bottle), stir in the hydrogen peroxide and let the wine sit for about a minute to neutralize them. Stir in the water with a wooden spoon.
Stir in the raw vinegar well to oxygenate the wine.
Cover the jar with either tightly-woven, quadrupled cheesecloth or a piece of muslin, even a thick paper towel, securing with rubber band/string/a screw on metal canning band, or, like I used, 😉 a zip tie to keep fruit flies out. You can cover it with a paper coffee filter for extra protection from fruit flies if desired. The jar needs to breathe (vent its Carbon dioxide) so do not, under any circumstances, put the metal inner jar canning lid or glass clamped vacuum lid on to seal.
Place your jar on the counter, out of direct light, or in a cupboard, where the temperature stays between 65° and 75°F. The longer you leave it alone to fully develop it’s acidity, especially if you have blended more than one type of wine, the better. Ideally, leave it alone a minimum of one month before checking your acidity level. Your ph should be 4.0 or below.
Bottle half of the vinegar, in a pressure resistant bottle, leaving headspace and replace with the same amount of wine for another batch. Or, you can bottle it all, storing the mother (1/2 C) for another batch or to share with a friend to make her own.
Amazon carries many suitable bottles for storing vinegar
The vinegar can be used immediately (stored in the refrigerator if you like the flavor as it is) or aged longer in your cupboard or on the cool counter top to allow it to mellow further and the flavors to develop more fully.
Troubleshooting: Most fermenting problems with vinegar come from trying to ferment in temperatures that are too warm for the fermentation process. Try to keep your jars in a room that’s between 55 and 75°F.
Surface growth: If you see anything “scummy” starting to grow on your vinegar while it’s fermenting, scoop off the surface growth. If it smells fine, it is fine.
Over-Fermenting: If your vinegar develops an awful smell (like rotting garbage), toss it out. If it smells a little funky (like vinegar), it’s probably fine.
Mold Growth: If you’re having problems with mold growing on the vinegar (not simply white scum on the top), toss out the vinegar. Next time, make sure your vinegar is fermenting in a room that’s not above 75 degrees, and is in a place with good airflow.
Are you onFacebook? You might be interested in the things I may not devote an entire blog post to: food news, recipes, food facts, nutritional information, photos and other things that make my mouth water. If so, visit my This Girl Loves To Eat community at: https://www.facebook.com/ThisGirlLovesHerFood
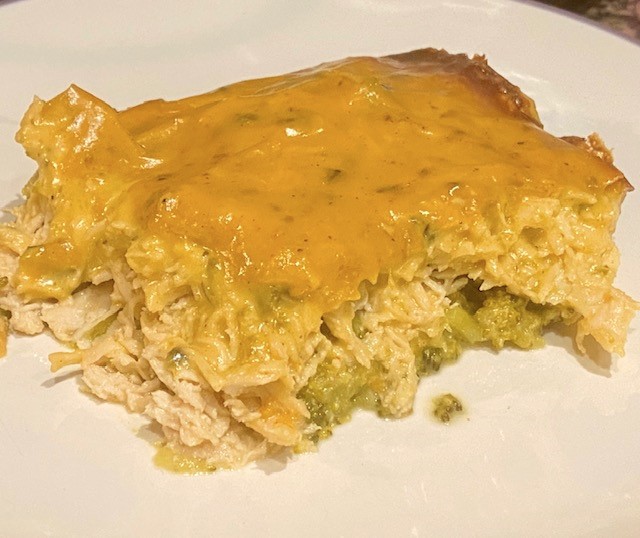
Playing around during #Keto meal prep this weekend, I came up with a high protein/low carb chicken and broccoli casserole that’s a great dinner with a salad or perfect for a grab-and-go lunch that can easily be reheated in the microwave at work! #ThisGirlLovesToEat
Cheesy Poblano Chicken Bake
1 Poblano Chili, seeded & finely chopped
4 TBLS Butter, divided
8 oz Fresh Broccoli Florets, trimmed
1.75 lb (28 oz) Chicken Breast (uncooked and cut into appx 2 x 2 chunks)
2 TBLS Bob’s Red Mill Paleo Baking Flour
1/2 Cup Water
1 Cup Half & Half
6 oz Sharp Cheddar Cheese, shredded
1/4 tsp Black Pepper
1/4 tsp Salt
1/4 tsp Garlic Powder
Preheat the oven to 350º F and spray the bottom of a 9 x 11 inch Pyrex baking dish with olive oil cooking spray.
In a microwave steamer, cook the raw broccoli on high power for 4 minutes. Layer the cooked broccoli into the Pyrex baking dish.
Using the same steamer, cook the chicken in the microwave for 5 – 6 minutes, just until cooked thru. Remove the chicken to your stand mixer with the paddle attachment and shred the chicken on low (about 2 minutes). Layer the chicken on top of the broccoli layer.
In a medium saucepan, combine 2 TBLS of the butter and the chopped Poblano pepper and saute until the peppers are soft and the butter has turned green (5-7 minutes). Add the remaining 2 TBLS butter, salt, pepper and garlic powder, and, once melted, stir in the flour. Cook while stirring constantly for about 2 minutes, over medium heat, until the mixture is bubbling and very well combined.
Add milk then water, and whisk until smooth, scraping roux out of the corners of the saucepan. Increase heat to medium high, bring to a simmer, stirring constantly until the mixture thickens, 2 to 4 minutes. Remove from heat and stir in the cheese until smooth. Add the paprika.
Pour the cheese sauce over the top of the chicken layer and spread to the edges of the pan.
Bake 20-30 minutes, or until sauce is bubbling and the casserole is warm throughout.
Nutrition Information (6 Servings)
350 Calories
20 g Fat
2 g Carbohydrates
37 g Protein
Are you on Facebook? You might be interested in the things I may not devote an entire blog post to: food news, recipes, food facts, nutritional information, photos and other things that make my mouth water. If so, visit my This Girl Loves To Eat community at: https://www.facebook.com/ThisGirlLovesHerFood
In this season of food gifts and party leftovers, this article, previously published by My Recipes, is particularly important and worth sharing & re-sharing. #ThisGirlLovesToEat
“We’ve all let something languish in the fridge a bit longer than we realized. It’s not unreasonable to look at a single patch of mold on a strawberry and wonder if the whole lot has to be tossed. But what about a block of cheese with a quarter-sized fuzzy spot? Is that safe to trim and eat? Or does it have to go, too?
Fortunately, this handy guide from the U.S. Department of Agriculture can have the final say on what stays and what goes when you spot mold on your food.
4 Moldy Foods You Can Eat:
Hard salami or dry-cured country ham
It’s A-OK for hard salamis to have a thin white coating on the outside of the meat. This mold is put there on purpose: to produce flavor and protect the cured meat from bacteria. It’s safe to consume, as is any mold that grows on dry-cured country ham. Large slabs of the super salty pork are often used in restaurants as part decor, part conversation starter (and also a tangy topper to everything from pasta to avocado toast). If you buy one of these delicacies, don’t fear a little mold growth on the crust. Scrub it off (be sure to dry the ham well) before eating.
Cheeses made with mold
The moldinblue, Gorgonzola, Stilton, Brie, and Camembert is to be expected. After all, these cheeses are injected with mold before they ripen—that’s why they’re so funky and delicious. But not all molds are made to eat, so you can’t assume all molds on cheese get the approval. Hard cheeses, like Gorgonzola and Stilton, aren’t harmed by a little extra mold. Cut the spot away—half an inch to one inch all the way around—and enjoy. Softer cheeses, like Brie and Camembert, have to go if you spot mold growing on them. The fingerlike organisms of mold can reach deep into these softer cheeses and may develop into toxic substances.
Hard cheeses
Even cheeses that aren’t made with mold veins are safe to eat if you spot a speck of mold growing on them. Cheddar, for example, just requires you to trim an inch around the moldy spot (some experts argue you only need a half-inch buffer; do what feels safest for you) and toss that before diving in. Be sure to use a clean knife, and keep the blade away from the mold to prevent cross-contamination. When you’re finished slicing for your sandwich or burger, be sure to rewrap the cheese in a fresh covering so you don’t reinfect with mold spores.
Firm fruits and vegetables
Tough vegetables and fruit, like carrots, potatoes, and turnips can take the mold in stride. The mold threads have a hard time penetrating deep into these dense plant foods. Trim off an inch around the mold, and eat or cook as you planned. Softer fruits and vegetables, like cherries, strawberries, and corn, should be tossed. Mold can easily spread to nearby areas, even if you can’t see the spores with your naked eye.
When can molds be toxic?
All molds can cause allergic reactions and respiratory problems. That doesn’t mean they’re toxic. However, in the right conditions, some molds can turn into mycotoxins, poisonous substances that can make people physically sick. These substances are produced by certain molds that are most commonly found in grain and nut crops. However, they’ve also been known to show up in apples, grape juice, celery, and other fresh produce. That’s why, when in doubt, throw the moldy foods out.
Which moldy foods should I always toss?
The USDA says these foods are no good when you spot mold. Their high moisture content or porous nature makes them prime for rapid mold development. Don’t risk getting sick just to finish up Tuesday night’s pot roast. Toss it, and fry up a grilled cheese instead.
Foods you should always toss:
Luncheon meats, bacon, and hot dogs
Cooked leftover meat and poultry
Cooked casseroles
Cooked grains and pasta
Soft cheeses, like cottage cheese, chevre, cream cheese, and Neufchatel
Yogurt and sour cream
Jams and jellies — Mycotoxins can spread in these foods easily, so it’s not enough to scoop out a mold part and keep going deeper into the jar.l
Soft fruits and vegetables — They’re porous, which means mold can spread rapidly, even if you can’t spot the spores.
Baked goods and bread
Peanut butter, legumes, and nuts — Any foods processed without preservatives are at a high risk of developing mold spores. Be extra cautious and keep them stored appropriately.”
Despite following a #KetoLifestyle, I am lazy about making myself a proper weekday breakfast. Before switching to the low-carb diet plan, I often ate oatmeal with berries, but, because that isn’t allowed on Keto, I’ve had to give that particular pleasure up. 😦
I need to do a better job of spacing my meals out, so I’m not starving by the time I finally eat a meal, so I’m diving into the craze I’ve heard about but never tried: pressure cooker egg bites. Once I looked at the recipes, I realized that they’re like a fluffy crustless quiche or hand held omelette, two things I love! Since I have the tools I need to make them: an electric pressure cooker and a silicone egg mold insert, there’s no excuse left for not giving them a try.
There are many different ways to make egg bites.
Pure Protein – featuring just eggs, or eggs and meat
Vegetarian – using an egg substitute and vegetables, tofu, vegetarian cheese, or other sources of protein
Combo – eggs, meat, cheese and veggies
Super Combo – eggs, meat, cheese, veggies, plus cottage or ricotta cheese
Pressure Cooker Egg Bites
6 Large Eggs
1 Cup Shredded Cheese – I used 1/2 Cup Sharp Cheddar & 1/2 Cup Pepper Jack
2 TBLS Finely Diced Onion
2 TBLS Finely Chopped Bacon
1/4 Cup Chopped Baby Bella Mushrooms (Or Fresh Spinach Stemmed, Rolled and Chopped)
1/4 Cup Yellow or Green Zucchini Diced (Or Bell Peppers)
1/4 tsp Oregano (if desired)
1/2 tsp Cajun Spice (if desired)
Freshly Ground Sea Salt and Black Pepper
Using olive oil spray, or olive oil and a paper towel, grease each individual cup of the egg bite mold.
In a pan, over medium heat, cook the bacon until browned, then add onion, mushrooms and zucchini and cook for about 3 minutes.
Whisk the eggs with your seasonings in a large measuring cup. Add the cooked vegetable mixture and cheese and stir well. Spoon or pour mixture into egg bite mold. It should fill all spots evenly to just below rim. Cover egg mold with foil.
Add 1 1/2 c water to pressure cooker. Put trivet inside and set egg bite mold onto the trivet. Close the lid and set machine to cook on high for 8 minutes and then allow to release naturally for 4 minutes. Immediately remove the egg bite mold and then remove the egg bites from the mold so that they do not sit in any water that has pooled in the bottom of the mold.
Eat immediately or cool sightly then store in a covered container in the refrigerator to reheat for later meals or snacks. #ThisGirlLovesToEat
Nothing is worse than realizing that you have a refrigerator full of expensive groceries that are nearing the end of their freshness and it’s time to cook them or they’ll go to waste.
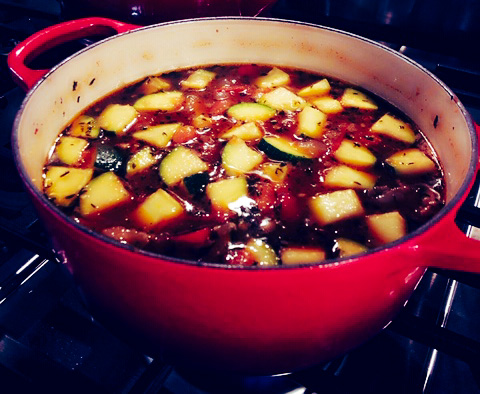
Unfortunately I found myself in just that situation today, with a ridiculous amount of post New Year’s ingredients that were past their ability to be frozen, so a week’s worth of meal prepping #BetterThanUsual meals began with a soup that my family usually boycotts. I’m betting that, with a pound of filet mignon, they won’t be boycotting this one. 😉 The bonus for me is that it is #KetoFriendly
Refreigerator Keto Soup
2 Pieces Thick Cut Bacon cut into 1/4″ strips
1/2 Medium Onion chopped
2 cloves garlic minced
2 tsp Fresh Thyme chopped
3/4 Pound Uncooked Steak cut into 1/2″ pieces
2 Medium Zucchini chopped into 1/2″ chunks
3 Roma Tomatoes chopped (or 1 can diced tomatoes)
1 Can Campbells Condensed Beef Consommé + 1 Can Water or 2 Cans Beef Broth
Freshly ground sea salt & pepper to taste
Over medium heat, cook bacon until almost brown. Add in onion, garlic, and thyme. Sauté about 5 minutes then add the steak and cook over medium-low heat until just browned.
Add the tomatoes and zucchini and stir in. Cook about 5 minutes. Salt and pepper liberally. Add the consommé and water to the pan and return the heat to medium. Bring the soup to a boil then return to the heat to medium-low and continue to cook for about 30 minutes.
Serve with shredded cheddar or pepper jack cheese over to top if desired. #ThisGirlLovesToEat
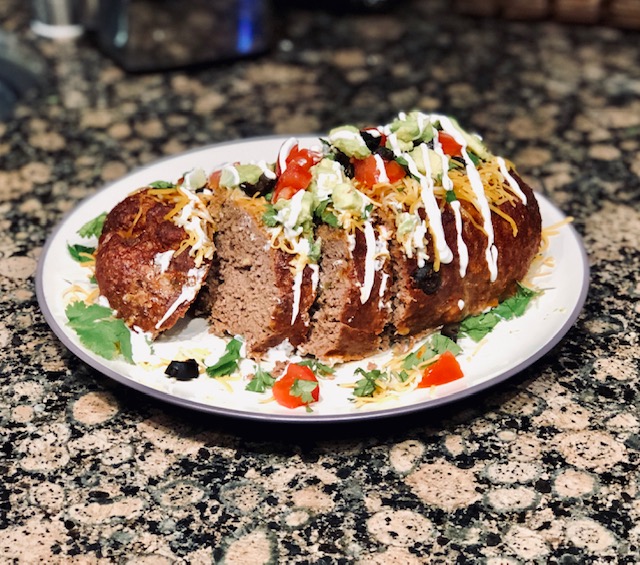
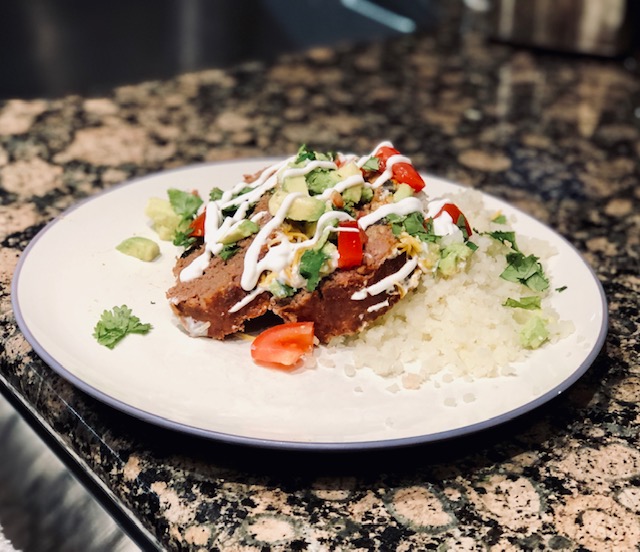
Another day – another discovery of a #KetoFriendly main dish that your family won’t miss the carbs in! You can satisfy them by throwing potatoes into the oven while this is baking and throw some cauliflower into a pan to steam for yourself to mash up for a simple meal. The best part is that this one is SO low carb that you can easily have your wine PLUS it makes enough for leftovers. #EverybodyWins#ThisGirlLovesToEat
Keto Mexican Meatloaf
3 pounds ground sirloin (90/10) – if you need more fat you should use 80/20 ground beef
2 large eggs
2/3 cup medium chunky salsa – or whatever heat level you desire
1-2.25 oz can sliced olives
2/3 cup crumbs from saltine crackers (I processed the crackers in my Vitamix)
1 to 2 tsp chili powder
1+1/2 tsp paprika
2 tsp onion powder
1 tsp garlic powder
2+1/2 tsp salt
1-10 oz can enchilada sauce – I used Las Palmas (<1g carbs per serving)
1 cup shredded cheddar cheese
2 Roma tomatoes diced
1 ripe medium avocado diced
1/4 cup chopped fresh cilantro
sour cream
Heat your oven to 350° and line the inner grease catch tray of your broiler pan with foil. Place the top portion of the broiler pan back on top after spraying it with olive oil spray.
In a small bowl, combine all of the dry spices with your cracker crumbs.
In a large mixing bowl combine your ground beef/sirloin, eggs, salsa, 1/2 the can of olives, and cracker crumb/spice mixture using your hands. Form the meat into one long loaf or two smaller loaves. Cover with 1/3 of the can of the enchilada sauce and put into the oven.
After 30 minutes pull far enough out of the oven to pour another 1/3 of the can of the sauce over the meatloaf and put back into the oven for another 30 minutes then put the rest of the enchilada sauce over the meatloaf. Cook for another 15 – 20 minutes and take out of the oven.
Let the meat loaf sit for 5 minutes before slicing. Serve by adding the as little (or as much) of the cheese, avocado, tomatoes, olives, cilantro as you want to the sliced meatloaf. Drizzle sour cream and additional hot sauce or salsa on top as desired.
It tastes just like a taco! Now I’m really looking forward to the leftovers.
For those of us hosting big family meals, at just over a month before Thanksgiving, we’ve officially reached the “almost the holidays” panic time. That time when we revisit what we did last year to determine:
What dishes served had the most leftovers
What dishes got rave reviews
What dishes had no leftovers (for adjusting amount prepared)
What dishes were too much effort and underwhelmed
It’s also the time when we take a look at new recipes that we might want to add to this year’s menu, which means we get to make our families Guinea pigs for the next few weeks while we’re trying them out.
I already have one sweet potato recipe that my family loves, but this one (from the December 2005 issue of Food & Wine Magazine) looks pretty good, it’s easy, serves 10 – 12, and can be made the day before which frees up time on the big day, another bonus.
Vanilla Bean Whipped Sweet Potatoes
4 pounds medium sweet potatoes
1 cup heavy cream
4 TBLS unsalted butter
1/2 vanilla bean, slit lengthwise, seeds scraped
kosher salt and freshly ground pepper
Preheat the oven to 400° F.
Poke the sweet potatoes several times with a fork and bake for about 35 minutes, or until tender. Let cool slightly, then peel and transfer them to a food processor (I actually use my stand mixer). Puree until fairly smooth.
In a small saucepan, combine the cream with the butter and the vanilla bean and seeds. Bring to a simmer. Remove the vanilla bean.
With the processor (or stand mixer) on, carefully pour the vanilla cream into the sweet potatoes and process until smooth. Season the sweet potato puree with salt and pepper, transfer to a bowl and serve.
I’d definitely consider doubling this recipe to make sure there were plenty of leftovers for piling on a turkey sandwich or frying up as sweet potato pancakes. #ThisGirlLovesToEat
If you use Facebook and are interested in the things I may not devote an entire blog post to: things like health articles, my favorite recipes, fun drinks, food facts, nutritional information, restaurant reviews, photos and other things that make my mouth water, I have a very active page on Facebook you can visit too:https://www.facebook.com/ThisGirlLovesHerFood
I’ll be honest, cold is relative to where you are in the world. Today I’m thankful to not be in Central or Eastern Europe, which is seeing temperatures as low as -30°C (-22°F). Brrr
Here, in Irvine, CA today it is 62°F and raining which means I am under a warm blanket with my two Labrador Retrievers snuggled up beside me and the fireplace on as I sip on some coffee laced liberally with some Bailey’s Irish Cream. I use the words, “I’m freezing” in nearly every conversation I have today, but I am loving this weather. At this time last year, we were heading into what was billed as the hottest February on record with day after day of temperatures in the upper 90’s that led to 2016 being called one of the hottest, if not THE hottest year on record, so excuse my exaggeration with the term “freezing” as, in order to be cold last year, I had to have my air conditioner running.
Today I saw a picture at one of my favorite websites, www.bonappetit.com, for Chili Colorado, that made my mouth water.
I hadn’t yet decided what to make for dinner, but, after seeing this picture, no further searching was needed. This will definitely be dinner, and a couple of workday lunches as well! I am not a big pork fan, so I’ll be making the beef option.
***NoteI always trim all of the visible fat away so that the meat is as lean as possible.
Remove the stems and seeds from all of your chilis. Make sure you have chosen soft and pliable chilis. If they are dry and brittle they are too old. They will be tasteless and ruin your dish.
Cover chiles with 3 cups of your chicken stock (it should already be boiling) and let them steam, covered with plastic wrap, for about 30 minutes until they are plump and tender. Put the chilis and all of the soaking liquid into a blender and purée until very smooth.
Cut 2 to 3 pounds boneless pork shoulder (or boneless beef shoulder) into ½” pieces and season with salt and pepper.
Brown the meat in a large, heavy pot over medium-high heat with a couple of TBLS of olive oil so meat doesn’t stick.
Chop your 6 cloves of garlic and throw it in the pot along with 2 bay leaves, 1 TBLS ground cumin, 2 tsp each of chopped fresh sage and chopped fresh oregano. Stir that around for about a minute, or until very fragrant.
Add in your remaining 5 cups of chicken stock and simmer uncovered for about an hour.
Stir in the chile purée and simmer for another 45 minutes until the meat is very tender and the sauce is a thick, mahogany-red color.
Season with additional salt and pepper.
Serve with flour tortillas – you can serve rice and beans for a full, authentic Mexican meal, if you desire, as well.
Just imagine the love and attention you’ll get from your family when they come into the house and are surrounded by the smell of chili Colorado simmering on the stove 😉 !
If you use Facebook and are interested in the things I may not devote an entire blog post to: things like health articles, my favorite recipes, fun drinks, food facts, nutritional information, restaurant reviews, photos and other things that make my mouth water, I have a very active page on Facebook you can visit too:https://www.facebook.com/ThisGirlLovesHerFood


 Playing around during #Keto meal prep this weekend, I came up with a high protein/low carb chicken and broccoli casserole that’s a great dinner with a salad or perfect for a grab-and-go lunch that can easily be reheated in the microwave at work! #ThisGirlLovesToEat


 I’ll be honest, cold is relative to where you are in the world. Today I’m thankful to not be in Central or Eastern Europe, which is seeing temperatures as low as -30°C (-22°F). Brrr