My niece is marrying a boy from England so, it’s time to brush up on some culinary delights from across the pond! This one comes courtesy of Justin Chapple at Food & Wine Magazine.
Ingredients
2 1/4 cups all-purpose flour, plus more for dusting
1/4 cup granulated sugar
1 tablespoon baking powder
2 tablespoons finely grated lemon zest (can add more to zing up the lemony goodness) plus 1/4 cup fresh lemon juice
1 teaspoon kosher salt
1 tablespoon poppy seeds (optional)
1 stick unsalted butter, cut into cubes and chilled
1 cup heavy cream, plus more for brushing
1 cup confectioners’ sugar
Directions
Preheat the oven to 375°. Line a large baking sheet with parchment paper. In a food processor, pulse the 2 1/4 cups of flour with the granulated sugar, baking powder, lemon zest, salt and 2 teaspoons of the poppy seeds. Add the butter and pulse until it resembles coarse meal. Add the 1 cup of heavy cream and pulse until evenly moistened.
Transfer the dough to a lightly floured surface, gather any crumbs and knead a couple of times until the dough just comes together. Using a lightly floured rolling pin, roll the dough into a 9-by-6-inch rectangle. Using a large knife, cut the dough into 8 scones. Transfer the scones to the prepared baking sheet and brush with heavy cream. Bake in the lower third of the oven for about 25 minutes, until firm and lightly golden. Let the scones cool.
In a medium bowl, whisk the confectioners’ sugar with the lemon juice and the remaining 1 teaspoon of poppy seeds. Brush the scones with the glaze and let stand until set, about 15 minutes.
Make Ahead
The scones can be stored in an airtight container for up to 2 days.
Are you on Facebook? You might be interested in the things I may not devote an entire blog post to: food news, recipes, food facts, nutritional information, photos and other things that make my mouth water. If so, visit my This Girl Loves To Eat community at: https://www.facebook.com/ThisGirlLovesHerFood
I wasn’t raised in a Jewish family so wasn’t ever given the chance to experience some of the best, most flavorful, dishes that, thankfully, I was able to enjoy when I began visiting #TheRollAndRye deli in Culver City, CA with my father-in-law. Latkes, sweet noodle kugel, and matzo ball soup, if you haven’t had them made by a good Jewish cook, are treats you need to taste to appreciate!
When I married into the family I, not his Jewish daughter or granddaughter, was gifted with his Mother’s 80+ year old Jewish cookbook with his single request that I make noodle kugel for him. #DoneDeal
Fearing I couldn’t duplicate the soups he loved so well, until I came across this recipe in #Delish Magazine, I never attempted matzo ball soup. The lightness of the matzo balls makes them better than any I’ve ever tried.
1.Soup: In a very large pot over medium heat, heat oil. Cook onion, carrots, celery, turnip, and parsnip, stirring occasionally, until vegetables are fragrant, about 2 minutes. Place chicken on top of vegetables and toss so chicken gets slightly covered in veggies and oil. Add broth and enough water to just cover chicken. Add dill and parsley; season with salt and pepper. Bring to a boil, then reduce heat to medium-low and simmer, partially covered, 2 hours.
2. Remove chicken (shred for soup or reserve for another use). Reserve a few carrot pieces (to be sliced and added to soup later), then strain broth into a large bowl or measuring cup; season with salt and pepper. Discard remaining vegetables and herbs.
3.Matzo balls: In a medium bowl, beat eggs. Add fat and seltzer and mix well to combine. Add matzo meal, salt, and pepper and mix well, ensuring all matzo meal is incorporated into egg mixture. Refrigerate at least 30 minutes. 4. Meanwhile, bring a large pot of water to a boil. Using a cookie scoop (for medium matzo balls) or ice cream scoop (for large matzo balls), form mixture into balls, smoothing by rolling between slightly wet hands. Drop each ball into boiling water. (They will sink initially but rise as they cook.) Cook until centers of balls are fully cooked through, 25 to 35 minutes. They’ll look dense and dark yellow in the center if they’re not done.
5. Add matzo balls to soup, or place into serving bowls and top with soup. Top with chicken (if using), reserved carrots, and dill.
TIP** Double the recipe and make a second batch of #MatzoBalls to freeze. After cooking the matzo balls, place them on a parchment-lined baking sheet and freeze. Once frozen, you can transfer to a resealable plastic bag. To prepare, drop frozen balls into boiling broth and cook until heated through.
TIP 2** Matzo balls are sponges for flavor: They soak up whatever is around them. All the more reason to make sure the stock they’re sitting in is as good as possible.
Recipe courtesy of JOANNA SALTZ – Delish Magazine, April 2022
Are you on Facebook? You might be interested in the things I may not devote an entire blog post to: food news, recipes, food facts, nutritional information, photos and other things that make my mouth water. If so, visit my This Girl Loves To Eat community at: https://www.facebook.com/ThisGirlLovesHerFood
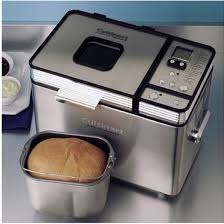
One of the biggest complaints I, and many others, have about Keto Bread is that it tends to taste too eggy. I’ve been on a mission to eliminate that and discovered that, with my new bread machine, I can bake #KetoFriendly, #EggFree, loaves of bread.
Of course, buying a new bread machine means yet another tool I need to find a home for in my #StorageChallengedKitchen. But #ThisGirlLovesToEat, so I’ll find a corner somewhere. 😉
My machine is a Cuisinart Convection Breadmaker and does have a low-carb setting, so that is a bonus.
Keto Bread Machine White Bread
2+1/2 tsp Bread Machine Instant Yeast
1 + 1/3 Cup 90º F Tap Water
2 TBLS Sugar
1/4 Cup Neutral Oil (Vegetable or Canola) – unless you want the flavor in your bread, then you can use Olive Oil (I like to use a blend of Olive-Avocado Oil)
3 tsp Vital Wheat Gluten
3 Cups/300 g (weigh it if you can) Carbalose® Lo-Carb Flour (I have used Bob’s Paleo Flour as well)
Salt or other seasonings as desired (I always add a bit of salt)
Using a paper towel, lightly oil the inside of your bread machine pan and the kneading paddle. Plug in your bread machine (but do not preheat), add your yeast, sugar and warm water to the pan and close the machine lid. Set a timer for 12 minutes to allow your yeast to activate (start bubbling).
As soon as your yeast is nice and foamy, add (in this order) your oil, the wheat gluten, any spices you are using, and the flour.
Close your lid and set the machine to Low Carb setting (if it has one) or bake at basic mode for a 1.5 pound loaf.
**Tip: To keep your loaf from having a hole in the middle, when the rise cycle starts, remove the paddle and center your loaf back in the pan without handling it too much.
Allow loaf to cool in the pan then slice into 12 slices.
Nutrition Information Per Slice (with Canola Oil)
Calories 120
Protein 8.25 g
Carbs 4.83 g
Fat 7.42 g
Are you onFacebook?You might be interested in the things I may not devote an entire blog post to: food news, recipes, food facts, nutritional information, photos and other things that make my mouth water. If so, visit my This Girl Loves To Eat community at:https://www.facebook.com/ThisGirlLovesHerFood
This article appeared in today’s Los Angeles Times – Nicholas Goldberg says it more perfectly than I ever could, so enjoy his ode to 75 years of the institution known as Langer’s Deli!
They’ve been making the world’s best pastrami sandwiches for 75 years. Can they keep it up? BY NICHOLAS GOLDBERG | COLUMNIST JUN 20, 2022 | 3:00 AM LOS ANGELES TIMES
The long, slow decline of the Jewish delicatessen has been bemoaned and lamented for many years. In the early 1930s, there were more than 1,500 kosher delis and many more non-kosher ones in the five boroughs of New York alone, according to city records. In recent years, the estimate fell to 150 in all of North America.
That’s why it is a cause for celebration that Langer’s delicatessen, the venerable pastrami emporium on 7th and Alvarado near MacArthur Park, marked another milestone birthday this weekend. The restaurant, which opened with space for 12 customers in June 1947, is now 75 years old.
Langer’s is, of course, a Los Angeles institution. In 1991, Jonathan Gold wrote in The Times: “The fact is inescapable: Langer’s probably serves the best pastrami sandwich in America.”
In 2002, Nora Ephron went farther, declaring unequivocally in the New Yorker that Langer’s made the finest hot pastrami sandwich in the world. She described it as “soft but crispy, tender but chewy, peppery but sour, smoky but tangy.”
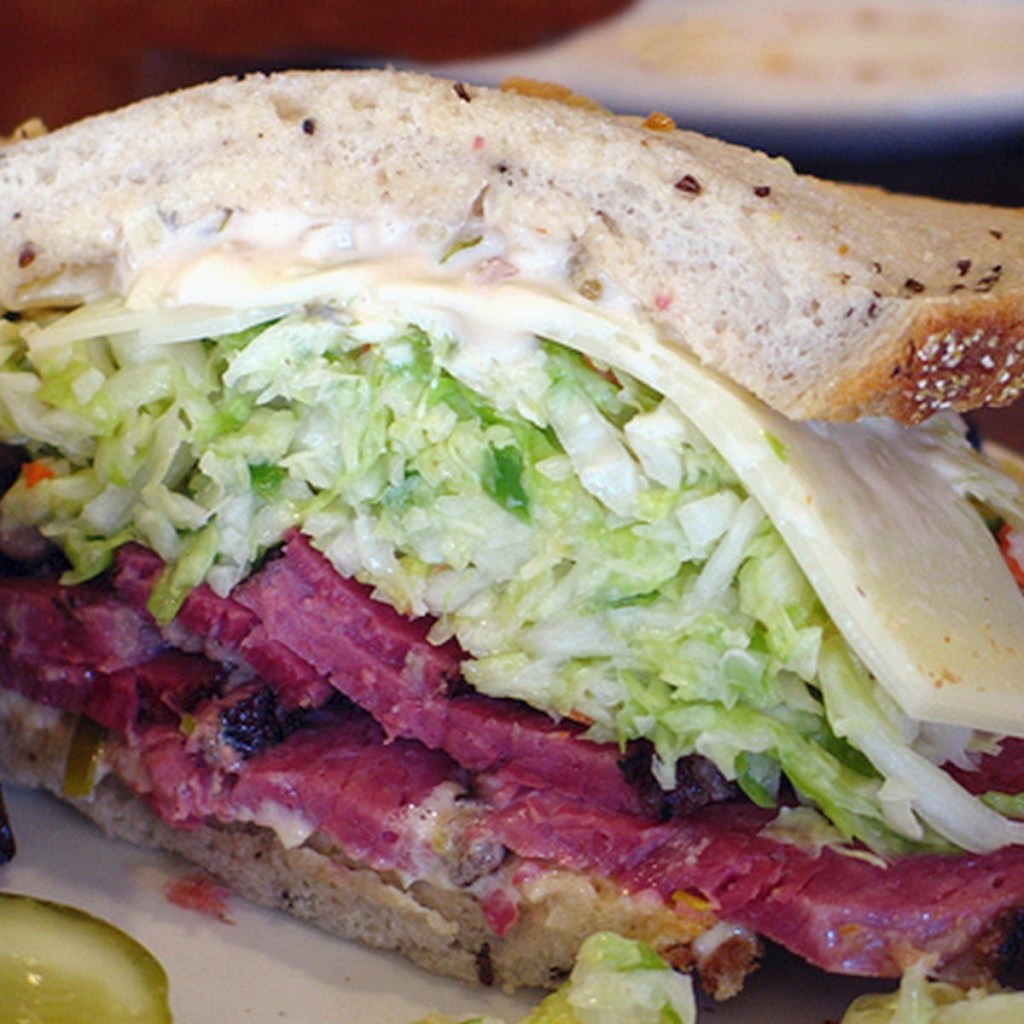
And, if I may be so bold, my recent lunch of matzo ball soup and hot pastrami on rye with sauerkraut confirmed — to my satisfaction, anyway — that those assessments still hold.
Of course, if you don’t want pastrami, there are alternatives. You can have the corned beef (Mimi Sheraton called it “excellent” in a 42-year-old review that still hangs, fading now, in the restaurant’s window). Or blintzes, kasha varnishkes, latkes, a bowl of borscht or a knish with gravy. For dessert, noodle kugel. I guess you could also order the hamburger or even — don’t tell the ancestors, please — a ham and cheese sandwich. But that would be foolish.
Ephron was snide about the decor. “It is decorated, although ‘decorated’ is probably not the word that applies, in tufted brown vinyl,” she wrote. That was 20 years ago, and that’s pretty much how it still looks today.
She noted that Langer’s always seems to be just barely hanging on. That’s also still true.
The sufferings of Jewish delis over the years have been legion, the challenges monumental: There’s the passing of the shtetl generation and its children. The assimilation of its grandchildren. The dispersal of the Jewish population from the cities to suburbs (and, in the case of Langer’s, from Westlake-MacArthur Park to the San Fernando Valley and the Westside).
Rising rents. The climbing costs of ingredients. The tut-tutting of cardiologists everywhere, what with all the fat, carbohydrates and salt.
More recently, the COVID closures. And now, a new burst of inflation.
The price of a pastrami sandwich at Langer’s rose recently to $22, a number that even its owner, Norm Langer, concedes is meshuga. “Is half a pound of meat, two slices of rye bread and a pickle worth $22?” he asks. “I don’t know. But I’ve got to make ends meet.”
When the restaurant first opened, a pastrami sandwich cost about 35 cents. When The Times mentioned the deli in 1973, the price had risen to $1.75. In 2002, it was $8.50.
Langer is 77 years old. He says he has no plans to retire. “I get up in the morning, I’ve got to go somewhere,” he says. “Everybody needs a place to go.”
The restaurant was opened by his father, Al Langer of Newark, N.J., who’d gotten his start in delis years earlier when his mother sent him to work to raise money to help pay for his $35 bar mitzvah. In 1947, Al was living in L.A., was recently out of the service and had saved $500. He borrowed a few thousand more.
In those days, the Westlake-MacArthur Park neighborhood had a big, middle-class Jewish population. At one point the restaurant had so much business it stayed open nights until 3 a.m. Now it closes at 4 p.m.
In the 1980s, The Times wrote endless stories about the troubles facing the deli because of the changing neighborhood, including one histrionic article about MacArthur Park headlined “Winos, Dopers, Crime Overrun City Landmark.” But Langer’s hung on.
The restaurant got a needed boost in 1993 when Metro’s Red Line opened, with a subway station just a block and a half away. Crowds flocked in from downtown.
“I saw 500 people lined up to get into Langer’s and I told Norm, ‘It was worth spending $1.2 billion to keep you in business,’ ” said then-County Supervisor Zev Yaroslavsky, a regular.
In L.A. today the delis that still exist include Canter’s, which opened in 1931 in Boyle Heights and only later moved to its location on Fairfax. Also Art’s Deli, Nate ’n Al’s and Wexler’s. There’s Brent’s Deli. To name just a few.
But they keep closing down. Izzie’s in Santa Monica shut its doors in May. Greenblatt’s in West Hollywood closed in 2021 after 95 years.
New delis have opened, in some cases with modern, sustainable or health-conscious twists on the classic cuisine. Less shabby, less irascible, they’re gambling that deli food can be gentrified and rejuvenated.
But pastrami, let’s face it, is an acquired taste. So are creamed herring, chicken liver, tongue, whitefish salad and other old country staples. The bagel may be firmly embedded in the American food pantheon, but traditional Ashkenazi deli fare of the sort that flourished in the years after the great Jewish immigration from Eastern Europe is unquestionably endangered.
And with it a tangible link to the culinary past. A connection to the forefathers. A piece of the collective culture.
The good news is that reports of its extinction have proved premature so far, as Langer’s demonstrates. So rather than rend my garments, I’ll make the most of it while I can (and hope my heart holds out).
Are you onFacebook? You might be interested in the things I may not devote an entire blog post to: food news, recipes, food facts, nutritional information, photos and other things that make my mouth water. If so, visit my This Girl Loves To Eat community at: https://www.facebook.com/ThisGirlLovesHerFood
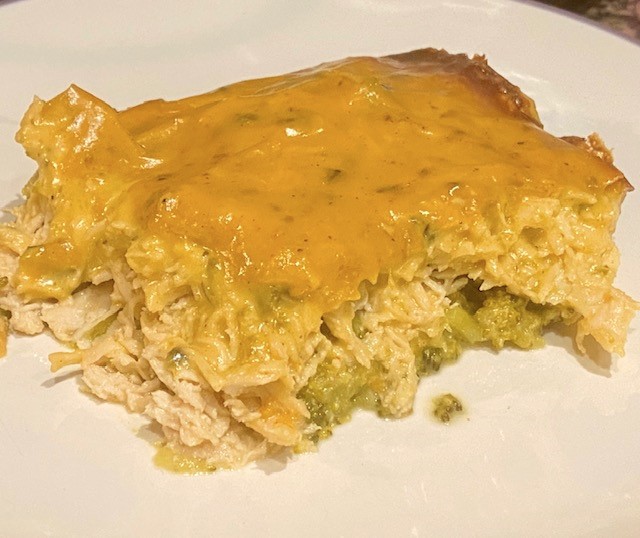
Playing around during #Keto meal prep this weekend, I came up with a high protein/low carb chicken and broccoli casserole that’s a great dinner with a salad or perfect for a grab-and-go lunch that can easily be reheated in the microwave at work! #ThisGirlLovesToEat
Cheesy Poblano Chicken Bake
1 Poblano Chili, seeded & finely chopped
4 TBLS Butter, divided
8 oz Fresh Broccoli Florets, trimmed
1.75 lb (28 oz) Chicken Breast (uncooked and cut into appx 2 x 2 chunks)
2 TBLS Bob’s Red Mill Paleo Baking Flour
1/2 Cup Water
1 Cup Half & Half
6 oz Sharp Cheddar Cheese, shredded
1/4 tsp Black Pepper
1/4 tsp Salt
1/4 tsp Garlic Powder
Preheat the oven to 350º F and spray the bottom of a 9 x 11 inch Pyrex baking dish with olive oil cooking spray.
In a microwave steamer, cook the raw broccoli on high power for 4 minutes. Layer the cooked broccoli into the Pyrex baking dish.
Using the same steamer, cook the chicken in the microwave for 5 – 6 minutes, just until cooked thru. Remove the chicken to your stand mixer with the paddle attachment and shred the chicken on low (about 2 minutes). Layer the chicken on top of the broccoli layer.
In a medium saucepan, combine 2 TBLS of the butter and the chopped Poblano pepper and saute until the peppers are soft and the butter has turned green (5-7 minutes). Add the remaining 2 TBLS butter, salt, pepper and garlic powder, and, once melted, stir in the flour. Cook while stirring constantly for about 2 minutes, over medium heat, until the mixture is bubbling and very well combined.
Add milk then water, and whisk until smooth, scraping roux out of the corners of the saucepan. Increase heat to medium high, bring to a simmer, stirring constantly until the mixture thickens, 2 to 4 minutes. Remove from heat and stir in the cheese until smooth. Add the paprika.
Pour the cheese sauce over the top of the chicken layer and spread to the edges of the pan.
Bake 20-30 minutes, or until sauce is bubbling and the casserole is warm throughout.
Nutrition Information (6 Servings)
350 Calories
20 g Fat
2 g Carbohydrates
37 g Protein
Are you on Facebook? You might be interested in the things I may not devote an entire blog post to: food news, recipes, food facts, nutritional information, photos and other things that make my mouth water. If so, visit my This Girl Loves To Eat community at: https://www.facebook.com/ThisGirlLovesHerFood
Recipes like this are why it’s so damn hard to stay Keto. 😂😂😂 Food & Wine Magazine just keeps enticing me to #TheDarkSide!
Three Pepper Cacio de Pepe
3 tablespoons extra-virgin olive oil
1 teaspoon crushed pink peppercorns
1/2 teaspoon coarsely ground Tellicherry pepper
1/2 teaspoon ground Szechuan pepper
12 ounces uncooked bronze-cut fusilli col buco pasta (such as Giusto Sapore) or bucatini pasta
1 1/2 ounces pecorino Romano cheese, grated with a Microplane grater (about 1 cup), plus more for garnish
1 1/2 ounces Parmigiano-Reggiano cheese, grated with a Microplane grater (about 1 cup)
1 Cup reserved pasta cooking water
Heat oil, pink peppercorns, Tellicherry pepper, and Szechuan pepper in a large skillet over medium. Cook, stirring occasionally, until peppercorns begin to sizzle and darken, 4 to 5 minutes. Remove from the heat.
Prepare pasta in a pot according to package directions for al dente. Using tongs or a spider, transfer pasta to a colander to drain, reserving cooking liquid in pot. Let pasta stand 2 minutes.
Working off of heat, add cheeses and 1/4 cup reserved cooking liquid to peppercorn mixture in skillet, whisking until water is absorbed and mixture resembles consistency of a chunky paste. Add an additional 1/4 cup cooking liquid, whisking until mixture is thick and mostly smooth. Add drained pasta to mixture; working quickly, vigorously stir until cheese mixture coats pasta, about 30 seconds. Gradually stir in 1/2 cup cooking liquid, 1/4 cup at a time, until a creamy sauce forms and coats the pasta, 20 to 40 seconds for each addition. Divide pasta mixture among 4 bowls; garnish with additional pecorino Romano. Serve immediately. #ThisGirlLovesToEat
Suggested Pairing
Light-bodied, lemony Frascati.
Are you on Facebook?You might be interested in the things I may not devote an entire blog post to: food news, recipes, food facts, nutritional information, photos and other things that make my mouth water. If so, visit my This Girl Loves To Eat community at:https://www.facebook.com/ThisGirlLovesHerFood
Ground chicken breast is one of my favorite ways to build a base for a #Keto meal! It’s so versatile, mixes so well with most of my favorite ingredients, and is so easy to meal prep for the week ahead, that it’s become my go-to for creating new #KetoRecipes.
This recipe for #ChickenBaconRanchMeatballs is fun because you can eat them all alone or pop them on a skewer between a piece of lettuce and 1/2 a plum or cherry tomato and drizzle with some ranch dressing for a fun lunch, light dinner, or appetizer. #ThisGirlLovesToEat
Chicken Bacon Ranch Meatballs
2 Pounds Ground Chicken Breast
4 Pieces Thick Cut Bacon
3 Pieces Thick Cut Peppered Bacon
1 Large Egg
2 Cups Fresh Baby Spinach
1 TBLS Olive Oil
4 TBLS Ranch Dressing
1/2 Cup Panko
Olive Oil Spray
Using your hands, combine all of the ingredients in a medium bowl until well mixed.
Spray the basket in your air fryer lightly with olive oil spray, place a layer of meatballs, with space between for the air to flow around, set the temperature to 380° F, and set the timer for 8 minutes. Cook the meatballs, shaking them to turn them about halfway through so they brown evenly.
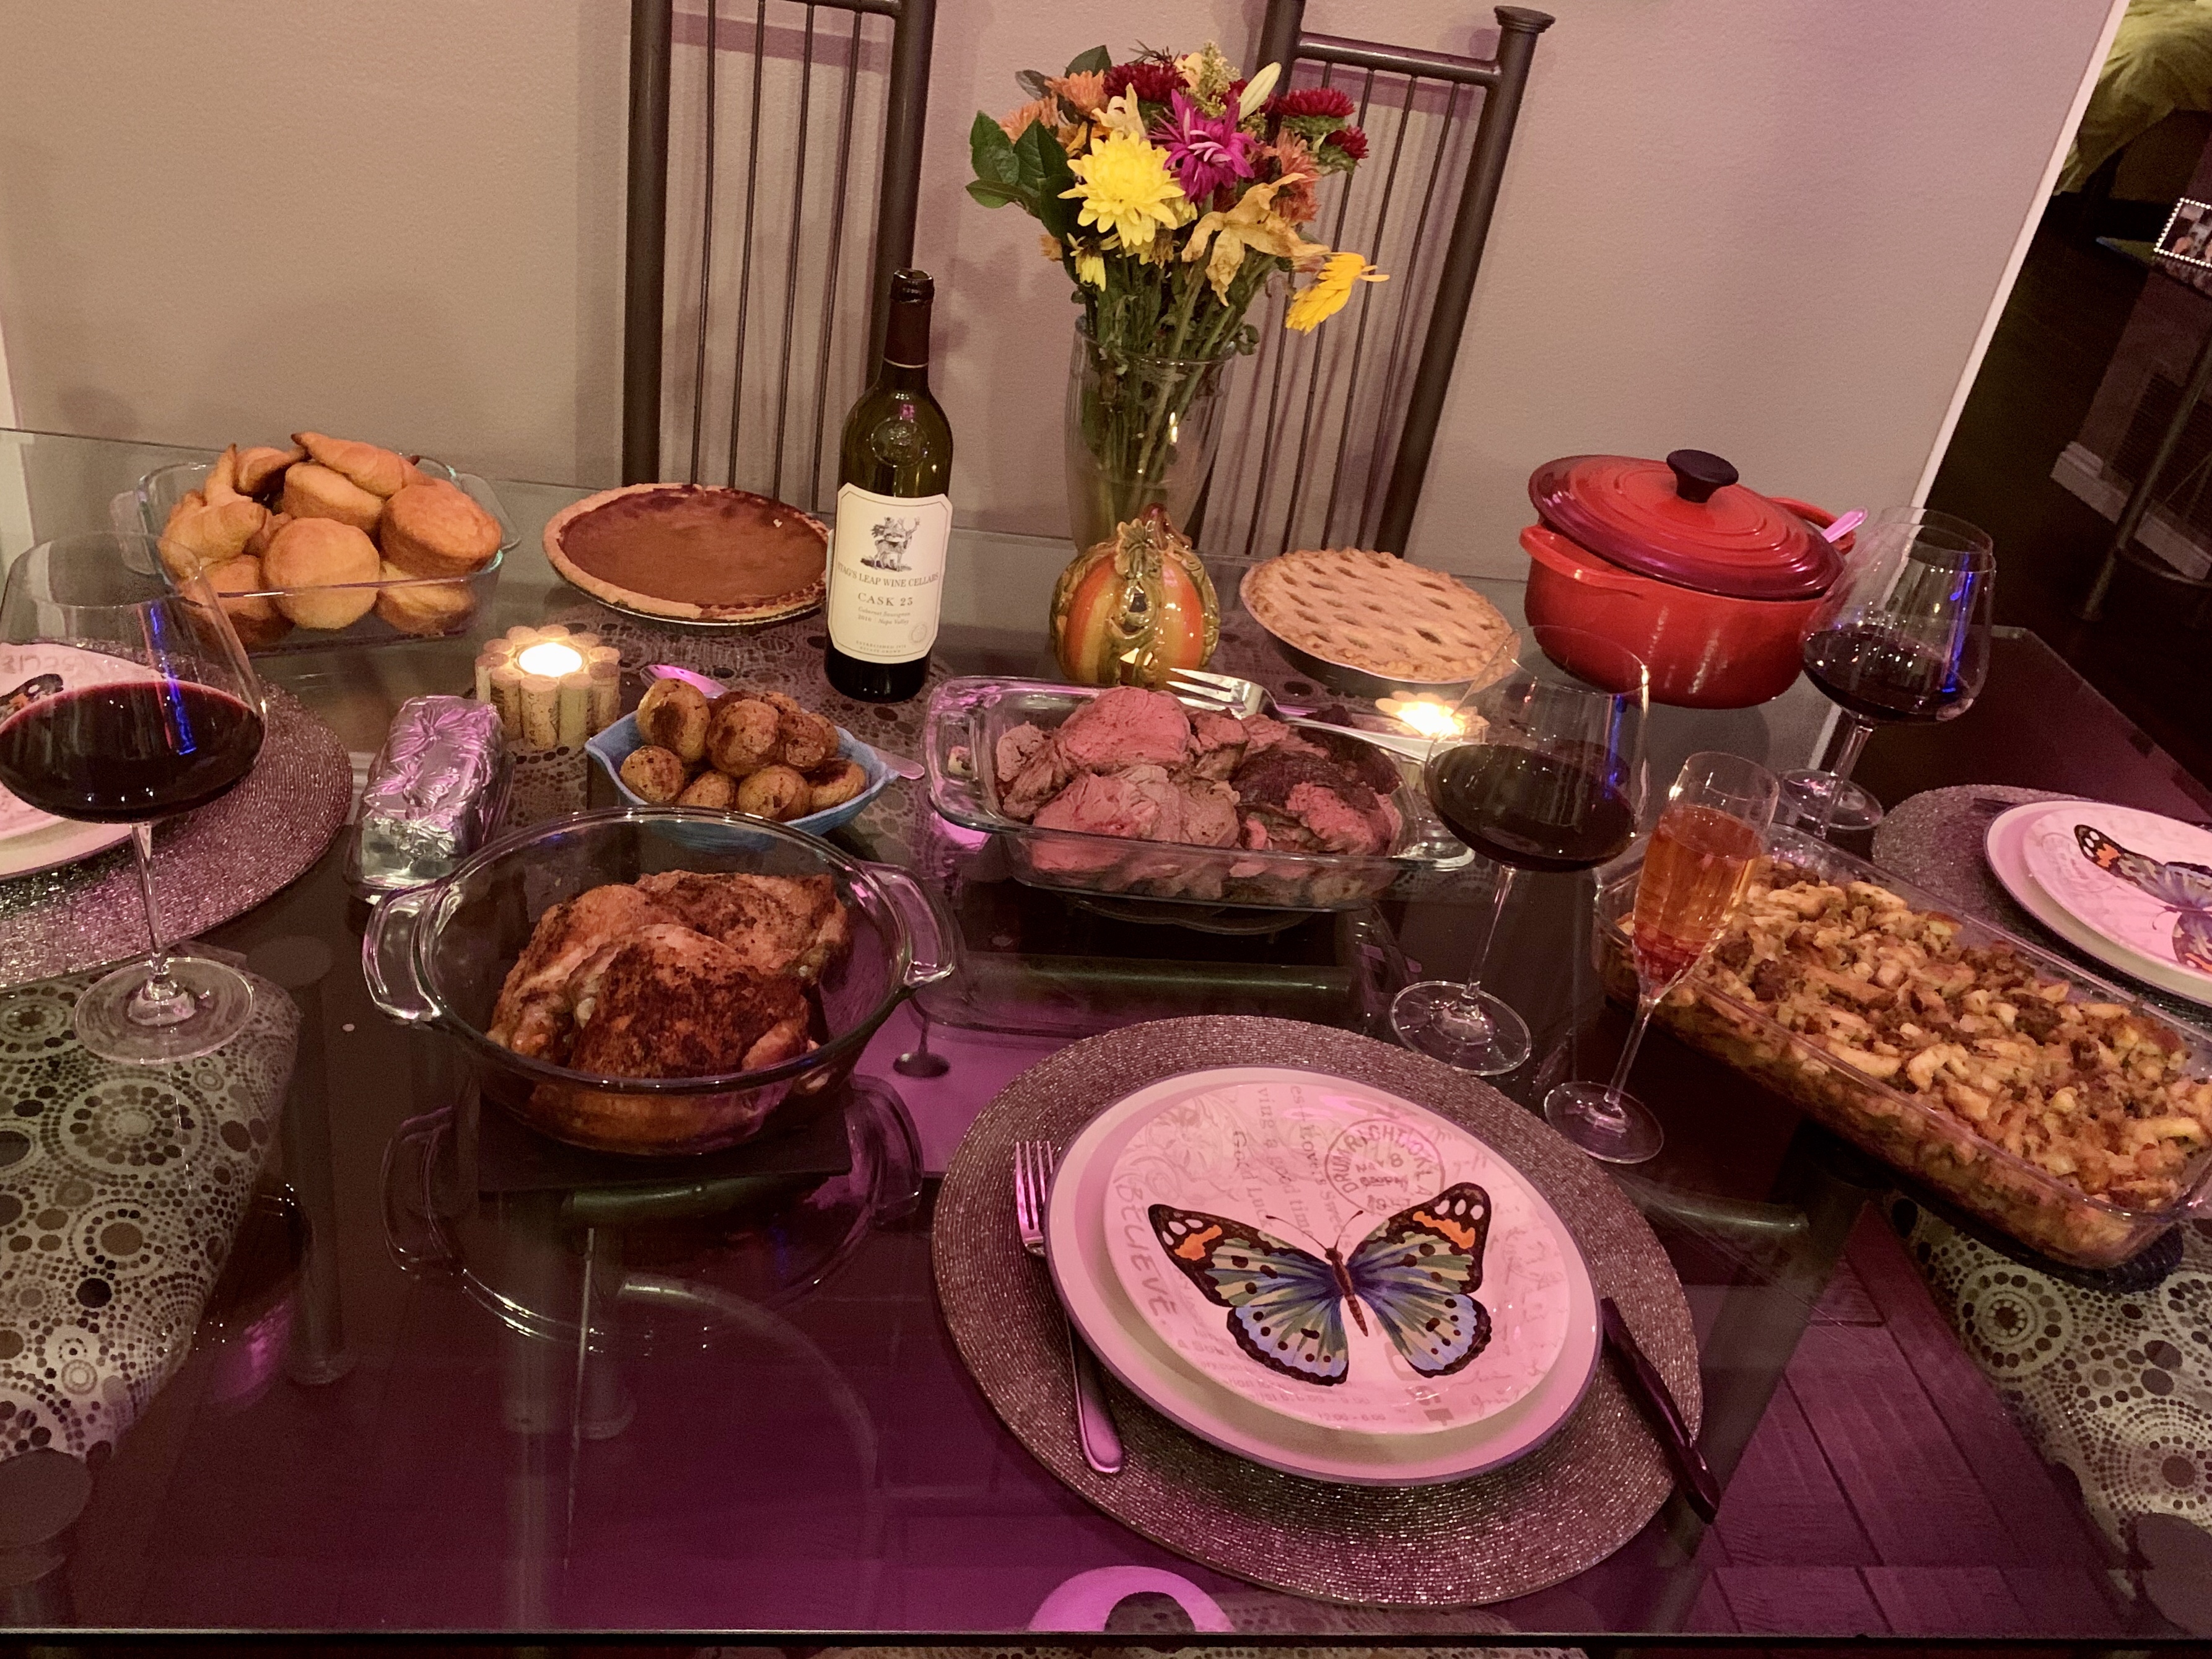
Although I am not making the traditional Thanksgiving fare, there are still some foods that accompany the feast that I need to have, like stuffing. This stuffing recipe is great alongside roast beef, so it could be your go-to for Christmas #RoastBeast too! #ThisGirlLovesToEat
Sausage Stuffing for Beef
1 Pound Ground Italian Sausage (Mild or Hot – your choice)
1 Cup (2 Sticks) Salted Butter (1/4 Cup Melted Butter)
1 Cup Finely Chopped Onion
1 Bunch Celery (including the tops), chopped
1 Medium Granny Smith Apple, chopped
1+1/2 to 2 Cups Beef Broth (Or 1 Can Beef Consommé + water to desired moistness)
1 – 16 oz Bag Dried Bread Chunks for Stuffing (Any type of bread)
1 TBLS Chopped Parsley
1 Large Egg, beaten
1 tsp Ground Black Pepper
Pinch Nutmeg (to taste)
Preheat oven to 350° F. Butter a 9″ x 13″ Baking pan and set aside.
In large dutch oven, brown the sausage (I like big chunks). Remove the sausage from the pan and melt the butter, scraping up the browned pieces. Add the oonion and celery and cook until onion is translucent.
Add the apple and stir the sausage back into the pan. Add the pepper and nutmeg, the parsley, and adjust the salt if needed. Turn off the heat and add your cubed bread. Slowly stir in your beef broth/Consommé and then add your egg.
Spoon the stuffing into the prepared baking dish and drizzle the melted butter over the top of the stuffing. Baker for 40 minutes covered and an additional 10 minutes or so uncovered, to crisp up the top!
When my father-in-law found out I enjoyed cooking, one of the first things he gave me was his Mother’s Jewish Cookbook. He then opened it to much used page that had a recipe for a traditional #SweetLokshenKugel. I was behind the 8 ball for a couple of reasons on this one: I am not Jewish, so many of the words used in the, 70 + year old cookbook were, quite literally, foreign to me and, without the benefit of a picture accompanying the recipe, I was clueless as to what the recipe was actually for. Dad did clue me in that it was for a noodle kugel that his Mother used to make, but beyond that he was pretty much useless. 😉 Once I #googled some of the words for the kosher ingredients and, what turned out to to be brand names, I was able to modernize the recipe and create something that he loved and requested for many years.
Sweet Noodle Kugel
16 oz Wide egg noodles
1 Cup Sugar (I now substitute 1/2 Cup Truvia)
1 Stick Butter, melted
1 Large Egg
1 Medium Granny Smith Apple, grated
8 oz Golden Raisins
1 – 20 oz Can Crushed Pineapple (mine came in heavy syrup)
1-2 tsp Ground Cinnamon
1/4 tsp Ground Nutmeg
1 tsp Vanilla
Preheat the oven to 350° F. Grease a 13 x 9 inch baking dish with butter and set aside.
Boil the noodles for 10 minutes. Drain and put into a large mixing bowl or return to the pan you cooked them in. Add the butter to the noodles and toss to combine.
Combine the Sugar (or Truvia), Egg, Grated Apple, Crushed Pineapple (undrained), Raisins, Vanilla, Ground Nutmeg and Cinnamon, stirring well.
Add the combined ingredients to the noodles and toss until well distributed throughout.
Pour the noodle mixture into the prepared baking pan and bake for 45 minutes to an hour, just until tips of the noodles on top begin to brown. Cool and cut into 16 – 20 equal pieces. Can be served warm or room temperature.
Nutrition Information (for 16 servings using Truvia)
205 Calories
6.5 g Fat
26.62 g Carbohydrates
4.75 g Protein
If you’re interested in the things I may not devote an entire blog post to, like: health articles, my favorite recipes, fun drinks, food facts, nutritional information, restaurant reviews, gadget reviews, photos and other things that make my mouth water, I have a community page on Facebook: https://www.facebook.com/ThisGirlLovesHerFood
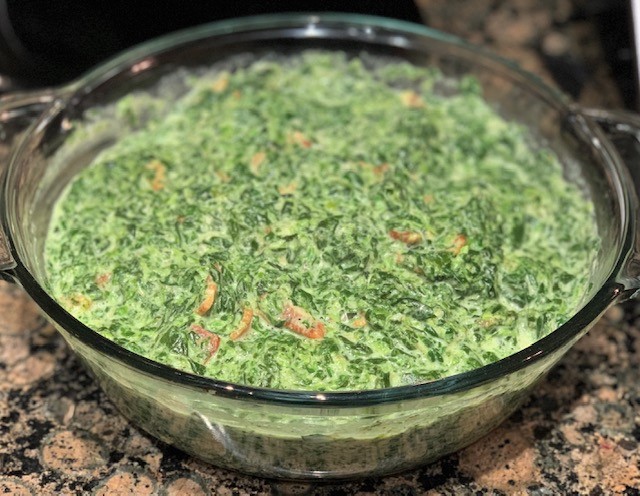
Creamed spinach may not seem like a side dish that pairs well with the traditional Thanksgiving meal, but the creamy richness is an especially nice companion to turkey, mashed potatoes and stuffing, and a nice change from the same old green bean casserole. It’s also great with ham and, of course, any type of beef. It’s #GlutenFree when you use #BobsRedMill Paleo Baking Flour and pretty #KetoFriendly too! #ThisGirlLovesToEat
Creamed Spinach with Bacon
2 – 16 oz pkgs Frozen Chopped Spinach, defrosted and squeezed dry
3 Cups Warm Whole Milk
1 Pound Bacon, chopped into 1/2″ pieces
1 Cup Finely Chopped Onions
2 Cloves Garlic, minced
1 tsp Salt
1/2 tsp Freshly Ground Black Pepper
2/3 Cup Bob’s Red Mill Paleo Baking Flour (Grain & Gluten Free)
6 TBLS Butter, melted
Cook bacon slowly until browned but not crispy. Remove bacon to a paper towel lined plate and leave the grease in the pan. Over medium heat, cook the onions and garlic until the onions are translucent.
Add the salt & pepper and stir in the flour. Stir and cook for 2-3 minutes, until a very light brown, fluffy roux forms. Slowly stir in the warm milk (I microwave mine in a Pyrex measuring cup for about 2 minutes) and stir until smooth.
Add the bacon back into the pan and cook for about another minute, stirring continuously. Add the spinach and cook, stirring occasionally, over low-medium heat until all of the spinach is mixed in and warmed through.
Cover the top with the melted butter until ready to serve.
Nutrition Information: (Makes 12 – 14 Half Cup Servings)
165 Calories
5 g Carbohydrates
6.4 g Fat
8.2 g Protein
If you’re interested in the things I may not devote an entire blog post to, like: health articles, my favorite recipes, fun drinks, food facts, nutritional information, restaurant reviews, gadget reviews, photos and other things that make my mouth water, I have a community page on Facebook: https://www.facebook.com/ThisGirlLovesHerFood


 Playing around during #Keto meal prep this weekend, I came up with a high protein/low carb chicken and broccoli casserole that’s a great dinner with a salad or perfect for a grab-and-go lunch that can easily be reheated in the microwave at work! #ThisGirlLovesToEat


 Add the salt & pepper and stir in the flour. Stir and cook for 2-3 minutes, until a very light brown, fluffy roux forms. Slowly stir in the warm milk (I microwave mine in a Pyrex measuring cup for about 2 minutes) and stir until smooth.
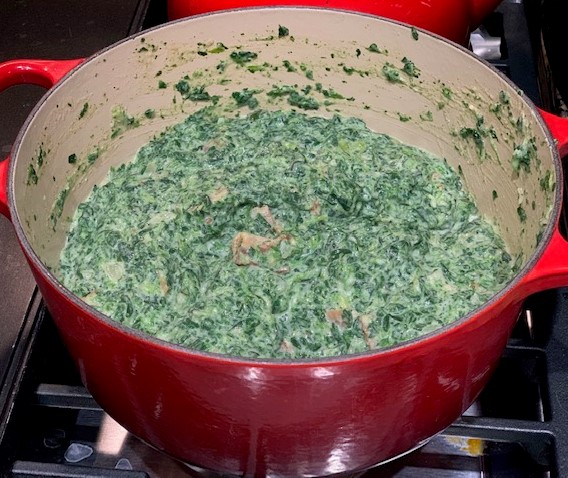 Add the bacon back into the pan and cook for about another minute, stirring continuously. Add the spinach and cook, stirring occasionally, over low-medium heat until all of the spinach is mixed in and warmed through.
