Skinny Buffalo Chicken Burritos

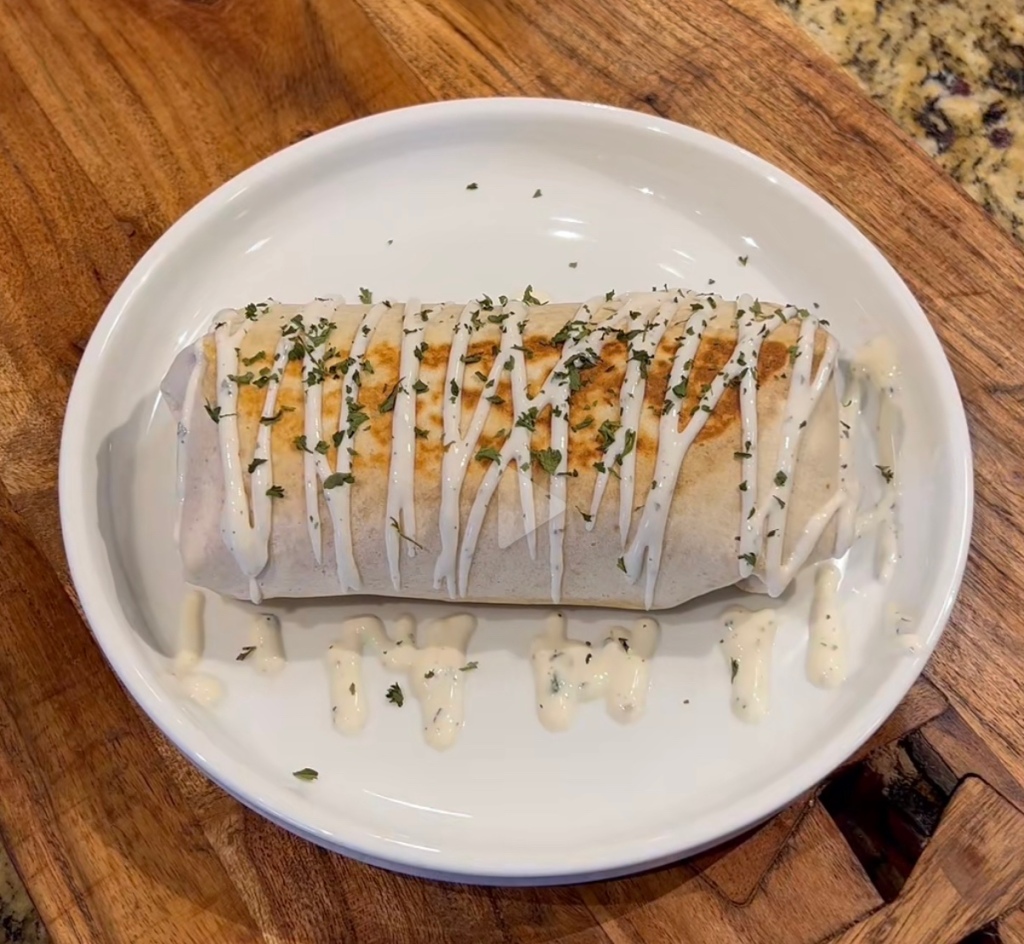
I saw this video on #TikTok and got inspired to use the method but slim down the ingredients used to make it #KetoFriendly and not just low fat, like the original intended. Thanks, Nikita Fair for the inspiration!

  • 1 Pound Chicken Breast, cut into 4 equal pieces
  • 1/4 Cup Franks Red Hot Buffalo Sauce
  • 1 Cup Cottage Cheese
  • 1 TBLS Ranch Seasoning (Homemade or Store Bought)
  • Paprika
  • Garlic Salt
  • Ground Pepper
  • 1 Cup Shredded Cheddar Cheese
  • 4 Mission Carb Balance Flour Tortillas

Sprinkle the chicken breasts with the garlic salt, pepper, and paprika and cook at 375°F in the air fryer for 10-12 minutes until internal temperature reaches 160°F. Remove chicken, cover with foil and set aside while you prepare the sauce.

In mini (or full size) blender jar, combine cottage cheese, buffalo sauce, and ranch seasoning and blend on medium-high until smooth.

Uncover chicken and chop into about 1/2” chunks. Combine with sauce and cheese. Divide chicken mixture equally onto the 4 tortillas. Fold the tortillas and place seam side down on a hot sauté pan. Brown burrito on both sides and wrap in foil to keep warm if not serving immediately. Can be stored in refrigerator or freezer and warmed back up.

Nutrition information: 541 Calories 27.5 g Fat 5.5 g Carbs 61.5 g Protein

Are you on Facebook? You might be interested in the things I may not devote an entire blog post to: food news, recipes, food facts, nutritional information, photos and other things that make my mouth water. If so, visit my This Girl Loves To Eat community at: https://www.facebook.com/ThisGirlLovesHerFood

I Guess Adult Pickles Are a Thing

Leave millions of people in isolation, with time to fill, an internet full of ideas + the ability to get anything you need to bring weird ideas to life shipped to you, and what do you get?

Apparently a whole lot of drunk people eating pickles! I’ve seen whiskey pickles, tequila pickles, Old Bay and vodka pickles, beer and pickles, apple infused vodka pickles, and even candied pickle pops made with vodka & Kool-Aid. I’m not a trendy, #TikTok kind of girl, but I’m up for a challenge, the boys are coming over for Father’s Day & I can’t wait to give this a try so I can see their faces when they take their first bites.

Drunken Pickles

2 C Small Pickles or Gherkins

1 C Pickle Juice

1 C Good Bourbon – I like Makers Mark

5 Sprigs of Dill

A Few Dashes of Hot Sauce – I like Frank’s Red Hot

If You like a little more kick, add a few shakes Red Pepper Flakes

4” Cocktail Skewers

  1. In a medium bowl, combine pickles with pickle juice, whiskey, dill and hot sauce. Refrigerate for at least an hour. I plan to leave them overnight.
  2. Drain and skewer pickles. Serve.

Recipe courtesy of Lena Abraham, Senior Food Editor, Delish Magazine, June 30, 2017; Photo credit: Chelsea Lupkin

Are you on Facebook? You might be interested in the things I may not devote an entire blog post to: food news, recipes, food facts, nutritional information, photos and other things that make my mouth water. If so, visit my This Girl Loves To Eat community at: https://www.facebook.com/ThisGirlLovesHerFood

Buffalo Cauliflower Bites

3

Changing over to a Keto focused diet has meant embracing some foods that I wasn’t a fan of out of necessity, like cauliflower.  But, not having been a prior fan of anything cauliflower related, it’s been a journey making cauliflower my friend.

To be completely honest, without mass quantities of Frank’s Red Hot, Butter, Zatarain’s Creole Seasoning, Pesto Sauce, Cheese Sauce or any version of Queso, and plain old Salt & Pepper, I would likely still be struggling with it…

I’ve had buffalo cauliflower at restaurants but never been able to replicate it at home using my oven. It has either come out overcooked or soggy.  Major fail!  Now that I have jumped on the #Airfryer bandwagon, I have finally managed to create a recipe at home that I’d actually serve people I like. 😉

Air Fried Buffalo Caulifower Bites

  • Medium Head Cauliflower OR 1 Bag Fresh Cauliflower Florets
  • 2 tsp Dried Cilantro
  • 2 TBLS (or more to taste) Frank’s Red Hot or other Hot Sauce
  • 2 TBLS Butter, melted

Either cut the head of cauliflower into florets or empty your bag into a medium sized bowl.  Sprinkle the cilantro over the cauliflower and stir with a rubber spatula to make sure it’s evenly distributed.

Mix the Franks (or other hot sauce) and butter until well combined and pour over the cauliflower.  Toss to coat the cauliflower.

Spray or brush the basket of your air fryer with olive oil.

Pour the cauliflower into the basket and close the drawer of the air fryer.  Set to 400° F and set the timer to cook for 18-20 minutes, depending on how much cauliflower you have.  Shake your basket every 4 minutes.  If, at the end of your cooking time your cauliflower isn’t as browned as you want it (I like mine to be browned at the edges), add some more time in increments of 2 minutes.

Serve with low carb ranch dressing and carrot & celery sticks if desired.  #ThisGirlLovesToEat

Buffalo Shrimp Lettuce Boats

northwoodpizzaI just ate my first true #CheatMeal since going Keto 4 months ago.  3 huge, luscious, cheesy, hand tossed pieces of pizza from my favorite neighborhood pizza place, #NorthwoodPizza.  I loved all 3 of them but I couldn’t feel any worse about myself right now.  #ThisGirlLovesToEat

I don’t feel bad about myself for eating the pizza.  I wanted it so I ate it.  I feel bad about myself because I’ve reprogrammed my body to not overeat carbs and now my body feels awful.  I’m bloated, I have a stomach ache and my digestion is all out of whack.  Tonight just proves Keto is working for me.  It’s time to go right back to adapting my favorite cheats so they work FOR my body, not against it.

One of my very favorite meals is deep fried buffalo shrimp eaten alone or in tacos.  My take on this recipe, from Delish, allows me to get my buffalo shrimp fix without destroying my diet goals or the improved way my body functions and feels.

Buffalo Shrimp Lettuce Wraps

  • 1 TBLS Butterbuffshrimplettucewraps
  • 2 Cloves Garlic, minced
  • 1/4 Cup Hot Sauce, I prefer Frank’s Red Hot
  • 1 TBLS Extra-Virgin Olive Oil
  • 1 Pound Shrimp, peeled & deveined with tails removed
  • Kosher Salt
  • Freshly Ground Black Pepper
  • 1 Head Romaine, leaves separated
  • 1/2 Small Red Onion, finely chopped
  • 1 Rib Celery, finely chopped
  • 1/2 Cup Blue Cheese, crumbled
  • 1/2 Ripe Avocado Chopped (optional)
  • Ranch Dressing (optional)
  1. Make buffalo sauce: In a small saucepan over medium heat, melt butter. When melted completely, add garlic and cook until fragrant, 1 minute. Add hot sauce and stir to combine. Turn heat to low while you cook the shrimp.
  2. Make shrimp: In a large skillet over medium heat, heat oil. Add shrimp and season with salt and pepper. Cook, flipping halfway, until pink and opaque on both sides, about 2 minutes per side. Turn off heat and add the buffalo sauce, tossing to coat.
  3. Assemble wraps: Add a small scoop of shrimp to the center of a romaine leaf, then top with red onion, celery, avocado (if desired), and blue cheese.  Drizzle with additional Hot Sauce and Ranch Dressing if desired.

Rainy Day Keto Veggie Chicken Soup

bssoup
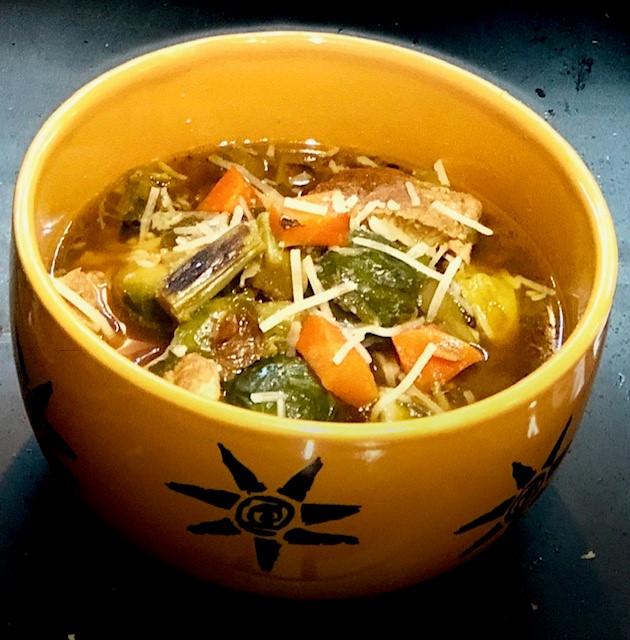
While veggies are admittedly limited during the most strict part of Keto, there are many ways to incorporate very flavorful options in moderation.  This soup, that serves 4 is one of them.  The higher #GoodFat to calorie percentage, from the olive oil, is perfect for Keto followers!

Keto Carmelized Veggie Chicken Soup

  • 1 Carrot chopped (About 1/2 Cup)
  • 1/ 2 Cup (about 3)  chopped Green Onion (green & white parts)
  • 3 Cloves Garlic, chopped
  • 8 TBLS Olive Oil, divided
  • 10 – 12 Raw Brussels Sprouts, cut in half
  • 6 Raw Asparagus Spears, chopped into about 1/2″ chunks
  • 4 Cups Chicken Broth
  • 1 Cup Cooked Chicken Breast either shredded or cut into 1/2″ chunks
  • Freshly Ground Sea Salt & Pepper to taste
  • 2 TBLS Italian Parsley, chopped

In a 2 quart saucepan, heat 2 TBLS olive oil over medium-high heat.  Add carrot, green onions, and garlic and cook for 1-2 minutes.  Add another 2 TBLS olive oil and cook another minute while stirring.  Remove carrot mixture from the pan.

Add 2 TBLS olive oil, Brussels sprouts and asparagus and cook, stirring occasionally, 6-8 minutes.  Add last 2 TBLS olive oil and return the carrot mixture to the pan.  Cook an additional 3-4 minutes, or until green vegetables start to brown.

Stir in broth.  Bring to a boil.  Reduce heat to low.  Add the cooked chicken.  Cook 5 to 7 minutes or until vegetables are tender.  Garnish each serving with chopped parsley and shredded Parmesan cheese (if desired).  We spiced ours up with Frank’s Red Hot sauce, but you could also add dried red pepper flakes if you like your soup spicy.  #ThisGirlLovesToEat

** Vegetarian option:  Omit the chicken and swap vegetable broth for the chicken broth.

Nutrition Information:  330 Calories  40.5g Fat  21g Protein  1g Carbs

Holiday Rush Cooking: Cheesy Cauliflower Casserole

roastedgarliccheesycauliflowerWhen the hustle and bustle of the December holiday season is in full swing, the last thing I want to worry about is making dinner.  This main dish casserole can be made ahead and served with a salad for a great weeknight meal.

If you don’t eat, or don’t like pork products, you can easily substitute shredded chicken (grocery store rotisserie or home prepared) for the ham and either leave the bacon out or substitute turkey bacon.  Another option is to cut leftover steak or prime rib into cubes as a substitute for the ham and leave in the bacon.  If you are vegetarian you can leave the meat out completely and add more bell pepper (red, yellow, orange or green). It’s a recipe that’s easy to get creative with.

Roasted Garlic Cheesy Cauliflower

  • 2 Heads of Cauliflower
  • 2 Cups Shredded Pepper Jack Cheese
  • 8 oz Cream Cheese
  • 2 Cups Shredded Aged Gouda (or Trader Joe’s Gouda/Parmesan Blend) Cheese
  • 4 TBLS Butter
  • 1 Green Bell Pepper Diced
  • 3 Chopped Green Onions
  • 6 Slices Cooked Bacon
  • 2 Cups Diced Cooked Ham
  • 1 Clove Garlic, Roasted
  • 3 Shallots, Roasted
  • Freshly Ground Pepper
  • About 1 TBLS Olive Oil
  • 2 TBLS Almond Flour
  • 3/4 cup heavy cream or 1/2 & 1/2

Preheat oven to 350 degrees.  Grease a 9 x 13 Pyrex baking dish and set aside.

roastedgarlicPeel away the papery skin and cut off the top of the garlic clove.  Place inside a square of foil, drizzle with olive oil, close up the foil package, and place in a shallow pan in the oven.  Do the same for the shallots.  Bake 30-40 minutes and remove from oven.  Set aside for a few minutes then open up foil pouch to let cool.

Break apart cauliflower heads, discard the stem and steam in a steamer in a large pot until tender but not mushy (about 20 minutes per head – you may have to do it in 2 batches).  Transfer cauliflower to Vitamix Container or Food Processor and pulse until florets break apart but do not pulverize.  Remove the cauliflower and put into a large mixing bowl.  Add diced bell pepper, ham, half of the chopped green onions, and half of the crumbled bacon.  Toss to combine.

In heavy saucepan squeeze the roasted garlic and shallots out of their skins and add 3 TBLS butter.  Cook over medium heat until butter melts.  Using a fork or an immersion blender stir/blend until the garlic and shallots are crushed and well combined.  Add a generous amount of pepper, the cream (or 1/2 & 1/2) and bring just to a boil.  Combine the last 1 TBLS of butter (melted) with 2 TBLS of the Almond flour (all purpose if Keto isn’t a concern for you) and blend or whisk into the mixture in the pan until the mixture begins to thicken.  Add the cream cheese then 1 Cup of the pepper jack and 1 Cup of the gouda, stirring constantly until melted.  It may not be a flowing sauce, but resemble a big melted blob – that’s ok.  Remove from heat and pour into the cauliflower mixture in a large bowl.  Use a large rubber spatula to stir together until well mixed.

Spread into prepared 9 x 13 pan, sprinkle remaining bacon, green onion and cheeses over the top, cover loosely with foil and bake for 30 minutes; remove foil and continue to bake until cheese is brown and bubbly.  Remove from oven and let cool 5-10 minutes. I serve with a bottle of Frank’s Red Hot for those who like more spice. #ThisGirlLovesToEat

Buffalo Spinach Artichoke Dip

Tasting Table is one of my favorite Twitter follows.  I love browsing their website for restaurant reviews, recipes, new spins on classic drinks, and guides to cities I am planning to travel to.

I was surfing their website today and came across an appetizer that included 4 of my favorite tastes in a single dish: bacon, Buffalo sauce, spinach and artichoke hearts!  Add to that the ability to make ahead, the reviewers rated it 100% make again, and it didn’t call for any hard to get ingredients and this girl who loves to eat was sold!

Note:  I did adapt the recipe from the original:

    1. I prefer a bit more bacon (and I buy mine from the butcher case, never pre-packaged because we don’t have great options in my stores);
    2. I made the blue cheese optional (it’s not a favorite of mine) and offered some substitution options; and
    3. I added a bit more hot sauce to mine.

bcartdip

Buffalo Spinach-Artichoke Dip

  • 3 slices (5 ounces) thick-cut bacon (I use 6 slices)
  • 3 garlic cloves, minced
  • ½ medium yellow onion, finely chopped
  • 9 ounces frozen artichoke hearts, thawed and finely chopped
  • 6 cups baby spinach, roughly chopped
  • 8 ounces cream cheese, softened
  • 4 ounces smoked blue cheese, softened (I don’t care for Blue Cheese, so I substitute Gorgonzola.  You can also use Goat Cheese, Feta, Stilton, or Brie)
  • 1½ cups grated Parmesan cheese, divided
  • ½ cup sour cream
  • 6 tablespoons Franks Red Hot Sauce (I like mine spicy so I add a couple TBLS more)
  • Kosher salt and freshly ground black pepper, to taste
  • ½ cup Panko bread crumbs
  • 1 tablespoon olive oil
  1. Preheat the oven to 400°.
  2. In a large skillet, heat the bacon over medium-high heat.  Cook, turning as needed, until the bacon is golden and the fat has rendered, 8 to 10 minutes.
  3. Transfer the bacon to a paper towel-lined plate to drain, then finely chop and set aside.
  4. Add the garlic and onions to the pan and cook, stirring often, until golden, 8 to 10 minutes.
  5. Add the artichoke hearts and spinach and cook until the spinach is lightly wilted, 2 to 3 minutes.
  6. Meanwhile, in a large bowl, stir the cream cheese, blue cheese (or whatever cheese you’ve substituted), 1 cup of the Parmesan, sour cream, and hot sauce until smooth.
  7. Fold in the spinach and artichoke mixture. Season with salt and pepper.
  8. Transfer to a 1½-quart casserole dish and smooth the top with a rubber spatula.
  9. In a small bowl, mix the remaining ½ cup of Parmesan with the chopped bacon, panko crumbs and olive oil.
  10. Sprinkle the panko crumb topping over the dip and place the casserole dish on a sheet pan in case any cheese bubbles over.
  11. Bake until golden brown and bubbling, 25 to 30 minutes, then serve.

tt_logo_image_1The recipe calls for serving with chips.  I like to eat this dip with really thick, freshly made tortilla chips, Triscuits, carrot chips, thick bell pepper slices or celery.

If you use Facebook and are interested in the things I may not devote an entire blog post to: things like health articles, my favorite recipes, fun drinks, food facts, nutritional information, restaurant reviews, photos and other things that make my mouth water, I have a very active page on Facebook you can visit too: https://www.facebook.com/ThisGirlLovesHerFood

Best Thing I’ve Ever Had at Islands!

I ate something great when I met my husband for a rare weekend lunch out at Islands yesterday.

cheddarfriesThey boast, and truly do have, the #ColdestBeerInTown and they’ve got an amazing menu of burgers, chicken sandwiches, salads, tacos, and some truly sinful appetizers.  If you can skip the fries covered in melted cheese and crispy bacon you have far more willpower than I do! #ThisGirlLovesToEat

I sat down at the bar, ordered an ice cold Kona Longboard from the tap,KO_LBL_Pour-with-Bottle_web_204X3771 and glanced at the menu, but was drawn to the bar top menu announcing their limited time specials: Moa Kaneohe Crisp Chicken Sandwich and it’s spicy brother  Moa Mauna Loa Crisp the difference between the two being the Moa Kaneohe has bacon, Swiss and a cream cheese ranch spread, while the Moa Mauna Loa has blue cheese crumbles, and Buffalo sauce on it.
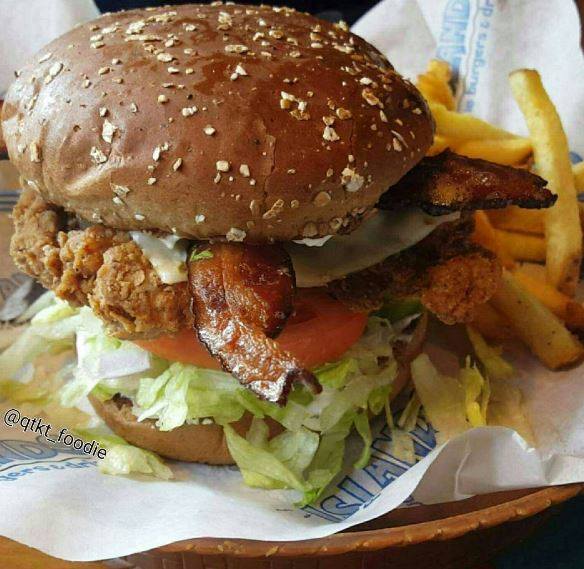
What really appealed to me about these chicken sandwiches was that the chicken breasts weren’t just the usual breaded in flour, dropped in oil, & fried, chicken breasts.  These chicken breasts were battered in a lighter tempura batter and then double fried.  I love tempura!

I like blue cheese dressing occasionally, but not on my burgers, and not even with my Buffalo wings.  But a girl can always ask the waitress for some accommodations to her order, right?

So, I ordered the cheddar cheese fries with bacon #IHaveZeroWillPower and then ordered the Moa Kaneohe Crisp Chicken Sandwich with it’s crisp bacon, lettuce, tomato, chopped red onion, Swiss cheese, cream cheese ranch spread and substituted the spicy chicken breast used in the Moa Mauna Loa: battered in a spicy tempura batter and fried, then added to the sandwich without the blue cheese crumbles, but with an added drizzle of the Buffalo sauce.

islandssandwich

It came out and people around me asked what I was eating…it was pretty darn impressive. Trying to figure out how I was going to get my mouth around it, I cut it in half and found that the breast was incredibly tender and juicy. Not only was it impressive to look at, it was cooked perfectly, and it was the right combination of fresh, creamy & spicy!

The manager was serving tables and stopped to ask if I liked my sandwich.  I told him I was loving it and commented it should always be on the menu.  He said they actually fry the breasts twice, which is why the sandwiches stay on the menu for such a limited time, the cooks complain they have to spend more time on them.  Knowing that, I’m even more impressed that they can keep the breasts from overcooking.

I give #2BigThumbsUp to the Moa Kaneohe Crisp Chicken Sandwich and Moa Mauna Loa Crisp Chicken Sandwich at Islands Restaurant.  I’m not sure how much longer they will be on the menu, but if you get a chance go to Islands and try them!

If you use Facebook and are interested in the things I may not devote an entire blog post to: things like health articles, my favorite recipes, fun drinks, food facts, nutritional information, restaurant reviews, photos and other things that make my mouth water, I have a very active page on Facebook you can visit too: https://www.facebook.com/ThisGirlLovesHerFood

Buffalo Cauliflower “Wings”

Another Twitter video find when I was hungry…best part?  It’s from www.health.com!

buffalocauliflower

My sister Wendi and I fell in love with these when we went to San Diego and found a sports bar to watch USC football at before going to a Blake Shelton concert last year. I’ve finally found a recipe that comes close to what we had there!

Buffalo Cauliflower “Wings”

  • Preheat oven to 400° F.
  • Wash a Large head of fresh cauliflower (About 1 lb).
  • Remove the outer leaves and stem and then cut to separate the individual florets.
  • Dry the florets and spread out on a cookie sheet lined with foil.
  • Sprinkle florets lightly with salt and pepper.
  • Put sheet in oven and roast for 20 – 25 minutes stirring once.

In a medium bowl combine:

  • 1 TBLS Butter melted
  • 3 TBLS Frank’s Red Hot Sauce (or any kind you like)
  • 1 tsp Vinegar
  • Put roasted cauliflower florets into the bowl and stir with rubber spatula until all florets are coated with sauce.
  • Return coated florets to the cookie sheet.
  • Roast at 400° F for 5-10 minutes more or until cauliflower starts to brown.

Make the dipping sauce:

  • In a small pan over medium-low heat put 2 tsp Olive Oil and 1 clove garlic, minced.
  • Heat until garlic starts to brown.
  • Transfer garlic and olive oil into the mixing container of a blender or Vitamix.
  • Add 1/2 Cup Plain Greek Yogurt.
  • 1/2 Avocado
  • 1 TBLS Parsley
  • 1 TBLS Chives
  • 1 tsp Dill
  • 1/4 tsp Apple Cider Vinegar
  • 1/4 tsp Onion Powder
  • 1/4 tsp Honey
  • Pinch of Salt & Pepper

Blend until well combined.  Transfer to a small serving bowl, cover and refrigerate until ready to serve.  Serve with the dip and ranch dressing on the side.

If you use Facebook and are interested in the things I may not devote an entire blog post to: things like health articles, my favorite recipes, fun drinks, food facts, nutritional information, restaurant reviews, photos and other things that make my mouth water, I have a very active page on Facebook you can visit too: https://www.facebook.com/ThisGirlLovesHerFood

Fired-Up Mac & Cheese

kraft_macaroni__cheese_2011I grew up on Kraft Macaroni and Cheese.  The blue box with the skinny little noodles that Mom combined with a 1/4 cup of “Oleo” as she called margarine (she NEVER used butter) and 1/4 cup of low-fat milk was a crowd pleaser to my sister, brother and I.  Later she would splurge on the more expensive box of “Kraft Deluxe Macaroni and Cheese” with it’s tiny can of cheese sauce in it, but, to my taste, you still can’t beat the skinny blue box.

Thankfully, as I grew so too did my palate.  I rarely pass up a macaroni and cheese on any menu and have developed a couple of favorite styles:  Lobster macaroni and cheese, if it has large claw chunks (and not just minced remnants), is my favorite, followed by a good white cheddar shells and cheese prepared with a hint of truffle oil and just a few exotic mushrooms.

spicyspiralmacncheeseWhen I’m cooking Macaroni and Cheese, I like it to have enough flavor, that if I served nothing else beside it, except maybe a tossed green salad, it could stand alone as a “Meatless Monday” main dish.  You won’t need a fire extinguisher nearby for this spirited macaroni and cheese, but you certainly won’t fall asleep while you’re eating it either.

Lisa’s Fired-Up Mac & Cheese

  • 1 – 16oz Box Cellentani Pasta (I use Barilla)
  • 8 TBLS Butter / Divided
  • 1/2 Cup Flour
  • 3 1/4 Cups Whole Milk
  • 1 tsp Dry Mustard
  • 3/4 tsp Salt
  • 1/2 tsp White Pepper
  • 3 Tsp Chili Powder
  • 1/4 Cup Hot Pepper Sauce (I prefer Frank’s Red Hot)
  • 1 1/2 Cups + 1/4 Cup (for sprinkling on top) Shredded Pepper Jack Cheese
  • 2 + 1/4 Cup (for sprinkling on top) Cups Shredded Sharp Cheddar Cheese
  • 3/4 Cup Grated Parmesan Cheese
  • 2/3 Cup Panko

Before you start, I have a couple of tips.

  1. If you can’t find shredded Pepper Jack or Sharp Cheddar you can always use the packaged slices and tear them up.  Generally the 8 ounce package should equal about 1 1/2 Cups.  Use your own judgement.  I usually err on the side of too much cheese in that type of situation and gauge it based upon the thickness of my sauce.  You can always thin (God Forbid) a bit with milk if you think it’s too thick.
  2. You can use any macaroni type noodle you prefer (elbow, shell, spiral) but I prefer the Cellentani because it combines the features of a slightly larger elbow with a spiral and then throws in some textured grooves so you get as much of the sauce grabbing to it as possible in each bite.

Directions:

  • Preheat oven to 350°F
  • Prepare 2 – 13 x 9 Pyrex baking dishes (I use the deepest ones I have), or 1 deep dish throw away baking pan, by buttering the sides and bottoms – then set aside while you prepare the ingredients.
  • In a large stock pot, boil your pasta according to package directions. Drain, rinse and pour into largest mixing bowl you have.  Set aside.
  • In a large sauce pan over medium heat melt 4 TBLS butter.  Whisk in the flour and cook about a minute while constantly whisking then begin stirring in the milk about a 1/2 cup at a time until it’s well combined.
  • Stir in the spices and 1/4 Cup of the hot sauce.  Bring to a gentle boil, stirring constantly for 1 minute.
  • Remove from heat and stir in cheeses (not the cheese reserved for the top) until melted and smooth.
  • In a small pan melt the remaining 4 TBLS butter and stir in the bread crumbs.
  • Combine the remaining cheeses together.
  • Pour the sauce over the macaroni and, using a large rubber spatula, stir until all of the pasta is well coated.
  • Divide the pasta between the 2 prepared pans
  • Sprinkle 1/2 of the remaining cheese mixture over the top of each and put the pans, uncovered into the oven.
  • Bake for 30-45 minutes, or until the cheese sauce is bubbling and beginning to brown on top.
  • Slide the baking dishes out of the oven and set the oven temperature to broil
  •  Divide the panko mixture between the two pans and return to the oven
  • Watch the pans carefully and remove from the oven as soon as your crumbs begin browning.

Make sure you’ve got a bottle of hot sauce out for anyone who wants to spice it up even more!  Serve your macaroni and cheese with a salad as a dinner on it’s own, alongside burgers, steaks, or inside a great steak/brisket/tri-tip sandwich!

If you are on Facebook and are interested in the things I may not devote an entire blog post to, recipes, food facts, nutritional information, photos and other things that make my mouth water, I have a page on Facebook you can visit too:  https://www.facebook.com/ThisGirlLovesHerFood