Keto Lemon Cheesecake Bars

withberriesA light lemony cheesecake dessert on a buttery shortbread-like crust with a sweet-tart lemon layer covered by creamy cheesecake layer.  You can enjoy this guilt free because #ItsKeto!

Keto Lemon Cheesecake Bars

Preheat oven to 350° F and lightly butter a 13 x 9 Pyrex baking pan.

Using a pastry blender, forks, or your blender/Vitamix, combine the ingredients for your crust until coarse crumbs form.  TIP:  I like to use my Vitamix 750 Pro on the 2 setting, after pulsing to start, so that, instead of coarse crumbs, a light, fluffy dough forms.

  • 1+1/2 Cups Bob’s Red Mill Paleo Baking Flour
  • 1/2 Cup Swerve Confectioners Sugar Substitute
  • 3/4 Cup Cold Unsalted Butter, Cut into Cubes

Press the crumbs into the bottom of the baking dish.  Bake until golden brown, 18-21 minutes.  Don’t under cook the crust!  Remove from the oven and set aside.

Prepare the lemon layer by combining, in your blender:

  • 4 Large Eggs
  • 1 1/2 Cups Granulated Xylitol or Erithritol (Sugar Substitutes)
  • 1+1/2 TBLS Bob’s Red Mill Paleo Baking Flour
  • 2 TBLS Lemon Zest
  • 1 Cup Lemon Juice

Pour lemon mixture onto the baked crust.  Skim off any large bubbles from the surface of the lemon layer.

Prepare the cheesecake layer by combining, in your stand mixer or cleaned blender container:

  • 2 – 8 oz Packages Cream Cheese
  • 1 Cup Granulated Xylitol or Erithritol
  • 2 Large Eggs

BEWARE:  If you use Xylitol in this recipe, which I prefer because there’s no aftertaste or cool sensation, Xylitol IS NOT PET SAFESo, no sharing with your furry babies.

When well combined, pour and spread over the lemon mixture.  It’s ok if the lemon layer peeks through, the cheesecake layer rises to the top during baking.  Bake until the filling is set about 40 minutes.  Remove from oven and cool pan on a wire rack before putting into the refrigerator to chill.  Cut into 24 Bars and top with a couple of fresh berries if desired.  #ThisGirlLovesToEat

Nutrition Information (24 Servings):

  • 131 Calories (Savings of 125 Calories without real sugars & all purpose flour)
  • 1 g  Fat (Savings of 13 g Fat from traditional recipe)
  • 4 g  Carbs  (Savings of 27 g Carbs from traditional recipe)
  • 3 g  Protein

Low Carb Spinach Wraps

spinachwraps
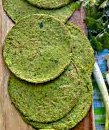
Since going Keto, I’ve missed sandwiches and wraps, so I’m always on the lookout for a low carb replacement.  Today I tripped across a simple recipe I could adapt for spinach based wraps that I can use for lunches or even burritos! #ThisGirlLovesToEat

Quick & Easy Spinach Wraps

  • 1/2 – of a 16 oz bag of Frozen Spinach (defrosted)
  • 3 Large Eggs
  • 1/2 tsp Psyllium Husk Powder
  • 1/4 tsp Xanthan Gum
  • 1/8 tsp Freshly Ground Sea Salt
  • 1/8 tsp Freshly Ground Black Pepper
  • 1/4 Cup Mozzarella Cheese
  • Olive Oil Cooking Spray
  1. Defrost spinach, then squeeze out all of the water.
  2. Put the spinach and all other ingredients in your blender or Vitamix.
  3. Process for 1-2 Minutes, gradually increasing your speed, until all ingredients are combined and very smooth.
  4. Add in 1/2 Cup Mozzarella Cheese.  Blend another 15-30 Seconds.
  5. Lightly spray a small skillet with the olive oil spray (I used a 6 1/3″ Le Crueset Skillet) and put on stove with flame set to medium-high heat.
  6. After about 30 seconds, lower heat to medium and pour about 1/2 of the batter in the middle of the pan.
  7. Using a spatula spread the batter out to make a tortilla shape – the mix will be thick but not unspreadable, just keep spreading until you have created an even, thin disc.
  8. Cook for 2-3 minutes, you should see bubbles popping like when cooking a pancake, or until the edges start to shrink away; check if cooked by lifting the edge: if it lifts easily, you can now flip your tortilla over and cook the other side for about another minute.
  9. Remove from pan, cool on a wire rack, and fill with your favorite sandwich or wrap fillings.

Cool completely and make sure wraps are dry before storing in a sealed container, between pieces of parchment or waxed paper, in the refrigerator.  Can be frozen in zip bags as well.

Nutrition Information per wrap (makes 3 large wraps):

  • 168  Calories
  • 6 g  Fat
  • 3 g  Carbs
  • 9 g  Protein

Coconut Lime Cauliflower Rice

Lime-Coconut-Cauliflower-Rice

A new spin on a Keto staple.

This recipe is so versatile that it could be:


  • A side dish for chicken, seafood, beef, pork, or grilled vegetables
  • A base layer for a sweet flavored (like Keto Sweet & Sour Chicken) Asian inspired main dish bowl
  • A bed for kebabs
  • A layer in a cold chicken salad
  • A taco or burrito ingredient, or even
  • Chilled and served as a “rice pudding” type dessert.

Tip:  This dish is better a day (or at least a few hours) after it’s been made and refrigerated, then reheated.

Coconut Lime Cauliflower Rice

  • 1 TBLS Butter
  • 1 Clove Garlic, Crushed into a Paste (I use jarred, crushed garlic)
  • 1 Medium-Large Head Cauliflower, Riced (About 6 Cups)
  • 1/4 tsp Salt
  • 1 Cup Lite Coconut Milk
  • 1 TBLS Lime Juice
  • Zest from 1 Lime

Heat the butter and garlic in a skillet over medium heat.

Steam the riced cauliflower in a microwave steamer for 3 minutes.  Add the cauliflower rice to the skillet, sprinkle with salt and cook for 2 minutes before adding in the coconut milk and lime juice. Cook the rice for 8 minutes stirring frequently until the rice has completely softened and most of the liquid has evaporated.

Sprinkle the rice with lime zest before serving.  #ThisGirlLovesToEat

Nutrition Information per serving – 6 Servings

  • 68 Calories
  • 2.5 g Fat
  • 6 g Carbohydrates
  • 2 g Protein


Quick Zucchini Pickle Ribbons

zuccpickleribbonsBecause the photo of the recipe isn’t on the same page as this recipe from #EatingWell Magazine, you could blink and miss it.  I’d have been sorry if I did!

Not only was I able to adapt it to make it #KetoFriendly, but it’s quick and easy & makes a perfect compliment for the Keto sandwiches I’m now able to enjoy because of my latest discovery: #Sola, 3g carbs per slice, Sweet Oat Bread!  It’s not cheap, but I can get it on Amazon and get my grilled cheese sandwich fix again!

Quick Zucchini Pickle Ribbons

  • 2 Medium Zucchini
  • 8 Fresh Dill Sprigs
  • 3/4 Cup White Wine Vinegar
  • 3/4 Cup Water
  • 1 TBLS Erythritol (or other Sugar Substitute)
  • 2 tsp Mustard Seeds
  • 1 tsp Salt
  • 1 Crushed Garlic Clove
  • 1/4 tsp Crushed Dried Red Pepper
  1. Cut zucchini into long strips using a vegetable peeler, discarding the inner seeds. (You should have about 12 ounces of strips.) Place in a heatproof jar and add dill.
  2. Combine vinegar, water, sugar substitute, mustard seeds, garlic and crushed red pepper in a medium saucepan. Bring to a boil. Pour into the jar. Let stand at room temperature for 20 minutes. Drain and serve immediately.

Nutrition Information per 1/4 Cup Serving

8 calories; 0 g fat; 0 g fiber; 0 g carbohydrates; 1 g protein; 10 mcg folate; 0 mg cholesterol; 0 g sugars; 0 g added sugars; 99 IU vitamin A; 7 mg vitamin C; 8 mg calcium; 0 mg iron; 40 mg sodium; 107 mg potassium  #ThisGirlLovesToEat

Spicy Bacon Baby Potatoes

petitepotatoesBeing Keto doesn’t mean you can’t have ANY carbs, in fact, depending on the stage you are at in your weight loss journey, you can actually enjoy a fair amount of carbs as part of your lifestyle maintenance.

At this point in my journey, I am enjoying 20 to 40 grams of carbs a couple of days a week, especially when I want a real sandwich, sweet potato, or something fun like this mini-potato recipe.

One trick I use to control my carb portions is to only prepare small amounts so I am not tempted to gorge myself on them and derail my health goals.  This recipe is perfect for doing just that.

Nutrition Information for this entire recipe (2 servings)

  • Calories 290 (145 ea)
  • Fat 18.5 grams (9.25 g ea)
  • Carbohydrates 22 grams (11 g ea)
  • Protein 7 grams (3.5 g ea)

The potatoes are an excellent source of potassium (more than a banana) and vitamin C.  Petites are also a good source of vitamin B6 and are fat, sodium and cholesterol free.

If you prefer these to be Vegetarian, omit the bacon.  The Vegetarian nutrition information is:  Calories 219  Fat 13.5 g  Carbs 22 g  Protein 3 g

Spicy Bacon Baby Potatoes

  • 5 oz (About 1 Cup or 20) baby/petite potatoes, cut in half lengthwise
  • 4 Slices Bacon, diced while raw (I use kitchen shears)
  • 1 TBLS Olive Oil
  • 1 tsp Chopped Garlic
  • 1/2 tsp Dried Red Pepper Flakes (+/-)
  • Freshly Ground Sea Salt & Pepper to taste

In a skillet heat the oil and red pepper flakes for about 1 minute on medium heat.  Add the bacon and the potatoes.  Cover and cook for about 4 minutes.  Remove the lid, turn the potatoes and finish browning the bacon.  Remove the bacon to a paper towel to drain.  Add the garlic to the potatoes, season with salt and pepper, cover and cook for 3 – 4 more minutes.

When potatoes are fork tender (total of 7-8 minutes cooking time), remove them to a small serving bowl and add the bacon back in.  Toss to distribute and add more red pepper flakes if desired.  Serve warm.  #ThisGirlLovesToEat

Ham Wrapped Asparagus

asparaguswithhamaf2Talking to friends, I have heard a lot of them losing hope as the months of their dieting, and slow movements on the scale, drag on.  They’re getting bored with the foods they’re eating, or hate the foods that are promised to be the biggest help in losing weight, particularly eggs, on the #KetoDiet.  As one who suffers occasional food boredom as well, I’ve been sharing some of my favorite #MakeAhead snacks and #GrabAndGo meals that make me less tempted to cheat.

Air Fryer Ham Wrapped Asparagus

  • 8 Spears Fresh Asparagus, woody ends trimmed
  • 4 Large Thin Slices Ham, sliced in half (I use Columbus Brand Apple wood Smoked Ham)
  • Olive Oil Spray
  • Freshly Ground Salt & Pepper
  1. Lay asparagus spears in the basket of your air fryer and spray lightly with olive oil cooking spray.  Shake the spears in the basket to make sure the spears are coated.
  2. Season with salt and pepper and shake again before closing the air fryer.
  3. Cook spears for 3 minutes at 400° F, and remove from basket.
  4. Wrap each spear of asparagus with 1/2 piece of ham.
  5. Place back in basket, seam side down and lightly spray again with olive oil spray.
  6. Cook another 5-7 minutes at 400° F, shaking once in the middle of the time, until ham is lightly browned.
  7. Remove spears from basket and serve warm with grained mustard, if desired.

This is a great appetizer, light lunch, or even breakfast.  I love to make some of these and put them into the refrigerator to pack for a midday snack at the office!  #ThisGirlLovesToEat

Avocado Fries II

4

When you get a new #KitchenToy, like the 6 qt, 1700 Watt #DashDeluxeAirFryer you experiment.  My husband said he loved the recipe last week for Air Fried Avocado Fries, but he drenched them in Spicy Ranch dressing, so I’m not sure if he was being objective, and the amount of salt from the almond flour in the main breading component just wasn’t doing it for me, so I decided to give them another shot.  This version wasn’t as heavy, or as salty, and, I think, much better suited to the buttery freshness of the avocado.

Air Fryer Avocado Fries II

  • 2 Medium Avocados
  • 2 TBLS Coconut Flour
  • 2 Large Eggs
  • 3 TBLS Extra Fine Almond Flour
  • 2/3 Cup Crushed Pork Rinds (Any Flavor)  I used 4505 Cracklins BBQ

Using a rolling pin, meat tenderizer, or even a rubber mallet from the garage, crush your pork rinds (TIP: I leave them in their bag or use a paper/zip bag to avoid a big mess) until they 1resemble coarse crumbs.  Using a fork, combine with the almond flour in a shallow dish.

Put the coconut flour in a zip bag or shallow bowl.  In a separate bowl lightly beat the eggs.

Slice the avocado in half, remove from the shell, remove seed and slice each half into 4 portions.

Dip each slice in the egg wash then immediately coat with the crumb mixture.  Lay in a single layer in the basket of your air fryer.

2

Set the temperature to 400° F and set your timer for 8 minutes of cooking time.  Open the drawer at with 1 minute remaining, and, depending on the thickness of your slices, you may want to add 1-2 minutes if you want them crispier/browner.  When your slices have reached your desired shade of brown, remove the basket from your Air Fryer and immediately move them to a serving dish.  I served with Hidden Valley Spicy Ranch dressing, which has only 2 grams of carbs per 2 TBLS serving, making this a perfect #KetoFriendly treat!  #ThisGirlLovesToEat

Buffalo Cauliflower Bites

3

Changing over to a Keto focused diet has meant embracing some foods that I wasn’t a fan of out of necessity, like cauliflower.  But, not having been a prior fan of anything cauliflower related, it’s been a journey making cauliflower my friend.

To be completely honest, without mass quantities of Frank’s Red Hot, Butter, Zatarain’s Creole Seasoning, Pesto Sauce, Cheese Sauce or any version of Queso, and plain old Salt & Pepper, I would likely still be struggling with it…

I’ve had buffalo cauliflower at restaurants but never been able to replicate it at home using my oven. It has either come out overcooked or soggy.  Major fail!  Now that I have jumped on the #Airfryer bandwagon, I have finally managed to create a recipe at home that I’d actually serve people I like. 😉

Air Fried Buffalo Caulifower Bites

  • Medium Head Cauliflower OR 1 Bag Fresh Cauliflower Florets
  • 2 tsp Dried Cilantro
  • 2 TBLS (or more to taste) Frank’s Red Hot or other Hot Sauce
  • 2 TBLS Butter, melted

Either cut the head of cauliflower into florets or empty your bag into a medium sized bowl.  Sprinkle the cilantro over the cauliflower and stir with a rubber spatula to make sure it’s evenly distributed.

Mix the Franks (or other hot sauce) and butter until well combined and pour over the cauliflower.  Toss to coat the cauliflower.

Spray or brush the basket of your air fryer with olive oil.

Pour the cauliflower into the basket and close the drawer of the air fryer.  Set to 400° F and set the timer to cook for 18-20 minutes, depending on how much cauliflower you have.  Shake your basket every 4 minutes.  If, at the end of your cooking time your cauliflower isn’t as browned as you want it (I like mine to be browned at the edges), add some more time in increments of 2 minutes.

Serve with low carb ranch dressing and carrot & celery sticks if desired.  #ThisGirlLovesToEat

Air Fried Avocado Fries

3

I bought another #KitchenToy and now have a whole new way to cook healthy meals.  Last week Amazon delivered a 6 quart, 1700 Watt, #DashDeluxeAirFryer to my front porch, and my avocados have finally ripened enough to give it a test run!  I’m not sure why, maybe because it was a killer #LightningDeal, but I bought the biggest one they make.  I hope I use it enough to justify giving up my storage space for it, it’s HUGE!


Air Fryer Avocado Fries

  • 2 Medium Avocados
  • 2 Large Eggs
  • 1/2 Cup Almond Flour (I use regular, not finely ground)
  • 1/2 Cup Crushed Pork Rinds (Any Flavor)  I like 4505 Cracklins Spicy Green Chili & Lime
  • 1/2 Cup Grated Paramesan Cheese (I like to use a 3 cheese blend of Asiago/Parmesan/Fontina)
  • 1/2 tsp Freshly Ground Black Pepper

Using a chopper, food processor, or your Vitamix, crush your pork rinds until they 2resemble coarse crumbs.  Combine with the flour and cheese.

In a separate bowl lightly beat the eggs.

Slice the avocado in half, remove from the shell, remove seed and slice each half into 4 portions.

Dip each slice in the egg wash then immediately coat with the crumb mixture.  Lay in a single layer in the basket of your air fryer.

Set the temperature to 400° F, set your timer for 10 minutes and cook for 5 of the 10 minutes.  Open the drawer at 5 minutes and flip the slices over then continue cooking to the end.  I served with a low carb spicy ranch dressing.  #ThisGirlLovesToEat

Kumquat Margaritas

Kumquat-Margaritas

We have a Kumquat tree in our backyard and I honestly never know what to do with them!  Now I do.  As they say about lemons, when life gives them to you, make lemonade…well, apparently kumquats and tequila are a thing too!  Who knew?

Kumquat Margaritas

  • 1 Pint Kumquats (About 40)
  • 2 Medium Limes
  • 1 Cup Water
  • 1/4 Cup Sugar
  • 3/4 Cup Silver Tequila
  • 1/4 Cup Grand Marnier
  • 3 Cups Crushed Ice
  • 3 TBLS Kosher Salt
  • 4 wedges of lime (for serving)

Pressing down, roll the limes on your counter, or a cutting board, to release the juice.  Cut your limes in half, remove the seeds, and put 3 of the halves in your blender container.  Cut the remaining half in half again, then use the wedges to wet the rims of your margarita or old fashioned glasses, dip the rims in the salt, and set aside.  Drop the lime wedges into the blender container.  Slice the kumquats in half, remove the seeds, and add them to the blender container.  Add water to the blender and puree until mostly smooth.

Pour the mixture through a fine mesh sieve into a medium saucepan, pressing the solids to extract as much liquid as possible.  Discard skins and pulp.  Add sugar and bring to a boil over high heat.  Reduce heat to a simmer and cook, stirring occasionally, until thick and syrupy, 20-25 minutes.  Let cool to room temperature, about 15 minutes, then refrigerate until cold, about 1 hour.

Mix tequila and Grand Marnier with 1/3 Cup of the kumquat reduction.  Serve over crushed ice in the salt rimmed glasses with a wedge of lime.  Makes 3 Drinks (about 2/3 Cup each)  #ThisGirlLovesToEat