Amazing Lemon Everything Sauce

There’s no way around it, when you are dieting or following a low carb lifestyle, you will get tired of the same old, go-to, chicken or fish recipes.  It’s inevitable.  You can avoid this by keeping a stockpile of flavorful sauces to change up your routine.  This lemon sauce is one I’ve used forever!  It found it in the November 2014 edition of Cooking Light Magazine, and it’s a perfect solution to chicken burn out!  This sauce is so versatile that you can spoon it over any style chicken or fish, use it on veggie kebabs, drizzle it over a pile of zoodles, sauteed or steamed asparagus, spinach, broccoli, cauliflower, or even dip luscious steamed artichoke leaves in it!

Amazing Lemon Sauce

  • 2 Cups Unsalted Chicken Stocklemoneverythingsauce
  • 3 Large Eggs
  • 2 TBLS Grated Lemon Zest
  • 2 + 1/2 TBLS Fresh Lemon Juice
  • 1/2 tsp Kosher Salt
  • 1 TBLS Olive Oil

Heat the chicken stock over medium-high heat in a heavy, medium saucepan to 180° or until tiny bubbles form around the edge. Do not boil.  Once you reach the tiny bubble stage, turn the heat down as low as you can.

Combine the eggs, lemon zest, lemon juice, and salt in the bowl of your stand mixer fitted with the wire whip attachment.  Beat on medium until the eggs are frothy and lighter in color.  If you don’t have a stand mixer, you can use a hand blender or whisk by hand in a medium bowl or use your Vitamix or blender.

Slowly add about a cup of the hot chicken stock into the egg mixture 1/4 cup at a time, while stirring on low speed, or lightly by hand, constantly with a whisk.

Once you’ve mixed the cup of stock in, add the egg, lemon, and stock mixture back to the pot, stirring to combine.  Warm the sauce gently, until it thickens enough to a spoon. Turn off the heat.

Whisk in the olive oil to finish and serve warm over your favorite meat, fish or vegetables.  #ThisGirlLovesToEat

Nutrition Information (per 2 TBLS)

  • 19 Calories
  • 1.4 g Fat
  • 1.5 g Protein
  • <1 g Carbs
  • 28 mg Cholesterol
  • 84 g Sodium
  • 5 mg Calcium

Low Carb & Gluten Free Brownies

avocadobrowniesAlthough I’m not a daily dessert eater, I do have a wicked love of anything chocolate.  These #KetoFriendly brownies satisfy that love without ruining my diet goals.  #ThisGirlLovesToEat

Keto Avocado Brownies

  • 2 Ripe Avocados
  • 4 Large Eggs
  • 6 TBLS Unsweetened Creamy Peanut Butter
  • 1/2 Cup Bob’s Red Mill Paleo Baking Mix
  • 2 tsp Baking soda
  • 2/3 cup Cocoa powder, unsweetened
  • 2/3 cup Xylitol (Sugar Substitute)
  • 1/2 tsp Kosher salt
  • 2 tsp Vanilla extract, pure
  • 1/2 Cup Butter
  1. Preheat oven to 350° and line a 8”-x-8” square pan with parchment paper. In a blender or food processor, combine all ingredients and blend until smooth.
  2. Transfer batter to prepared baking pan and smooth top with a spatula.
  3. Bake until brownies are soft but not at all wet to the touch, 40 – 45 minutes. Let cool 25 to 30 minutes before slicing and serving.

Salted Lime Sweet Potato Chips

sweetpotatochipsI’m a savory snack girl, but don’t want to completely derail my hard earned Keto gains by cheating with a bag of store bought potato chips.  What’s a snacker to do?  This snacker chooses to spend her carbs on a healthier version of sweet potato chips, without the store bought preservatives and additives.  #ThisGirlLovesToEat

Salted Lime Sweet Potato Chips

  • 4 Medium Sweet Potatoes (or yams)
  • 1 TBLS Corn Starch
  • Olive Oil Spray
  • 4 Limes
  • Freshly Ground Sea Salt
  1. Preheat oven to 425° and place oven safe cooling racks on 2 baking sheets.
  2. Wash sweet potatoes and thinly slice with a very sharp kitchen knife or mandolin.
  3. Place sweet potato slices in a bowl and cover them with warm water and corn starch. Soak for 15-20 minutes.
  4. Remove the potatoes from the water and dry very well with a paper towel.
  5. Lay a single layer of potatoes on each rack and spray each side of the potato slice with olive oil spray.
  6. If you have a small spray bottle, fill it with your lime juice & spritz top side lightly with the lime juice.  If you don’t have a spray bottle, drizzle the lime juice lightly over your potatoes.
  7. Lightly salt the tops then bake for 15 – 25 minutes (depending on thickness of slices), flipping the potato slices half way through the baking process. Check the potato chips frequently, it may take less time if your chips are sliced extra thin, to make sure that they don’t burn! Remove from oven and allow to cool for 5-10 minutes before serving.

Nutrition Information (Serving Size 1 oz):

  • 24 Calories
  • 0 g Fat
  • 4 g Carbs
  • <1 g Protein

Jalapeno Popper Chicken Casserole

There’s nothing better than finding out one of your favorite guilty pleasures is #KetoFriendly!  Thanks to Christina Cherrier at #EatWell101 one of my favorites, chicken jalapeño poppers, is now an easy to make casserole!  Winna Winna Chicken Dinner! 😉 #ThisGirlLovesToEat

jalapenopopperchickencasseroleJalapeño Popper Chicken Casserole

  • 2 lbs (900g) boneless, skinless, chicken breast cooked and shredded (about 3-4 chicken breasts)
  • 1/2 teaspoon garlic powder
  • 8 oz (225g) cream cheese, softened
  • 1/2 cup (125ml) heavy cream or milk
  • 1/4 cup (60ml) chicken stock
  • 1/2 pound (125g) jalapeño peppers (about 5-6 peppers)
  • 4 oz (125g) sharp cheddar cheese, grated
  • 1/2 teaspoon paprika
  • 1/2 cup crumbled crispy bacon

Preheat your oven to 375˚F (190ºC). Lay shredded cooked chicken in a 13 x 9″ casserole dish. Season with garlic powder, paprika, and pepper.

Whisk together heavy cream, cream cheese, and chicken stock. Spread the mixture evenly over shredded chicken.

Wash the jalapeño peppers and cut the tops off. Remove the seeds and stems if you want it milder, or leave some if you want more spicy. Cut the peppers into strips and lay them on top of the cream cheese. Sprinkle the cheddar cheese on top.

Bake for 20 minutes or until bubbly and hot. Remove from oven 5 minutes before cooking is complete and sprinkle with bacon; then return for the remaining cooking time. Garnish the jalapeño popper chicken casserole with fresh chopped parsley. Enjoy!

Notes:

  • Serve warm on a bed of cauliflower rice, with a side salad, sautéed spinach, or veggies like broccoli, or Brussels sprouts.
  • This recipe is naturally gluten free, low carb, and Keto friendly.

Air Fryer Chicken Kebabs

chickenonrachOne way to meal prep for the week is to do kebabs in the air fryer.  Not only is it fast, but it’s a perfect way to measure out exactly what you’re eating.  Today I made chicken kebabs and put them together with 3 different sides for 3 different healthy meals this week.  These can easily be laid atop a bed of fresh spinach topped with olive oil and salt & pepper, beside a green salad, or on a mound of cauliflower mash.  Except for needing to remove and heat the kebabs separately with the salad, it’s a quick & easy minute in the microwave for a hearty weekday lunch or dinner.  #ThisGirlLovesToEat

Air Fryer Chicken Kebabs

  • 1 – 12 oz Chicken Breast, Trimmed (I used chicken breast fillets)
  • 1 Medium Zucchini, Cut into 1/2″ Slices
  • 18 Plum or Cherry Tomatoes
  • 6 Bamboo Skewers or metal skewers supplied with rack
  • 3 TBLS Low Carb BBQ Sauce

Cut the skewers (if using bamboo skewers & necessary) with a pair of kitchen shears, down to just short of the length of your Air Fryer Tray.  Soak the skewers in water for 10-15 minutes.

Cut your chicken into about 1″ Chunks and toss in 3 TBLS low carb BBQ sauce.

Thread each skewer with 3 slices Zucchini (About 1 oz), 3 plum or cherry tomatoes, 2 oz chicken breast cut into 4 chunks.  Start and end with a piece of zucchini for stability and alternate pieces of chicken and cherry tomato with a piece of zucchini in the middle.

If you have a rack for your air fryer (for holding skewers), place as many skewers as will fit without crowding (mine holds 3).  Cook for 9-10 minutes at 350° F then remove cooked skewers and finish cooking the rest.  Brush with more BBQ if desired.

Nutrition Information (Serving Size 2 Skewers)

  • 166  Calories
  • 1.2 g  Fat
  • 10 g  Carbs
  • 28 g  Protein

Chicken Bacon Ranch Balls

chickenbaconranchballsAppetizers and small plates are the easiest way to stay on target when I’m trying to lose a few pounds or clean up my diet.  These chicken, bacon, ranch meatballs are perfect with a small salad and a side of cauliflower mash for an easy weeknight dinner and a great way to snack without guilt at tailgate parties!  Low carb, nut free, gluten free, grain free, and, best of all for me, #KetoFriendly!

Chicken Bacon Ranch Balls

  • 1 Pound Ground Chicken
  • 12 Slices Thick Cut Bacon
  • 1/4 Cup Shredded Sharp Cheddar Cheese
  • 1 Large Egg, Beaten
  • 1 tsp Dried Dill
  • 1 tsp Garlic Powder
  • 1 tsp Onion Powder
  • 1/2 tsp Dried Parsley
  • 1/2 tsp Salt
  • 1/4 tsp Freshly Ground Pepper
  1. Preheat oven to 425° F and line baking sheet with foil and baking rack. Lay bacon strips on baking rack in even layer. Bake bacon in oven until crispy, about 15-20 minutes depending on thickness of bacon.  Crumble bacon into small pieces. (Dispose of foil from baking sheet or use second baking sheet.) Decrease oven heat to 375 degrees and line baking sheet with parchment paper.
  2. To a large mixing bowl, add ground chicken, crumbled bacon, shredded cheddar, egg, and spices. Using hands, mix together until thoroughly combined. Form mixture into equal-sized balls, about 1 1/2 tbsp of mixture per ball, place on prepared baking sheet, and lightly press down to slightly flatten. Bake until golden brown and cooked throughout, 25-30 minutes.
  3. Remove poppers from oven, allow to cool slightly, and serve with low carb ranch dressing drizzled on balls or on the side.  #ThisGirlLovesToEat

Nutrition Information – Serving 1 Ball (Makes 16 Balls)

  • 116  Calories
  • 9 g   Fat
  • 0 g   Carbs
  • 9 g   Protein


Moscow Mule Popsicles

moscowmulepopsiclesSummer is Coming!  Can you think of a better way to cool off on a hot summer day than with a boozy adult popsicle?  What if it was a Keto treat to boot?

Making them is as easy as combining 3 ingredients, pouring them into an ice pop mold, sliding them into the freezer, and keeping your grubby hands off of them until they have time (overnight is best) to form into decadent boozy refreshment on a stick.

Moscow Mule Popsicles


Combine ingredients in mixing glass or pitcher. Divide among 6 freezer pop molds, close securely,­ and freeze until solid (ideally overnight).

After pops are removed from freezer, they melt fairly quickly to a consistency like granita or firm slushy; serve with straws and cups, if you like.  Makes 6.

Tip:  I used the Ozera Reusable Popsicle Molds with Tray & Cleaning Brush.  The popsicles released quick & clean, they are dishwasher safe, BPA free, and have a build in drip tray for catching any boozy goodness that tries to melt away.  #ThisGirlLovesToEat
View the recipe on Wine Enthusiast Magazine

Low Carb Spinach Wraps

spinachwraps
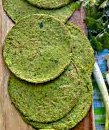
Since going Keto, I’ve missed sandwiches and wraps, so I’m always on the lookout for a low carb replacement.  Today I tripped across a simple recipe I could adapt for spinach based wraps that I can use for lunches or even burritos! #ThisGirlLovesToEat

Quick & Easy Spinach Wraps

  • 1/2 – of a 16 oz bag of Frozen Spinach (defrosted)
  • 3 Large Eggs
  • 1/2 tsp Psyllium Husk Powder
  • 1/4 tsp Xanthan Gum
  • 1/8 tsp Freshly Ground Sea Salt
  • 1/8 tsp Freshly Ground Black Pepper
  • 1/4 Cup Mozzarella Cheese
  • Olive Oil Cooking Spray
  1. Defrost spinach, then squeeze out all of the water.
  2. Put the spinach and all other ingredients in your blender or Vitamix.
  3. Process for 1-2 Minutes, gradually increasing your speed, until all ingredients are combined and very smooth.
  4. Add in 1/2 Cup Mozzarella Cheese.  Blend another 15-30 Seconds.
  5. Lightly spray a small skillet with the olive oil spray (I used a 6 1/3″ Le Crueset Skillet) and put on stove with flame set to medium-high heat.
  6. After about 30 seconds, lower heat to medium and pour about 1/2 of the batter in the middle of the pan.
  7. Using a spatula spread the batter out to make a tortilla shape – the mix will be thick but not unspreadable, just keep spreading until you have created an even, thin disc.
  8. Cook for 2-3 minutes, you should see bubbles popping like when cooking a pancake, or until the edges start to shrink away; check if cooked by lifting the edge: if it lifts easily, you can now flip your tortilla over and cook the other side for about another minute.
  9. Remove from pan, cool on a wire rack, and fill with your favorite sandwich or wrap fillings.

Cool completely and make sure wraps are dry before storing in a sealed container, between pieces of parchment or waxed paper, in the refrigerator.  Can be frozen in zip bags as well.

Nutrition Information per wrap (makes 3 large wraps):

  • 168  Calories
  • 6 g  Fat
  • 3 g  Carbs
  • 9 g  Protein

Skip the Take-Out Beef & Broccoli

Clean eating isn’t hard if you put a little thought into it.  I love Chinese take-out but hate all of the carb-heavy thickeners and calorie bomb, sugary sauces that are used in restaurant fare.  A few tweaks, and a little make-ahead prep, lets me put this weeknight staple on the table in under 15 minutes after work!  The substitutions I made are also #KetoFriendly, which is something this busy Keto girl definitely loves. #ThisGirlLovesToEat

BeefAndBroccoli

Keto Beef & Broccoli

  • 3 TBLS Low Sodium Soy Sauce
  • 2 TBLS Olive Oil (I used garlic infused)
  • 2 TBLS Toasted Sesame Oil
  • 2 TBLS Clam Juice
  • 1 TBLS Apple Cider Vinegar
  • 1 tsp Garlic Powder
  • 1 tsp Onion Powder
  • 1 tsp Freshly Grated Ginger
  • 1/2 tsp Red Pepper Flakes (or more to taste)
  • 1/2 tsp Xanthan Gum

In a small bowl, whisk together all ingredients EXCEPT the Xanthan gum and set aside.

  • 1 Pound Lean Beef Sirloin, Boneless Ribeye, Flat Iron, or Flank Steak, sliced very thinly across the grain
  • 2 Cups Broccoli Florets
  • 1 TLS Olive Oil
  • 2 Crushed Garlic Cloves (I use 2 tsp jarred crushed garlic)
  • 1/2 tsp Freshly Ground Sea Salt
  • 1/2 tsp Freshly Ground Black Pepper
  • 1 TBLS Sliced Green Onions  (Scallions)
  • 2 TBLS Sliced Almonds (if desired)
  • 1 TBLS Toasted Sesame Seeds (if desired)

Put the sliced beef and 1/3 of the marinade in a quart sized zip bag, seal and put in the refrigerator to marinate for 4-6 hours (while your’re at work all day) or overnight.

Do ahead tip:  Stir fry the broccoli until it’s just crisp-tender (3-4 minutes) in 1 – 2 TBLS olive oil over medium-high heat, then remove from pan to a large zip bag or covered bowl and put in the refrigerator.

When you are ready to assemble your dish, using a large skillet, (I use my 4.5 quart high sided Dutch oven) heat the olive oil over medium-high heat.  Discard the marinade and place the beef into your pan.  If you’ve sliced your beef nice and thin, it should take only 2-3 minutes per side to brown.  Remove the beef to the bowl with the broccoli and add the reserved 2/3 marinade, salt & pepper to the pan.  Cook for about 2 minutes then stir the Xanthan Gum into the sauce.  Cook another minute or two, or until the sauce has thickened to a desired consistency and add the meat & broccoli back to the pan to coat in the sauce and warm through.  Add the Green Onions in the last few seconds of cooking.

Serve over cooked cauliflower rice and top with sliced almonds & toasted sesame seeds if desired.

Nutrition Information (Serves 6)

  • 203 Calories
  • 14 g Fat
  • 1.3 g Carbs
  • 15.5 g Protein

Coconut Lime Cauliflower Rice

Lime-Coconut-Cauliflower-Rice

A new spin on a Keto staple.

This recipe is so versatile that it could be:


  • A side dish for chicken, seafood, beef, pork, or grilled vegetables
  • A base layer for a sweet flavored (like Keto Sweet & Sour Chicken) Asian inspired main dish bowl
  • A bed for kebabs
  • A layer in a cold chicken salad
  • A taco or burrito ingredient, or even
  • Chilled and served as a “rice pudding” type dessert.

Tip:  This dish is better a day (or at least a few hours) after it’s been made and refrigerated, then reheated.

Coconut Lime Cauliflower Rice

  • 1 TBLS Butter
  • 1 Clove Garlic, Crushed into a Paste (I use jarred, crushed garlic)
  • 1 Medium-Large Head Cauliflower, Riced (About 6 Cups)
  • 1/4 tsp Salt
  • 1 Cup Lite Coconut Milk
  • 1 TBLS Lime Juice
  • Zest from 1 Lime

Heat the butter and garlic in a skillet over medium heat.

Steam the riced cauliflower in a microwave steamer for 3 minutes.  Add the cauliflower rice to the skillet, sprinkle with salt and cook for 2 minutes before adding in the coconut milk and lime juice. Cook the rice for 8 minutes stirring frequently until the rice has completely softened and most of the liquid has evaporated.

Sprinkle the rice with lime zest before serving.  #ThisGirlLovesToEat

Nutrition Information per serving – 6 Servings

  • 68 Calories
  • 2.5 g Fat
  • 6 g Carbohydrates
  • 2 g Protein