Broiled Flat Iron Steak

broiledflatironsteakWhen I’m meal prepping, I like to multi-task.  Often I have something in the air fryer, the pressure cooker, in the oven, and even in the broiler simultaneously.  It’s easy to do that when you pre-plan your meals and know your timeline.

I love this marinade for flat iron steak (or any cut of beef) because it allows me to do other dishes while the meat sits in the bag to absorb all of the flavors for four hours.  If you marinate the steak while you’re at work during the day, you’ll be ready to have a great meal on the table for your family in under 30 minutes.  Steam a package of vegetables in the microwave and it’s a simple clean up as well!

Broiled Flat Iron Steak

  • 2 Pounds Flat Iron Steak
  • 2/3 Cup Red Wine (I used full-bodied Westerly Merlot)
  • 1/2 Cup Olive Oil
  • 4 Cloves Crushed Garlic
  • Freshly Ground Sea Salt & Black Pepper

Combine all of the marinade ingredients in a gallon sized zip bag then add the raw steak to the bag.  Push out as much air as you can then zip the bag closed.  Place the bag in the refrigerator and allow the meat to marinate for 4-6 hours.

Set the oven temperature to broil.

Line a broiler pan with foil and top with either the broiler pan top or a roasting rack if one fits on top of your pan.  My oven is a Kitchen Aid and didn’t come with a broiler pan.  There was an option to order one by mail or $49 + Tax and shipping.  I searched the part number on Amazon and found it (with the included roasting rack) for $34.51 + free shipping!  I use it all the time!

When oven has reached it’s temperature, place the pan under the broiler and cook for 6-8 minutes per side.  If you have a nice thick piece of steak you should get a medium end result.  Adjust your time up or down to fit your desired degree of doneness.

For most tender result, slice diagonally across the grain.  #ThisGirlLovesToEat

Nutrition Information (8 – four ounce servings)

  • 331 Calories
  • 26 g Fat
  • 3 g Carbs
  • 21 g Protein
Advertisement

Thai Street Chicken

thaistreetchickenKeith Schroeder of Cooking Light Magazine wrote a book, and received a James Beard Foundation Focus on Health Book Award, Mad Delicious – The Science of Making Healthy Food Taste Amazing!, in 2014 that doesn’t just talk about the what and how of cooking great meals, but also the why.  This recipe is one that was featured in both his book and the magazine, and perfectly illustrates why guests at his table love every dish this Atlanta chef prepares!

If you replace the brown sugar with Sukrin Gold, this recipe can easily become a flavorful, Keto Friendly meal.

Thai Street Chicken

  • 1/2 Cup Cilantro Stems
  • 1/2 Cup Parsley Stems
  • 1 TBLS Brown Sugar
  • 2 tsp White Pepper
  • 2 TBLS Fish Sauce
  • 1 TBLS Oyster Sauce
  • 4 crushed garlic cloves (I use 4 tsp of jarred, crushed garlic)
  • 1 + 1/2 Pounds Boneless/Skinless Chicken Thighs (About 6)
  • Olive Oil Cooking SPray
  • 1 Cup Julienned Carrots
  • 2 Peeled/Scored/Sliced Cucumbers
  • 12 Sprigs Fresh Cilantro
  • 2 Limes Cut into Wedges

Put the parsley & cilantro stems into a gallon sized zip bag and, using a rolling pin or can of vegetables, bruise the stems by pushing down and rolling over the stems from outside the bag.  Add the brown sugar (or brown sugar alternative), the white pepper, the fish and oyster sauces, and the garlic and combine.  Add the chicken, zip the bag closed, and massage the marinade into the thighs.  Refrigerate for 30 minutes.

While the chicken is marinating, prepare the dipping sauce.

Thai Dipping Sauce

  • 6 TBLS White Vinegar
  • 6 TBLS Brown Sugar (or Brown Sugar Alternative)
  • 1/4 Cup Shaved Shallots
  • 4 TBLS Fresh Lime Juice
  • 1 tsp Fish Sauce
  • 2 Minced Thai Bird Chiles
  • 1 Clove Garlic, Crushed (1 tsp jarred crushed garlic)
  • 1/2 tsp White Pepper

In small saucepan, over medium heat, bring the vinegar, sugar and shallots to a boil.  Simmer for another 10 minutes then remove from heat.  Puree with an immersion blender (or in a blender).

Cool and then stir in the lime juice, fish sauce, chiles, garlic and white pepper.

After 30 minutes, removed the marinated chicken from the zip bag and discard the remaining marinade.  Put the chicken thighs on metal skewers.  Make sure your chicken is long and flat, you don’t want cubes with this style chicken.

Heat an oven safe (if cooking in your oven) grill pan, sprayed with Olive Oil cooking spray, over medium-high heat (or in a 300° oven).

Place the skewers on the hot grill and cook for 15 minutes.  Flip the skewers over and cook another 15 minutes.  You should be able to easily pull off a cooked piece of the chicken when it’s done.  Remove the skewers from the heat, slide the chicken off of the skewers and place on one side of a platter to rest for 10 minutes.

On the other side of the patter, in rows, line up the carrots, cucumber, cilantro springs, and lime wedges.  Serve with the dipping sauce.

Amazing Lemon Everything Sauce

There’s no way around it, when you are dieting or following a low carb lifestyle, you will get tired of the same old, go-to, chicken or fish recipes.  It’s inevitable.  You can avoid this by keeping a stockpile of flavorful sauces to change up your routine.  This lemon sauce is one I’ve used forever!  It found it in the November 2014 edition of Cooking Light Magazine, and it’s a perfect solution to chicken burn out!  This sauce is so versatile that you can spoon it over any style chicken or fish, use it on veggie kebabs, drizzle it over a pile of zoodles, sauteed or steamed asparagus, spinach, broccoli, cauliflower, or even dip luscious steamed artichoke leaves in it!

Amazing Lemon Sauce

  • 2 Cups Unsalted Chicken Stocklemoneverythingsauce
  • 3 Large Eggs
  • 2 TBLS Grated Lemon Zest
  • 2 + 1/2 TBLS Fresh Lemon Juice
  • 1/2 tsp Kosher Salt
  • 1 TBLS Olive Oil

Heat the chicken stock over medium-high heat in a heavy, medium saucepan to 180° or until tiny bubbles form around the edge. Do not boil.  Once you reach the tiny bubble stage, turn the heat down as low as you can.

Combine the eggs, lemon zest, lemon juice, and salt in the bowl of your stand mixer fitted with the wire whip attachment.  Beat on medium until the eggs are frothy and lighter in color.  If you don’t have a stand mixer, you can use a hand blender or whisk by hand in a medium bowl or use your Vitamix or blender.

Slowly add about a cup of the hot chicken stock into the egg mixture 1/4 cup at a time, while stirring on low speed, or lightly by hand, constantly with a whisk.

Once you’ve mixed the cup of stock in, add the egg, lemon, and stock mixture back to the pot, stirring to combine.  Warm the sauce gently, until it thickens enough to a spoon. Turn off the heat.

Whisk in the olive oil to finish and serve warm over your favorite meat, fish or vegetables.  #ThisGirlLovesToEat

Nutrition Information (per 2 TBLS)

  • 19 Calories
  • 1.4 g Fat
  • 1.5 g Protein
  • <1 g Carbs
  • 28 mg Cholesterol
  • 84 g Sodium
  • 5 mg Calcium

Italian Sausage Burgers with Garlicky Spinach

Italian-Sausage Burgers with Garlicky SpinachI love a big, juicy cheeseburger but they can get boring after a while.  This recipe is one that will definitely take away the boredom and might even be one that I can whip out at a tailgate this football season to change it up a bit!

This can easily be #KetoFriendly by eliminating the ciabatta roll and eating with a knife & fork on top of the spinach.  #ThisGirlLovesToEat but this girl loves her skinny jeans too!

Italian Sausage Burgers with Garlicky Spinach

  • 10 ounces baby spinach
  • 2 tablespoons extra-virgin olive oil, plus more for brushing
  • 2 garlic cloves, minced
  • 1 teaspoon anchovy paste (optional)
  • Salt
  • 1 pound sweet or hot Italian sausages (or a combination of both), casings removed
  • 4 slices of provolone cheese
  • 1/4 cup sun-dried-tomato pesto
  • 4 round ciabatta rolls, split and toasted  (If you’re Keto, skip the rolls)

In a large skillet, bring 1/4 inch of water to a boil. Add the spinach and cook, stirring, until just wilted, about 1 minute; drain and press out as much water as possible. Wipe out the skillet.

In the same skillet, heat the 2 tablespoons of olive oil until shimmering. Add the garlic and anchovy paste and cook over high heat, stirring, until fragrant, 1 minute. Add the spinach, season with salt and stir just until coated, about 10 seconds.

Light a grill or preheat a grill pan. Using slightly moistened hands, form the sausage meat into four 4-inch patties, about 3/4 inch thick. Brush the burgers with oil and grill over moderate heat until browned and crusty on the bottom, about 5 minutes. Carefully flip the burgers. Top with the cheese and grill until the burgers are cooked through and the cheese is melted, about 5 minutes longer. Spread the pesto on the rolls. Top with the burgers and spinach and serve.

These burgers would be great paired with a fruit forward zinfandel like a 2015 Sextant Zinfandel Holystone out of Paso Robles, CA or an Artezin 2016 Old Vine Family Farmed Sustainable Zinfandel out of Mendocino County, CA.   #GirlsGoneWine

Indoor Grilled Swordfish

swordfish

One of the things I hear people complain about when summer ends is that cook-out season is over.  I’ve always thought that was odd.  My family grilled year round.  I remember my dad and grandpa out on the deck of our mountain cabin, even in the snow, grilling steaks on the BBQ.  For some people though, the harshness of the winters where they live just doesn’t make that an option.  Solution: their oven’s broiler and a good broiler pan!

broilerdrawerI’d never consider it if I had to use the hard to clean, slide out broiler pan drawer that was part of my mom’s 1970’s oven.  Thankfully technology has improved enough to encourage me to give indoor broiling a try.  When I upgraded my slide in range there was a parts order form included. The only thing that caught my eye was an easy to clean broiler pan with a roasting rack.  Once I had the part number it was easy to find, and get it faster, on Amazon.  As soon as I got it, I started experimenting with fast & easy indoor grilling recipes for the winter.  This #KetoFriendly swordfish recipe was so good that my husband forgave me for paying #WholeFoods prices for the #WildCaught delicacy.kitchenaidwhirlpoolbroilerpan

Indoor Grilled Swordfish

  • 2 – 4 to 6 oz swordfish fillets
  • Juice of 1/2 a lemon
  • 1/4 cup butter melted
  • freshly ground sea salt
  • freshly ground black pepper
  • 3 cups arugula
  • sliced cucumber
  • sliced tomato
  • bottled red wine vinaigrette
  • olive oil spray

Swordfish:

Remove the slotted top of the broiler rack and set aside.  Line the inside of the broiler pan with aluminum foil (for easy cleanup).  Spray the roasting rack lightly with olive oil spray and place onto the foil lined broiler pan.

Liberally salt and pepper one side of the swordfish steaks and place, seasoned side down, onto the prepared rack. Salt and pepper the top side of the swordfish steaks, then squeeze your lemon over each steak until you’ve gotten about 2 tsp of juice on each steak.  Brush each steak with the melted butter. Put them under the broiler, about 2 to 3 inches from the heat source. Broil the steaks for about 4 minutes.

Turn the swordfish steaks, squeeze your lemon over each steak, brush each with melted butter and broil for 5 minutes longerDO NOT OVERCOOK or your swordfish will get rubbery.  When your steaks have finished cooking, remove the broiling pan from the oven, set on the stove, and tent loosely with foil while you prepare your salad.

Salad:

Divide the arugula between 2 plates.  Divide your tomatoes between the plates, with then just to the side of the arugula.  Stack & quarter your cucumber slices then divide them between the plates, scattering them atop the arugula.  If it’s avocado season, and you like them, slice one up and add it to the top of your salad.  Lightly dress your salad with 2 TBLS red wine vinaigrette.  You don’t want to overpower the lightness of your fish.  #ThisGirlLovesToEat

Lazy Sunday Skewers

salmonskewers

You work all week looking forward to the two long lazy days off, but how often do you just get to relax and do absolutely nothing on Saturday and Sunday?  If you’re like most people, there’s errands to run, kids to shuttle to one sporting or social event or another, family gatherings, and maybe even date night on one or both nights so that by Sunday you’re exhausted.

The last thing you want to do on your one day off is spend it in the kitchen.  Skewers are the perfect solution to that cooking dilemma.  Skewers are also great for grilling at picnics, parties, & tailgates.

No matter which recipe you are making there are some simple kebab tips:

  1. Cut the ingredients into similar-size pieces and prepare as the recipe directs.
  2. If marinating, refrigerate 1 hour for fish and up to overnight for meat and poultry.
  3. Preheat a grill to high.
  4. If using wood skewers, soak skewers in water for at least 20 minutes.
  5. Thread the ingredients onto skewers.
  6. Use 2 skewers per kebab, side-by-side, to keep the food from spinning and make flipping on the grill easier.
  7. Grill the kebabs, turning, until the ingredients are charred and cooked to desired doneness, 3 to 15 minutes.

Rosemary Lamb: rosemarylambskewers

  • Marinate 1 pound cubed lamb leg in 1/2 cup olive oil, the juice of 1 lemon, 4-6 stems fresh rosemary (leaves stripped), 3 smashed garlic cloves, and salt & pepper.
  • Skewer with 1 to 1+1/2  inch chunks of zucchini & grill.

Garlic-Dijon Salmon:

  • Marinate 1 to 1+1/2 pounds de-boned, skinned, chunks wild-caught salmon in 1/4 cup olive oil, the juice of 1/2 a lemon, 3 minced garlic cloves, 2 TBLS chopped fresh parsley, freshly ground sea salt and pepper.
  • Skewer with slices of lemon between the salmon. Grill for 3 to 4 minutes per side.
  • Serve on top of grilled asparagus spears.

caesarskewer

Chicken Caesar:

  • Mix 1 pound ground chicken2 tablespoons Caesar dressing1/2 cup Parmesan1/4 cup breadcrumbs and 1 teaspoon lemon zest.
  • Form into mini burgers, skewer and grill.
  • Serve on whole romaine leaves with grilled crusty garlic bread and more dressing.

bucaneerporkskewerBuccaneer Pork:

Boil 1 cup water, 3 TBLS each salt and brown sugar, 2 tsp pickling spices & 4 garlic cloves. Add 1 cup rum, then cool. Add 1 pound cubed pork tenderloin and marinate. Skewer with pineapple chunks. Grill, basting with bottled jerk sauce.  Serve over steamed white rice#ThisGirlLovesToEat

Italian Sausage Burgers with Garlicky Spinach

Italian-Sausage Burgers with Garlicky Spinach

I love a big, juicy cheeseburger but they can get boring after a while.  This recipe is one that will definitely take away the boredom and might even be one that I can whip out at a tailgate this football season to change it up a bit!

Italian Sausage Burgers with Garlicky Spinach

  • 10 ounces baby spinach
  • 2 tablespoons extra-virgin olive oil, plus more for brushing
  • 2 garlic cloves, minced
  • 1 teaspoon anchovy paste (optional)
  • Salt
  • 1 pound sweet or hot Italian sausages (or a combination of both), casings removed
  • 4 slices of provolone cheese
  • 1/4 cup sun-dried-tomato pesto
  • 4 round ciabatta rolls, split and toasted

In a large skillet, bring 1/4 inch of water to a boil. Add the spinach and cook, stirring, until just wilted, about 1 minute; drain and press out as much water as possible. Wipe out the skillet.

In the same skillet, heat the 2 tablespoons of olive oil until shimmering. Add the garlic and anchovy paste and cook over high heat, stirring, until fragrant, 1 minute. Add the spinach, season with salt and stir just until coated, about 10 seconds.

Light a grill or preheat a grill pan. Using slightly moistened hands, form the sausage meat into four 4-inch patties, about 3/4 inch thick. Brush the burgers with oil and grill over moderate heat until browned and crusty on the bottom, about 5 minutes. Carefully flip the burgers. Top with the cheese and grill until the burgers are cooked through and the cheese is melted, about 5 minutes longer. Spread the pesto on the rolls. Top with the burgers and spinach and serve.

These burgers would be great paired with a fruit forward zinfandel like a 2015 Sextant Zinfandel Holystone out of Paso Robles, CA or an Artezin 2016 Old Vine Family Farmed Sustainable Zinfandel out of Mendocino County, CA.   #ThisGirlLovesToEat

Houston’s Hawaiian Rib-Eye

Someone at Bon Appétit was able to sweet talk the people in charge of the vault of recipes for some of the most ordered favorites at Hillstone’s (Houston’s Steakhouse) and I couldn’t be more excited!

One of my favorite items on the Houston’s menu is the Hawaiian Rib-Eye Steak.  It’s obviously one of their most popular items as well, since it it the featured photo on their website!  It’s juicy, full of flavor and hits the table with a hint of sizzle from the grill. What more could anyone ask for? #ThisGirlLovesToEat

hawaiian-rib-eye-steak

Houston’s Hawaiian Rib-Eye Steak (Serves 4)

Steak

  • 2 cups pineapple juice
  • ½ cup soy sauce
  • ½ cup sugar
  • 5 tablespoons apple cider vinegar
  • 2 teaspoons toasted sesame oil
  • ⅓ cup chopped white onion
  • 1 – 1-inch piece ginger, peeled, finely chopped
  • 2 – 1-inch-thick bone-in rib-eye steaks (about 3 pounds total)
  1. Whisk pineapple juice, soy sauce, sugar, vinegar, and oil in a small bowl until sugar is dissolved.  Add onion and ginger.
  2. Set aside 2 Tbsp. marinade for butter.
  3. Transfer remaining marinade to a large resealable plastic bag. Add steaks and seal bag, pressing out excess air. Chill at least 1 day.
  4. Remove steaks from marinade, pat dry, and let sit until room temperature, about 1 hour.

Do Ahead: Steaks can be marinated 3 days ahead. Keep chilled.

Butter

  • 4 tablespoons unsalted butter, room temperature
  • 2 teaspoons toasted sesame oil
  • Kosher salt
  1. Whisk butter and oil in a medium bowl to combine. Vigorously whisk in reserved marinade; season with salt.
  2. Transfer to the center of a sheet of parchment paper and roll up into a log. Chill until firm, at least 1 hour.

Do Ahead: Butter can be made 3 days ahead. Keep chilled.

Preparation

  1. Build a two-zone fire in a charcoal grill for direct (medium-high coals) and indirect (medium-low coals) heat.  Alternatively, heat a gas grill to high just before cooking, leaving one burner on low.
  2. Season steaks very lightly with salt (omit this step if marinating more than 24 hours).
  3. Grill over high heat, turning, until steaks are well browned and beginning to char around edges, about 4 minutes.
  4. Transfer to cooler part of grill and continue to cook until an instant-read thermometer inserted into thickest part of steaks registers 120° for medium-rare. (Alternatively, cook in a grill pan over medium-high heat, turning steaks every couple of minutes.)
  5. Transfer steaks to a wire rack.
  6. Slice butter into ¼”-thick rounds and divide between steaks.
  7. Let rest at least 10 minutes before slicing.

Serve alongside a baked sweet potato with a pat of butter & a dusting of cinnamon and sugar (or a splash of maple syrup) and a simple mixed green salad.

If you’re interested in the things I may not devote an entire blog post to like:  health articles, my favorite recipes, fun drinks, food facts, nutritional information, restaurant reviews, gadget reviews, photos and other things that make my mouth water, I have a community page on Facebook:  https://www.facebook.com/ThisGirlLovesHerFood

Cook Your Meat Perfectly With Science

cowchart

I love beef of nearly any cut, but I can’t stand it if it’s overcooked! I saw a headline for a way to cook it to a perfect degree of doneness every time and clicked on it immediately.  I did get struck by the giggles at the name of the not-so-new online cooking tool created by three girls at MIT in 2013: Cook My Meat.

Come on, COOK MY MEAT?  It doesn’t give your inner 12 year old the giggles?

Alright, I’ll revert to my adult self.

  • #CookMyMeat was created by Kate Roe, Laura Breiman, and Marissa Stephens, students at MIT in 2013.
  • You fill in the cut of your meat, the temperature you’ll be cooking it at, then you’re shown an approximation of how your meat will turn out: red, pink or well-done/overcooked

cook-my-meat1

You can even compare two different cooking methods and get a side by side result of how the steaks (or turkey or tuna steak) will turn out: 

  • Flip every 4 minutes
  • Flip every 15 seconds
  • Sear then cook low
  • Sous Vide then Liquid Nitrogen
  • Enter your own parameters

cookmymeat2

On_Food_And_Cooking_UScover
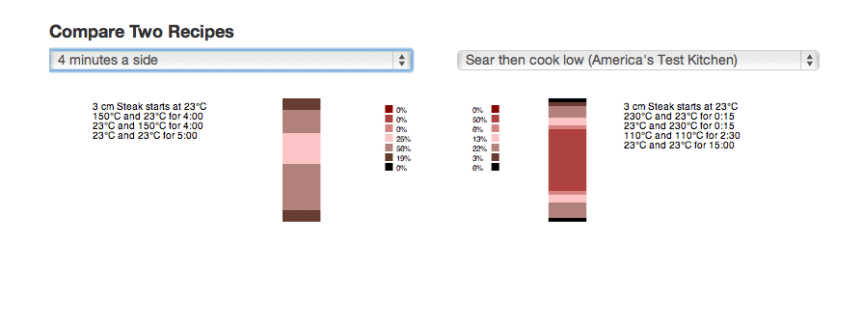
The girls developed the tool by calculating heat diffusion in the meat at each time step with the Crank-Nicolson method, using On Food and Cooking: The Science and Lore of the Kitchen as a guidepost for protein denaturaization temperatures.

The book, published in 1984, has been described by Alton Brown as “the Rosetta stone of the culinary world.”

I just wanted something simple to tell me how long to cook my steak so it comes out a bit more than medium-rare but not all the way to medium in that almost warm pink state.  This is a bit high tech and too much science, so I’ll be sticking to my instant read thermometer and my trusty steak knife & mag-light in the dark to make sure it’s not overcooked.  #ThisGirlLovesToEat

If you use Facebook and are interested in the things I may not devote an entire blog post to: things like health articles, my favorite recipes, fun drinks, food facts, nutritional information, restaurant reviews, photos and other things that make my mouth water, I have a very active page on Facebook you can visit too: https://www.facebook.com/ThisGirlLovesHerFood

Pressure Cooker “BBQ” Brisket

bbqbriskmacncheeseburgInspired by this picture of a decadent BBQ Brisket Macaroni & Cheese Burger, tweeted out yesterday by @FoodPorn, which, while it looks like an orgasm in food form, few of us could actually take down in a single seating, I went to the internet to find the recipe so I could surprise my husband with this culinary monstrosity.

But, lo and behold, there was no credit for the photo, and no linked recipe.  What’s a Food-a-holic to do?  Careful deconstruction of the photo and reconstruction using my favorite recipes for the parts, of course!

So, obviously there is a pile of gorgeous, juicy BBQ’d Brisket piled on top of what looks like a lightly toasted brioche bun.  I see some beautiful, but not overly gooey macaroni and cheese and a hint of coleslaw spilling out the side, but what I am not seeing is a burger patty.  Hmmm.

After carefully considering my options I went to my recipe file to start on the main ingredient:  the BBQ Brisket.  Because I am still essentially confined to my bed or a recliner with my leg elevated from my surgery 10 days ago, manning the BBQ is out of the question, so plan B is immediately enacted: Pull the pressure cooker out of the cupboard!

Lucky for me (and hopefully for you!), Emeril Lagasse has recipes adapted for using the pressure cooker on his website, and brisket happens to be one of them!

Emeril’s Fastest BBQ Brisket

  • 4 1/2 pounds beef brisket, trimmed and quartered
  • 3 tablespoons Worcestershire sauce
  • 1 tablespoon sweet paprika
  • 1 tablespoon dry mustard
  • 1 teaspoon chili powder
  • 4 tablespoons olive oil
  • 2 teaspoons salt
  • 1 medium yellow onion, diced
  • 6 cloves garlic, sliced
  • One 12-ounce bottle lager beer
  • 1 cup your favorite barbecue sauce
  • 1/4 cup light brown sugar
  • Brioche or slider buns for serving
  • your favorite coleslaw for serving (we’ll be using my recipe for coleslaw: Lisa’s Kicked Up Memphis Coleslaw)
  • Place the brisket in a large bowl, add the Worcestershire sauce, paprika, mustard, chili powder, and 2 tablespoons of the olive oil, and toss. Let the brisket marinate for 30 minutes at room temperature.
  • When ready to cook, season the beef with the salt.
  • Set a 6-quart pressure cooker to the “browning” program. When it is hot, add the remaining 2 tablespoons olive oil and brown the beef in batches. As it is browned, transfer the beef to a baking sheet and set aside.
  • When all the brisket is browned, add the onion and garlic to the pressure cooker and cook for 6 minutes, or until the onion is soft and slightly translucent. Return the beef to the pressure cooker and add the beer, barbecue sauce, and brown sugar. Close and lock the lid, and set to “high pressure” for 1 1/2 hours.
  • Open the pressure release valve, allow the steam to escape, and carefully unlock and open the lid. Transfer the beef to a baking sheet, and when it is cool enough to handle, thinly slice it across the grain.
  • Set the pressure cooker to the “simmer” program. Return the beef and any accumulated juices to the cooker and cook for 15 to 20 minutes.
  • Serve the brisket on slider buns, topped with the coleslaw.
  • The brisket can be stored in an airtight container in the refrigerator for up to 3 days or frozen for up to 3 months.

If you are going to also add macaroni and cheese, as in the photo above and like I am, I will be using my recipe for Fired-Up Mac & Cheese.

If you are on Facebook and are interested in the things I may not devote an entire blog post to, recipes, food facts, nutritional information, photos and other things that make my mouth water, I have a page on Facebook you can visit too:  https://www.facebook.com/ThisGirlLovesHerFood