Quick Keto Crab Cakes

crabcake1After accomplishing my goal of losing the 33 pounds that 3 foot surgeries and 5 breast surgeries (for a total of 8 in a 5 year span) piled on me, in just 12 weeks, it’s become second nature to convert my regular recipes into #KetoFriendly versions.

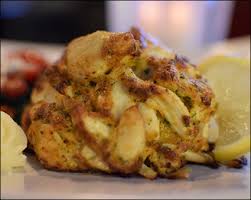
See how this quick & easy version of crab cakes compares versus other preparations in terms of net carbs per serving of 1 crab cake:

  • Whole Wheat Breadcrumbs – 15 g carbs
  • Panko – 11 g carbs
  • Almond Meal (or Almond Flour but not super-finely ground) – 1.5 g of carbs

Quick Keto Crab Cakes

  • 1 Large Egg
  • 2 TBLS Mayonnaise
  • 2 tsp Dijon Mustard
  • 1/4 tsp Ground Pepper
  • Pinch of Salt
  • Pinch of Cayenne Pepper
  • 1/4 Cup Chopped Scallions
  • 12 oz Jumbo Lump Crabmeat, drained and picked over
  • 1/2 Cup Almond Meal (or Regular Grind Almond Flour)
  • 2 TBLS Extra Virgin Olive Oil
  • Lime Wedges

Whisk egg, mayonnaise, mustard, pepper, salt, and cayenne pepper in a medium bowl.  Squeeze in the juice from one wedge of lime and whisk until well combined.  Stir in scallions and almond meal.  Fold in the crab.  Form the mixture into four patties.

Heat oil in large skillet over medium-high heat until shimmering.  Add the crab cakes and cook, turning once, until golden brown, 4 to 5 minutes per side.  Serve with lime wedges and cilantro lime aioli (if desired).

Serving size: 1 Crab Cake  Calories 265 / Fat 15 g / Carbs 1.5 g / Protein 22 g

crabcake2

Cilantro Lime Aioli

  • 1/3 Cup Fresh Cilantro
  • Juice and Zest of 1 medium Lime
  • A drop or 3 😉 Franks Red Hot (or your favorite) Hot Sauce
  • 1 tsp Ground Cumin
  • 3/4 Cup Mayonnaise
  • 1 Large Clove Garlic

Combine all ingredients in your blender container and process until well combined.

Serving size: 1 TBLS  Calories 100 / Fat 11 g / Carbs 0 g / Protein 0 g

Quick Cream of Mushroom Soup

Every once in a while you just need a hearty, comforting bowl of soup, especially one that can be put on the table in under 30 minutes!  The great thing about this soup is that it’s #LactoVegetarian and #KetoFriendly so you can keep it as a #GoToRecipe for when you are hosting friends or family who may be making those lifestyle choices.

Once you’ve seen how quick and easy this soup is to make, and how great it tastes,  you’ll never stress about hosting Keto or Vegetarian friends for lunch or dinner again!

creamofmushroomsoup

Keto Cream of Mushroom Soup

  • 24 oz Sliced Cremini Mushrooms (681 g)
  • 4 TBLS Butter (1/4 Cup)
  • 4 TBLS Olive Oil (1/4 Cup)
  • 2 Cloves Garlic, Chopped
  • 3 Green Onions (Scallions) Chopped – Reserve 2 TBLS for garnish
  • 2 Cups Vegetable Stock
  • 1 Cup Heavy Whipping Cream
  • 1/4 Cup Brandy
  • Salt and Pepper to taste
  • 4 Pieces Thick Cut Bacon (Cooked), Chopped – Leave out for Vegetarian
  • Sour Cream or Crème Fraîche (optional)

In a 5 qt Dutch oven, or large saucepan, heat the oil and butter until melted.  Add the garlic and  all but 2 TBLS of the chopped green part of the scallions to the pan.  Sauté for about 3 minutes.

Add all of the mushrooms and stir to make sure they are well coated with the oil/butter.  Season liberally with salt and pepper.  Cook over medium heat for 10-12 minutes, or until mushrooms have released their moisture and are softened.  Add the vegetable stock and cook and stir for 5 minutes, or until soup reaches a boil.

Remove soup from heat and, using an immersion blender, process the soup until it reaches your desired consistency.  I like mine to have pretty good texture, so I leave it kind of chunky.  If you like it really smooth, you can process the mushroom/broth mixture in batches, in your Vitamix or blender and return the blended mixture to the pan.  Make sure that you don’t over fill your blender container and watch your steam build up.

Once you’ve processed your soup, stir in your whipping cream and chopped, cooked bacon (if you’re not keeping it Vegetarian) and heat soup over low heat, but do not let it reach a boil.  Stir in the brandy for the last minute of heating and then turn off heat.  Keep covered until ready to serve.  #ThisGirlLovesToEat

Serving suggestions:

  • Top with a dollop of sour cream or crème fraîche
  • Top with chopped chives or scallions
  • Top with additional chopped bacon

Rainy Day Keto Veggie Chicken Soup

bssoup
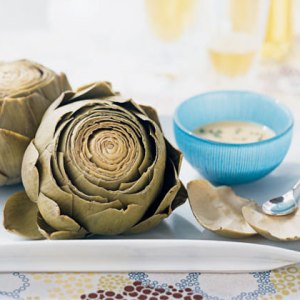
While veggies are admittedly limited during the most strict part of Keto, there are many ways to incorporate very flavorful options in moderation.  This soup, that serves 4 is one of them.  The higher #GoodFat to calorie percentage, from the olive oil, is perfect for Keto followers!

Keto Carmelized Veggie Chicken Soup

  • 1 Carrot chopped (About 1/2 Cup)
  • 1/ 2 Cup (about 3)  chopped Green Onion (green & white parts)
  • 3 Cloves Garlic, chopped
  • 8 TBLS Olive Oil, divided
  • 10 – 12 Raw Brussels Sprouts, cut in half
  • 6 Raw Asparagus Spears, chopped into about 1/2″ chunks
  • 4 Cups Chicken Broth
  • 1 Cup Cooked Chicken Breast either shredded or cut into 1/2″ chunks
  • Freshly Ground Sea Salt & Pepper to taste
  • 2 TBLS Italian Parsley, chopped

In a 2 quart saucepan, heat 2 TBLS olive oil over medium-high heat.  Add carrot, green onions, and garlic and cook for 1-2 minutes.  Add another 2 TBLS olive oil and cook another minute while stirring.  Remove carrot mixture from the pan.

Add 2 TBLS olive oil, Brussels sprouts and asparagus and cook, stirring occasionally, 6-8 minutes.  Add last 2 TBLS olive oil and return the carrot mixture to the pan.  Cook an additional 3-4 minutes, or until green vegetables start to brown.

Stir in broth.  Bring to a boil.  Reduce heat to low.  Add the cooked chicken.  Cook 5 to 7 minutes or until vegetables are tender.  Garnish each serving with chopped parsley and shredded Parmesan cheese (if desired).  We spiced ours up with Frank’s Red Hot sauce, but you could also add dried red pepper flakes if you like your soup spicy.  #ThisGirlLovesToEat

** Vegetarian option:  Omit the chicken and swap vegetable broth for the chicken broth.

Nutrition Information:  330 Calories  40.5g Fat  21g Protein  1g Carbs

Weekday Breakfast to Go

eggbitesbaconmushroom

Despite following a #KetoLifestyle, I am lazy about making myself a proper weekday breakfast.  Before switching to the low-carb diet plan, I often ate oatmeal with berries, but, because that isn’t allowed on Keto, I’ve had to give that particular pleasure up. 😦

I need to do a better job of spacing my meals out, so I’m not starving by the time I finally eat a meal, so I’m diving into the craze I’ve heard about but never tried: pressure cooker egg bites.  Once I looked at the recipes, I realized that they’re like a fluffy crustless quiche or hand held omelette, two things I love!  Since I have the tools I need to make them: an electric pressure cooker and a silicone egg mold insert, there’s no excuse left for not giving them a try.

There are many different ways to make egg bites.

  • Pure Protein – featuring just eggs, or eggs and meat
  • Vegetarian – using an egg substitute and vegetables, tofu, vegetarian cheese, or other sources of protein
  • Combo – eggs, meat, cheese and veggies
  • Super Combo – eggs, meat, cheese, veggies, plus cottage or ricotta cheese

Pressure Cooker Egg Bites

  • 6 Large Eggs
  • 1 Cup Shredded Cheese – I used 1/2 Cup Sharp Cheddar & 1/2 Cup Pepper Jack
  • 2 TBLS Finely Diced Onion
  • 2 TBLS Finely Chopped Bacon
  • 1/4 Cup Chopped Baby Bella Mushrooms (Or Fresh Spinach Stemmed, Rolled and Chopped)
  • 1/4 Cup Yellow or Green Zucchini Diced (Or Bell Peppers)
  • 1/4 tsp Oregano (if desired)
  • 1/2 tsp Cajun Spice (if desired)
  • Freshly Ground Sea Salt and Black Pepper

Using olive oil spray, or olive oil and a paper towel, grease each individual cup of the egg bite mold.

In a pan, over medium heat, cook the bacon until browned, then add onion, mushrooms and zucchini and cook for about 3 minutes.

Whisk the eggs with your seasonings in a large measuring cup.  Add the cooked vegetable mixture and cheese and stir well.  Spoon or pour mixture into egg bite mold. It should fill all spots evenly to just below rim.  Cover egg mold with foil.

Add 1 1/2 c water to pressure cooker. Put trivet inside and set egg bite mold onto the trivet.  Close the lid and set machine to cook on high for 8 minutes and then allow to release naturally for 4 minutes.  Immediately remove the egg bite mold and then remove the egg bites from the mold so that they do not sit in any water that has pooled in the bottom of the mold.

Eat immediately or cool sightly then store in a covered container in the refrigerator to reheat for later meals or snacks.  #ThisGirlLovesToEat


Nutrition Facts
Calories 109 Calories from Fat 63
Total Fat 7g
Saturated Fat 4g
Cholesterol 137mg
Sodium 208mg
Potassium 96mg
Total Carbohydrates 1g
Protein 7g
Vitamin A 14.6%
Vitamin C 15.1%
Calcium 12%
Iron 4.4%


Refrigerator Soup

Nothing is worse than realizing that you have a refrigerator full of expensive groceries that are nearing the end of their freshness and it’s time to cook them or they’ll go to waste.

Unfortunately I found myself in just that situation today, with a ridiculous amount of post New Year’s ingredients that were past their ability to be frozen, so a week’s worth of meal prepping #BetterThanUsual meals began with a soup that my family usually boycotts.  I’m betting that, with a pound of filet mignon, they won’t be boycotting this one. 😉  The bonus for me is that it is #KetoFriendly

refrigeratorsoup

Refreigerator Keto Soup

  • 2 Pieces Thick Cut Bacon cut into 1/4″ strips
  • 1/2 Medium Onion chopped
  • 2 cloves garlic minced
  • 2 tsp Fresh Thyme chopped
  • 3/4 Pound Uncooked Steak cut into 1/2″ pieces
  • 2 Medium Zucchini chopped into 1/2″ chunks
  • 3 Roma Tomatoes chopped (or 1 can diced tomatoes)
  • 1 Can Campbells Condensed Beef Consommé + 1 Can Water or 2 Cans Beef Broth
  • Freshly ground sea salt & pepper to taste

Over medium heat, cook bacon until almost brown.  Add in onion, garlic, and thyme.  Sauté about 5 minutes then add the steak and cook over medium-low heat until just browned.

Add the tomatoes and zucchini and stir in.  Cook about 5 minutes.  Salt and pepper liberally.  Add the consommé and water to the pan and return the heat to medium.  Bring the soup to a boil then return to the heat to medium-low and continue to cook for about 30 minutes.

Serve with shredded cheddar or pepper jack cheese over to top if desired.  #ThisGirlLovesToEat

Indoor Grilled Swordfish

swordfish

One of the things I hear people complain about when summer ends is that cook-out season is over.  I’ve always thought that was odd.  My family grilled year round.  I remember my dad and grandpa out on the deck of our mountain cabin, even in the snow, grilling steaks on the BBQ.  For some people though, the harshness of the winters where they live just doesn’t make that an option.  Solution: their oven’s broiler and a good broiler pan!

broilerdrawerI’d never consider it if I had to use the hard to clean, slide out broiler pan drawer that was part of my mom’s 1970’s oven.  Thankfully technology has improved enough to encourage me to give indoor broiling a try.  When I upgraded my slide in range there was a parts order form included. The only thing that caught my eye was an easy to clean broiler pan with a roasting rack.  Once I had the part number it was easy to find, and get it faster, on Amazon.  As soon as I got it, I started experimenting with fast & easy indoor grilling recipes for the winter.  This #KetoFriendly swordfish recipe was so good that my husband forgave me for paying #WholeFoods prices for the #WildCaught delicacy.kitchenaidwhirlpoolbroilerpan

Indoor Grilled Swordfish

  • 2 – 4 to 6 oz swordfish fillets
  • Juice of 1/2 a lemon
  • 1/4 cup butter melted
  • freshly ground sea salt
  • freshly ground black pepper
  • 3 cups arugula
  • sliced cucumber
  • sliced tomato
  • bottled red wine vinaigrette
  • olive oil spray

Swordfish:

Remove the slotted top of the broiler rack and set aside.  Line the inside of the broiler pan with aluminum foil (for easy cleanup).  Spray the roasting rack lightly with olive oil spray and place onto the foil lined broiler pan.

Liberally salt and pepper one side of the swordfish steaks and place, seasoned side down, onto the prepared rack. Salt and pepper the top side of the swordfish steaks, then squeeze your lemon over each steak until you’ve gotten about 2 tsp of juice on each steak.  Brush each steak with the melted butter. Put them under the broiler, about 2 to 3 inches from the heat source. Broil the steaks for about 4 minutes.

Turn the swordfish steaks, squeeze your lemon over each steak, brush each with melted butter and broil for 5 minutes longerDO NOT OVERCOOK or your swordfish will get rubbery.  When your steaks have finished cooking, remove the broiling pan from the oven, set on the stove, and tent loosely with foil while you prepare your salad.

Salad:

Divide the arugula between 2 plates.  Divide your tomatoes between the plates, with then just to the side of the arugula.  Stack & quarter your cucumber slices then divide them between the plates, scattering them atop the arugula.  If it’s avocado season, and you like them, slice one up and add it to the top of your salad.  Lightly dress your salad with 2 TBLS red wine vinaigrette.  You don’t want to overpower the lightness of your fish.  #ThisGirlLovesToEat

Lazy Sunday Skewers

salmonskewers

You work all week looking forward to the two long lazy days off, but how often do you just get to relax and do absolutely nothing on Saturday and Sunday?  If you’re like most people, there’s errands to run, kids to shuttle to one sporting or social event or another, family gatherings, and maybe even date night on one or both nights so that by Sunday you’re exhausted.

The last thing you want to do on your one day off is spend it in the kitchen.  Skewers are the perfect solution to that cooking dilemma.  Skewers are also great for grilling at picnics, parties, & tailgates.

No matter which recipe you are making there are some simple kebab tips:

  1. Cut the ingredients into similar-size pieces and prepare as the recipe directs.
  2. If marinating, refrigerate 1 hour for fish and up to overnight for meat and poultry.
  3. Preheat a grill to high.
  4. If using wood skewers, soak skewers in water for at least 20 minutes.
  5. Thread the ingredients onto skewers.
  6. Use 2 skewers per kebab, side-by-side, to keep the food from spinning and make flipping on the grill easier.
  7. Grill the kebabs, turning, until the ingredients are charred and cooked to desired doneness, 3 to 15 minutes.

Rosemary Lamb: rosemarylambskewers

  • Marinate 1 pound cubed lamb leg in 1/2 cup olive oil, the juice of 1 lemon, 4-6 stems fresh rosemary (leaves stripped), 3 smashed garlic cloves, and salt & pepper.
  • Skewer with 1 to 1+1/2  inch chunks of zucchini & grill.

Garlic-Dijon Salmon:

  • Marinate 1 to 1+1/2 pounds de-boned, skinned, chunks wild-caught salmon in 1/4 cup olive oil, the juice of 1/2 a lemon, 3 minced garlic cloves, 2 TBLS chopped fresh parsley, freshly ground sea salt and pepper.
  • Skewer with slices of lemon between the salmon. Grill for 3 to 4 minutes per side.
  • Serve on top of grilled asparagus spears.

caesarskewer

Chicken Caesar:

  • Mix 1 pound ground chicken2 tablespoons Caesar dressing1/2 cup Parmesan1/4 cup breadcrumbs and 1 teaspoon lemon zest.
  • Form into mini burgers, skewer and grill.
  • Serve on whole romaine leaves with grilled crusty garlic bread and more dressing.

bucaneerporkskewerBuccaneer Pork:

Boil 1 cup water, 3 TBLS each salt and brown sugar, 2 tsp pickling spices & 4 garlic cloves. Add 1 cup rum, then cool. Add 1 pound cubed pork tenderloin and marinate. Skewer with pineapple chunks. Grill, basting with bottled jerk sauce.  Serve over steamed white rice#ThisGirlLovesToEat

Tart & Spicy Butternut Squash Soup

It’s finally cool enough in California, at least once the sun goes down, to justify getting the stock pot out to make a hearty soup that can serve as dinner with a big salad & crusty bread that can then live on as a couple of workday lunches too!  Great for the wallet AND the waistline!  This soup is so rich, and has such depth of flavor, that it seems like a cheat meal, which is a plus during the non-stop holiday feast season.

Tart & Spicy Butternut Squash Soup

  • 1  –  2 to 2+1/2 lb Butternut Squash (Peeled/Seeded/Chopped into about 1″ Cubes)
  • 1  –  Large Granny Smith Apple (Cut into about 1″ Pieces – seeds/core/stem removed)
  • 3  –  Large Ribs Celery Chopped
  • 3  –  Carrots (Peeled/Chopped into about 1″ Pieces)
  • 1  –  Medium Yellow Onion (Peeled/Chopped into about 1″ Pieces)
  • 4  –  TBLS Butter
  • 1  –  32 oz Container Organic Chicken Stock
  • 1+1/2 Cups Water
  • Freshly Grated Sea Salt (To Taste)
  • Freshly Cracked Pepper (To Taste)
  • Freshly Ground Nutmeg (1/4 tsp)
  • Cinnamon (1/2 to 1 tsp)
  • Cayenne Pepper (Pinch to 1/8th tsp)
  • Chopped Parsley (if desired)

Melt the butter in a medium stockpot and add the onions, carrot and celery.  Sauté over low heat about 10 minutes.  When onions just start to brown, add the squash, apple, salt, pepper, chicken stock and water.  Turn the heat up to medium-high and bring just to a boil.  When bubbles appear at the edges of the pan, reduce heat to low.  Cover pan tightly and simmer soup for 45 minutes until squash is completely softened.

Remove soup from heat and either process soup until smooth using your blender (I use my Vitamix) and returning to the pan after processed or an immersion blender as shown in the video.

Once soup is smooth, add the Nutmeg, Cinnamon and Cayenne.  Adjust spices to taste.

I came across a video that uses the same technique I use to make my soup, with slightly different measurements, and it’s much prettier, so I’ll give the standard #ShoutOut and #HighFive to Simply Recipes for producing a great (and quick) video that I can also use to demonstrate how to assemble my soup!

I’ve already been remiss at keeping up with my blog, so not having to produce a video is a definite bonus! #ThisGirlLovesToEat

Eat All You Want & Don’t Gain! Really!

fruitsEveryone who follows this blog regularly knows that #ThisGirlLovesToEat.  Anything that lets me eat unregulated amounts of food that I like, except kale #IHateKale, without bursting out of my jeans is something that is going to catch my attention. Sounds unlikely?  I know, I doubt it too, but I’m willing to be a guinea pig!

According to scientists, you can eat as much of these 14 foods and not gain any weight due to their high water and low-starch fiber content while containing very few calories.

These foods are not high in muscle building (and fat burning) protein, but they are filled with vitamins, nutrients and antioxidants.

Celery:celery

  • 95% Water
  • Contains potassium, folate, fiber, and 30% of your daily requirement of vitamin K
  • Has about 6 calories per serving
  • Eat when fresh – celery loses most of it’s nutritional benefits after 5-7 days

Kale:

  • One of the few foods that contains an Omega 3 Fatty Acid
  • 1 Cup has about 33 calories
  • High in vitamins and folate

Blueberries:three-blueberries

  • Champion in the Antioxidant world – has more than any other fruit
  • 1 cup has about 85 calories
  • 1 cup has 14% of the recommended daily requirement of fiber

Cucumbers:

  • 96% Water
  • 16 calories per serving
  • Seeds and skin contain most of the Fiber and Vitamin A (Beta-Carotene) which is good for your eyes

Tomatoes:tomatoes

  • Contain lycopene, a carotenoid, which helps fight against chronic diseases
  • High in vitamins A, C, and B2, as well as folate, chromium, potassium, and fiber
  • 1 medium-sized tomato has about 25 calories

Grapefruit:

  • High in fiber, which stabilizes blood sugar helps you feel fuller for longer
  • 1/2 a grapefruit has about 50 calories
  • High in Vitamin C and folate
  • Grapefruit has been found to help in weight loss, lowering cholesterol, and improving digestion

Broccoli:Broccoli

  • Contains an anticarcinogen known as sulforaphane
  • Most nutritious when eaten raw or steamed
  • Contains vitamins A, C, E, and K
  • 1 serving contains 20% of your daily fiber requirement
  • 1 serving has about 31 calories

Cantaloupe:cantaloupeandhoneydow

  • Contains beta carotene, a form of vitamin A that promotes healthy eyes
  • Contains potassium
  • Contains more than 100% of your daily recommended value of vitamins A and C
  • 90% Water
  • 1 serving has about 55 calories

Cauliflower:

  • Contains antioxidants and phytochemicals to help fight off chronic disease
  • An excellent source of folate, fiber, and vitamins C and K
  • Has about 25 calories per serving

Blackberries:The blackberry

  • Blackberries can help your brain to stay alert
  • Rich in vitamin C as well as antioxidants known as bioflavonoids
  • Can aid with digestion
  • Tightens tissue, leading to younger-looking skin
  • 1 serving has about 62 calories

Lettuce:

  • Whether Romaine, Green Leaf, Red Leaf, Romain, etc.: 96% Water
  • Folate, iron, and vitamins A and C
  • 1 serving has 10 to 20 calories

Oranges:

  • High in Vitamin C which is crucial in collagen production: oranges help keep skin free of damage and looking good
  • Medium orange has about 80 calories
  • You need to eat the white stuff under an orange’s skin (pith) it contains a lot of fiber, which helps lower cholesterol and blood sugar levels

Strawberries:strawberries-on-white-plate

  • Fat-free, sodium-free, and cholesterol-free (healthy for the heart)
  • More vitamin C in one serving of strawberries than there is in one orange
  • Tons of polyphenols, a type of antioxidant
  • A good source of potassium and fiber
  • 1 Cup of strawberries has about 50 calories

Honeydew Melons:

  • Only slightly more calories per serving than cantaloupe (64)
  • Contains over half of the recommended daily value of vitamin C
  • Contains over half of the recommended daily value of copper, which is crucial for healthy skin

If you are interested in more scientific details, you can read the original article on INSIDER.

If you’re interested in the things I may not devote an entire blog post to like:  health articles, my favorite recipes, fun drinks, food facts, nutritional information, restaurant reviews, gadget reviews, photos and other things that make my mouth water, I have a community page on Facebook:  https://www.facebook.com/ThisGirlLovesHerFood

Artichokes With Roasted Garlic Wine Dip

home-artichokeI love living in Southern California where there is the availability of local fruits and vegetables in the stores, as well as what is trucked and flown in from around the country and from other parts of the world, pretty much year-round.  It really makes cooking and eating fun! #ThisGirlLovesToEat 

One of the few things that I do have to be patient for are artichokes.  Nowhere grows them as big and meaty as we do in California.  In fact, 99.99% of all commercially grown artichokes are grown in California. 

CAF_fest_logo-2017Since I happen to love them, it’s a pretty good thing that Lt. Governor Gavin Newsom named artichokes the Official State Vegetable of California on April 10, 2013.  Artichokes from California are so fabulous that they’ve had their own festival for the past 56 years: Castroville Artichoke Food & Wine Festival.

Some people dip their leaves in mayonnaise (which makes me want to gag), others in various aiolis, dips or other concoctions, but I’ve been a ridiculous creature of habit for as long as I can remember, eating my artichokes one way and one way only: dipping each succulent leaf into a bowl of melted butter.  Occasionally I may deviate in the preparation of the steam that surrounds my artichoke, adding some white wine, maybe some garlic or some lemon to the water, but I never deviate on my buttery leaf bath.  Until now.

This long forgotten recipe I’d clipped from the May 2007 edition of Cooking Light Magazine convinced me to change my ways (at least temporarily).

artichokes-dip-ck-1622453-x

Artichokes With Roasted Garlic Wine Dip

  • 2 whole garlic heads
  • 4 medium artichokes (about 3 1/2 pounds)
  • 1/2 cup dry white wine
  • 1 cup organic vegetable broth (such as Swanson Certified Organic)
  • 1 tablespoon butter
  • 1/4 teaspoon kosher salt
  • Chopped fresh parsley
  1. Preheat Oven to 400° F.
  2. Remove white papery skin from garlic heads (do not peel or separate the cloves). Wrap each head separately in foil. Bake at 400° F for 45 minutes; cool 10 minutes. Separate cloves; squeeze to extract garlic pulp. Discard skins.
  3. Cut off stems of artichokes, and remove bottom leaves. Trim about 1/2 inch from tops of artichokes. Place artichokes, stem ends down, in a large Dutch oven filled two-thirds with water; bring to a boil. Cover, reduce heat, and simmer 45 minutes or until a leaf near the center of each artichoke pulls out easily. Remove artichokes from pan.
  4. Combine half of garlic pulp and wine in a small saucepan; bring to a boil. Cook 2 minutes. Add broth; cook until reduced to 1/2 cup (about 8 minutes). Remove from heat; stir in butter and salt. Pour mixture into a blender; add remaining half of garlic pulp. Remove center piece of blender lid (to allow steam to escape); secure blender lid on blender. Place a clean towel over opening in blender lid (to avoid splatters). Blend until smooth. Sprinkle dip with parsley, if desired. Serve dip with warm artichokes.

If you’re interested in the things I may not devote an entire blog post to like:  health articles, my favorite recipes, fun drinks, food facts, nutritional information, restaurant reviews, gadget reviews, photos and other things that make my mouth water, I have a community page on Facebook:  https://www.facebook.com/ThisGirlLovesHerFood