Cheesy Jalapeno Cauliflower Cakes

cheddarjalapenocaulicakesThese little flavor bombs are #KetoFriendly and are a multi-meal side dish option.  They can be a nice hot side to meat, savory stews, or even beside eggs for breakfast.  You can even eat them cold, or at room temperature, beside a spicy bowl of chili!

Cheesy Jalapeño Cauliflower Cakes

  • 2 Cups Riced Raw Cauliflower
  • 1 Medium Jalapeño, chopped finely
  • 2 Large Eggs, beaten
  • 2 TBLS Melted Butter
  • 1/3 Cup Grated Parmesan Cheese
  • 1 Cup Grated Gouda Cheese
  • 1 Cup Grated Cheddar Cheese
  • 1/4 teaspoon salt
  • 1/4 teaspoon black pepper
  • 1/2 teaspoon garlic powder
  • 1/2 tsp onion powder
  • 1/2 teaspoon baking powder
  • 1/4 cup coconut flour

Preheat oven to 375° F.  Grease a 12 Cup muffin tin with olive oil spray and set aside.

Combine the cauliflower, egg, and jalapeno in a medium bowl.

Combine the grated cheeses and the rest of the dry ingredients, then stir into the cauliflower mixture.

Divide evenly between the 12 muffin cups and bake 30 minutes, or until tops are browned.  Turn off the oven and leave cakes in the oven for another 30-45 minutes.

Store any uneaten cakes in an airtight container in the refrigerator for up to 1 week or in the freezer for up to 3 months.  #ThisGirlLovesToEat

Moscow Mule Popsicles

moscowmulepopsiclesSummer is Coming!  Can you think of a better way to cool off on a hot summer day than with a boozy adult popsicle?  What if it was a Keto treat to boot?

Making them is as easy as combining 3 ingredients, pouring them into an ice pop mold, sliding them into the freezer, and keeping your grubby hands off of them until they have time (overnight is best) to form into decadent boozy refreshment on a stick.

Moscow Mule Popsicles


Combine ingredients in mixing glass or pitcher. Divide among 6 freezer pop molds, close securely,­ and freeze until solid (ideally overnight).

After pops are removed from freezer, they melt fairly quickly to a consistency like granita or firm slushy; serve with straws and cups, if you like.  Makes 6.

Tip:  I used the Ozera Reusable Popsicle Molds with Tray & Cleaning Brush.  The popsicles released quick & clean, they are dishwasher safe, BPA free, and have a build in drip tray for catching any boozy goodness that tries to melt away.  #ThisGirlLovesToEat
View the recipe on Wine Enthusiast Magazine

Low Carb Spinach Wraps

spinachwraps
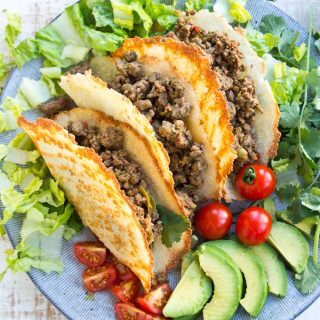
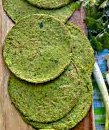
Since going Keto, I’ve missed sandwiches and wraps, so I’m always on the lookout for a low carb replacement.  Today I tripped across a simple recipe I could adapt for spinach based wraps that I can use for lunches or even burritos! #ThisGirlLovesToEat

Quick & Easy Spinach Wraps

  • 1/2 – of a 16 oz bag of Frozen Spinach (defrosted)
  • 3 Large Eggs
  • 1/2 tsp Psyllium Husk Powder
  • 1/4 tsp Xanthan Gum
  • 1/8 tsp Freshly Ground Sea Salt
  • 1/8 tsp Freshly Ground Black Pepper
  • 1/4 Cup Mozzarella Cheese
  • Olive Oil Cooking Spray
  1. Defrost spinach, then squeeze out all of the water.
  2. Put the spinach and all other ingredients in your blender or Vitamix.
  3. Process for 1-2 Minutes, gradually increasing your speed, until all ingredients are combined and very smooth.
  4. Add in 1/2 Cup Mozzarella Cheese.  Blend another 15-30 Seconds.
  5. Lightly spray a small skillet with the olive oil spray (I used a 6 1/3″ Le Crueset Skillet) and put on stove with flame set to medium-high heat.
  6. After about 30 seconds, lower heat to medium and pour about 1/2 of the batter in the middle of the pan.
  7. Using a spatula spread the batter out to make a tortilla shape – the mix will be thick but not unspreadable, just keep spreading until you have created an even, thin disc.
  8. Cook for 2-3 minutes, you should see bubbles popping like when cooking a pancake, or until the edges start to shrink away; check if cooked by lifting the edge: if it lifts easily, you can now flip your tortilla over and cook the other side for about another minute.
  9. Remove from pan, cool on a wire rack, and fill with your favorite sandwich or wrap fillings.

Cool completely and make sure wraps are dry before storing in a sealed container, between pieces of parchment or waxed paper, in the refrigerator.  Can be frozen in zip bags as well.

Nutrition Information per wrap (makes 3 large wraps):

  • 168  Calories
  • 6 g  Fat
  • 3 g  Carbs
  • 9 g  Protein

Sausage, Spinach & Feta Egg Muffins

MuffinStack1I eat a lot of portable egg breakfasts on Keto, like: Bacon Wrapped Omelettes, Pizza Egg Cups; Crustless Veggie Quiche; and Pressure Cooker Egg Bites.  I add in days of berries and yogurt but getting enough protein at breakfast is hard if I don’t include eggs.  Unfortunately I get tired of the same foods, so I need to keep experimenting in the morning.

Sausage, Spinach & Feta Egg Muffins

  • 12 Large Eggs
  • 12 oz Raw Ground Breakfast Sausage
  • 1/2 of a 5 oz Bag Fresh Baby Spinach
  • 1/2 Cup Feta Cheese
  • 1 Cup Half & Half
  • 1/2 tsp Pepper
  • 1/2 tsp Ground Nutmeg
  • 1/2 tsp Crushed Red Pepper Flakes (if desired)
  • Olive Oil Cooking Spray

Spray jumbo muffin tins with olive oil cooking spray & pre-heat oven to 375° F.

Roll spinach leaves and slice thinly.  Combine spinach, feta and raw, crumbled sausage in a bowl and combine.  Divide the mixture evenly between the muffin tins but do not pack down.

Lightly beat the eggs in a medium bowl, beat in the spices, and then the half & half.  Divide the egg mixture between the muffin tins and bake for 30 minutes (if using jumbo muffin tins) or 25 minutes for standard sized muffin tins.  Egg muffins are done when they brown around the edges, pull away slightly from the sides and are set in the middle.

muffintin

Nutrition Information (1 egg muffin)

  • 108 Calories
  • 4 g Fat
  • 1 g Carbs
  • 8 g Protein

Muffins can be kept in a sealed container in the refrigerator for a week or the freezer for a month.  Heat in the microwave 30-45 seconds.  #ThisGirlLovesToEat

Skip the Take-Out Beef & Broccoli

Clean eating isn’t hard if you put a little thought into it.  I love Chinese take-out but hate all of the carb-heavy thickeners and calorie bomb, sugary sauces that are used in restaurant fare.  A few tweaks, and a little make-ahead prep, lets me put this weeknight staple on the table in under 15 minutes after work!  The substitutions I made are also #KetoFriendly, which is something this busy Keto girl definitely loves. #ThisGirlLovesToEat

BeefAndBroccoli

Keto Beef & Broccoli

  • 3 TBLS Low Sodium Soy Sauce
  • 2 TBLS Olive Oil (I used garlic infused)
  • 2 TBLS Toasted Sesame Oil
  • 2 TBLS Clam Juice
  • 1 TBLS Apple Cider Vinegar
  • 1 tsp Garlic Powder
  • 1 tsp Onion Powder
  • 1 tsp Freshly Grated Ginger
  • 1/2 tsp Red Pepper Flakes (or more to taste)
  • 1/2 tsp Xanthan Gum

In a small bowl, whisk together all ingredients EXCEPT the Xanthan gum and set aside.

  • 1 Pound Lean Beef Sirloin, Boneless Ribeye, Flat Iron, or Flank Steak, sliced very thinly across the grain
  • 2 Cups Broccoli Florets
  • 1 TLS Olive Oil
  • 2 Crushed Garlic Cloves (I use 2 tsp jarred crushed garlic)
  • 1/2 tsp Freshly Ground Sea Salt
  • 1/2 tsp Freshly Ground Black Pepper
  • 1 TBLS Sliced Green Onions  (Scallions)
  • 2 TBLS Sliced Almonds (if desired)
  • 1 TBLS Toasted Sesame Seeds (if desired)

Put the sliced beef and 1/3 of the marinade in a quart sized zip bag, seal and put in the refrigerator to marinate for 4-6 hours (while your’re at work all day) or overnight.

Do ahead tip:  Stir fry the broccoli until it’s just crisp-tender (3-4 minutes) in 1 – 2 TBLS olive oil over medium-high heat, then remove from pan to a large zip bag or covered bowl and put in the refrigerator.

When you are ready to assemble your dish, using a large skillet, (I use my 4.5 quart high sided Dutch oven) heat the olive oil over medium-high heat.  Discard the marinade and place the beef into your pan.  If you’ve sliced your beef nice and thin, it should take only 2-3 minutes per side to brown.  Remove the beef to the bowl with the broccoli and add the reserved 2/3 marinade, salt & pepper to the pan.  Cook for about 2 minutes then stir the Xanthan Gum into the sauce.  Cook another minute or two, or until the sauce has thickened to a desired consistency and add the meat & broccoli back to the pan to coat in the sauce and warm through.  Add the Green Onions in the last few seconds of cooking.

Serve over cooked cauliflower rice and top with sliced almonds & toasted sesame seeds if desired.

Nutrition Information (Serves 6)

  • 203 Calories
  • 14 g Fat
  • 1.3 g Carbs
  • 15.5 g Protein

Coconut Lime Cauliflower Rice

Lime-Coconut-Cauliflower-Rice

A new spin on a Keto staple.

This recipe is so versatile that it could be:


  • A side dish for chicken, seafood, beef, pork, or grilled vegetables
  • A base layer for a sweet flavored (like Keto Sweet & Sour Chicken) Asian inspired main dish bowl
  • A bed for kebabs
  • A layer in a cold chicken salad
  • A taco or burrito ingredient, or even
  • Chilled and served as a “rice pudding” type dessert.

Tip:  This dish is better a day (or at least a few hours) after it’s been made and refrigerated, then reheated.

Coconut Lime Cauliflower Rice

  • 1 TBLS Butter
  • 1 Clove Garlic, Crushed into a Paste (I use jarred, crushed garlic)
  • 1 Medium-Large Head Cauliflower, Riced (About 6 Cups)
  • 1/4 tsp Salt
  • 1 Cup Lite Coconut Milk
  • 1 TBLS Lime Juice
  • Zest from 1 Lime

Heat the butter and garlic in a skillet over medium heat.

Steam the riced cauliflower in a microwave steamer for 3 minutes.  Add the cauliflower rice to the skillet, sprinkle with salt and cook for 2 minutes before adding in the coconut milk and lime juice. Cook the rice for 8 minutes stirring frequently until the rice has completely softened and most of the liquid has evaporated.

Sprinkle the rice with lime zest before serving.  #ThisGirlLovesToEat

Nutrition Information per serving – 6 Servings

  • 68 Calories
  • 2.5 g Fat
  • 6 g Carbohydrates
  • 2 g Protein


Air Fryer Mini Keto Pizza Crust / Flat Bread

Finally, I have settled on a recipe for dough that satisfies my need for pizza!  That it’s fast & easy to assemble and I get to make it in my Dash Air Fryer is just a bonus!  Even better, it tastes so good that it can be rolled out into a square, cut in half and used as a thin, savory sandwich bread.

hampestopizza
Ham & Pesto Mini Keto Pizza

Air Fried Mini Pizza Crust / Flat Bread

  • 8 oz Shredded Mozzarella Cheese
  • 2 oz Cream Cheese
  • 1 Large Egg at Room Temperature
  • 2/3 Cup Finely Ground Almond Flour
  • 1/3 Cup Coconut Flour
  • 1/2 tsp Dried Oregano or Basil
  • 1/4 tsp Onion Powder

Put egg, flours and spices into the bowl of your stand mixer fitted with the dough hook.  Do not mix yet.

In a 4 cup microwave safe measuring cup, cook mozzarella cheese and cream cheese on high for one minute.  Stir then cook in additional 30 second increments until all of the cheese is melted and it looks like cheese fondue.

Add to the egg and dry ingredients.  Stir on low speed until combined and a ball forms.

Remove the dough from your bowl roll into a large ball and cut into 4 sections.

Roll 1 section into a ball and, on a piece of parchment paper that will fit in your Air Fryer, roll out the dough and flatten into either a circle or square.

For Mini Pizza Dough:  Put your dough into the air fryer and cook at 350° for 5-7 minutes until the top is browned.  Turn the dough over and remove the parchment paper from the unbrowned side of the dough.  Cook for an additional 3-5 minutes then remove, top with your desired toppings, return to the air fryer and cook until your cheese is melted and begins to brown.  Don’t over sauce your pizza, this is a thin crust.

For Flat Bread:  Put your dough into the air fryer and cook at 350° for 5-7 minutes until the top is browned.  Turn the dough over and remove the parchment paper from the unbrowned side of the dough.  Cook for an additional 5-6 minutes until browned, then remove.  Slice in half and fill with your favorite sandwich ingredients.  #ThisGirlLovesToEat

Cheesy Green Chili Keto Breakfast Casserole

Steve-Swartz-1392x928_editedI’ve been Missing in Action for the past two weeks.  My brother-in-law passed away unexpectedly and cooking has been the last thing on my mind.  Eating however, has continued thanks to the wonderful people of the community of San Clemente, California.  The San Clemente Sunrise Rotary and the neighbors in their Flora Vista community have kept meals on our table round the clock the entire two weeks.  I have never been more  thankful or humbled.  The generosity and outpouring of support has been beyond anything I could have imagined, and I am so very grateful.

Very grateful and now 6 pounds heavier, LOL!  They’ve brought so much comfort food, and what is comfort food typically made up of? Carbs…a Keto dieter’s biggest FOE!  So, it’s time for this girl, who LOVES to eat, to get back on track.

IMG_4545_edited

Cheesy Green Chile Keto Breakfast Casserole

  • 8 Large Eggs
  • 6 oz Trader Joe’s (or any brand) Shredded Swiss & Gruyère
  • 8 oz Shredded Sharp Cheddar Cheese
  • 1 – 4 oz Can Mild Diced Green Chiles (Ortega or any brand)
  • 2 TBLS Bob’s Red Mill Paleo Baking Flour
  • 1/2 Cup Heavy Whipping Cream
  • Freshly Ground Sea Salt & Pepper to taste

Preheat your oven to 350° F, and butter the bottom and sides of a 9 x 13 glass baking pan.

Using a whisk. combine 1/2 of your whipping cream with the flour in a large mixing bowl to make a thick paste, then whisk in the rest of your cream and your eggs and set aside.

Combine your cheeses and put about 1 Cup of it into the bottom of your buttered pan.

Evenly distribute the diced green chiles over the top of the cheese layer.

Give the egg mixture another quick whisk and pour over the top of the chile & cheese in the pan, then sprinkle the remaining cheese on top.

Bake for 25-30 minutes or until the eggs are set in the center.  Mine took about 29 minutes.

Allow the casserole to set about 5 minutes after removing from the oven then cut into 12 pieces.  Serve as is or top with salsa and/or sour cream and chopped green onion or chives if desired.  #ThisGirlLovesToEat

Nutritional Information (12 Servings)

  • 142 Calories
  • 12 g Fat
  • <1 g Carbohydrates
  • 8.5 g Protein

Crispy Keto Taco Shells

Tomorrow is #CincoDeMayo and, if you’re Keto like me, you can feel left out. This recipe for Keto taco shells changes that in a flash! Most people just make a taco shell from cheese, much like the #FatBomb cheese crisps I love, but Sugar Free Londoner made a shell that’s crispy and more like a hard shell, with 1.1 net grams of carbs per shell, that I’m pretty excited about. #ThisGirlLovesToEat

Crispy Keto Taco Shells

  • 2+1/4 Cups Shredded Mozzarella Cheese
  • 1/2 Cup Coconut Flour (25 g)
  • 2 tsp Ground Psyllium Husk

Instructions

  1. Preheat the oven to 175 Celsius / 350 Fahrenheit.

  2. Mix all ingredients in a food processor or with an electric mixer until they resemble small crumbs. 

  3. Line a baking sheet with parchment paper. Draw circles of 6 inch / 15 cm diameter on the parchment. I traced around a small saucepan lid, but you can use any round object that size. 

  4. Scoop 1/4 cup of the taco shell mix onto each circle and spread out inside the circle.

  5. Place a second parchment paper on top and press down the dough with your hands or use a rolling pin. Press down well – you want it nice and compacted

  6. Remove the top parchment paper and bake in the oven for 7 minutes or until the edges of each taco have browned. 

  7. Remove from the oven and hang each taco shell over the side of a large saucepan until cooled. I like to use something a little bit wider than a pan edge, like a piece of sanded, clean 1/2″ dowling, so that there’s more room inside to stuff with fillings.

Nutrition Facts

Amount Per Serving 1 Taco Shell (23 g)

Calories 103 Calories from Fat 57
Total Fat 6.3g Saturated Fat 4.1g
Total Carbohydrates 3.3g Dietary Fiber 2.2gSugars 1.1g
Protein 8g

Spicy Bacon Baby Potatoes

petitepotatoesBeing Keto doesn’t mean you can’t have ANY carbs, in fact, depending on the stage you are at in your weight loss journey, you can actually enjoy a fair amount of carbs as part of your lifestyle maintenance.

At this point in my journey, I am enjoying 20 to 40 grams of carbs a couple of days a week, especially when I want a real sandwich, sweet potato, or something fun like this mini-potato recipe.

One trick I use to control my carb portions is to only prepare small amounts so I am not tempted to gorge myself on them and derail my health goals.  This recipe is perfect for doing just that.

Nutrition Information for this entire recipe (2 servings)

  • Calories 290 (145 ea)
  • Fat 18.5 grams (9.25 g ea)
  • Carbohydrates 22 grams (11 g ea)
  • Protein 7 grams (3.5 g ea)

The potatoes are an excellent source of potassium (more than a banana) and vitamin C.  Petites are also a good source of vitamin B6 and are fat, sodium and cholesterol free.

If you prefer these to be Vegetarian, omit the bacon.  The Vegetarian nutrition information is:  Calories 219  Fat 13.5 g  Carbs 22 g  Protein 3 g

Spicy Bacon Baby Potatoes

  • 5 oz (About 1 Cup or 20) baby/petite potatoes, cut in half lengthwise
  • 4 Slices Bacon, diced while raw (I use kitchen shears)
  • 1 TBLS Olive Oil
  • 1 tsp Chopped Garlic
  • 1/2 tsp Dried Red Pepper Flakes (+/-)
  • Freshly Ground Sea Salt & Pepper to taste

In a skillet heat the oil and red pepper flakes for about 1 minute on medium heat.  Add the bacon and the potatoes.  Cover and cook for about 4 minutes.  Remove the lid, turn the potatoes and finish browning the bacon.  Remove the bacon to a paper towel to drain.  Add the garlic to the potatoes, season with salt and pepper, cover and cook for 3 – 4 more minutes.

When potatoes are fork tender (total of 7-8 minutes cooking time), remove them to a small serving bowl and add the bacon back in.  Toss to distribute and add more red pepper flakes if desired.  Serve warm.  #ThisGirlLovesToEat