

 I love living in Southern California where there is the availability of local fruits and vegetables in the stores, as well as what is trucked and flown in from around the country and from other parts of the world, pretty much year-round. It really makes cooking and eating fun! #ThisGirlLovesToEat
One of the few things that I do have to be patient for are artichokes. Nowhere grows them as big and meaty as we do in California. In fact, 99.99% of all commercially grown artichokes are grown in California.
![]() Since I happen to love them, it’s a pretty good thing that Lt. Governor Gavin Newsom named artichokes the Official State Vegetable of California on April 10, 2013. Artichokes from California are so fabulous that they’ve had their own festival for the past 56 years: Castroville Artichoke Food & Wine Festival.
Since I happen to love them, it’s a pretty good thing that Lt. Governor Gavin Newsom named artichokes the Official State Vegetable of California on April 10, 2013. Artichokes from California are so fabulous that they’ve had their own festival for the past 56 years: Castroville Artichoke Food & Wine Festival.
Some people dip their leaves in mayonnaise (which makes me want to gag), others in various aiolis, dips or other concoctions, but I’ve been a ridiculous creature of habit for as long as I can remember, eating my artichokes one way and one way only: dipping each succulent leaf into a bowl of melted butter. Occasionally I may deviate in the preparation of the steam that surrounds my artichoke, adding some white wine, maybe some garlic or some lemon to the water, but I never deviate on my buttery leaf bath. Until now.
This long forgotten recipe I’d clipped from the May 2007 edition of Cooking Light Magazine convinced me to change my ways (at least temporarily).
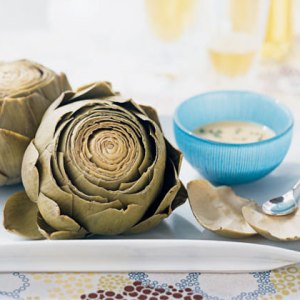
Artichokes With Roasted Garlic Wine Dip
- 2 whole garlic heads
- 4 medium artichokes (about 3 1/2 pounds)
- 1/2 cup dry white wine
- 1 cup organic vegetable broth (such as Swanson Certified Organic)
- 1 tablespoon butter
- 1/4 teaspoon kosher salt
- Chopped fresh parsley
- Preheat Oven to 400° F.
- Remove white papery skin from garlic heads (do not peel or separate the cloves). Wrap each head separately in foil. Bake at 400° F for 45 minutes; cool 10 minutes. Separate cloves; squeeze to extract garlic pulp. Discard skins.
- Cut off stems of artichokes, and remove bottom leaves. Trim about 1/2 inch from tops of artichokes. Place artichokes, stem ends down, in a large Dutch oven filled two-thirds with water; bring to a boil. Cover, reduce heat, and simmer 45 minutes or until a leaf near the center of each artichoke pulls out easily. Remove artichokes from pan.
- Combine half of garlic pulp and wine in a small saucepan; bring to a boil. Cook 2 minutes. Add broth; cook until reduced to 1/2 cup (about 8 minutes). Remove from heat; stir in butter and salt. Pour mixture into a blender; add remaining half of garlic pulp. Remove center piece of blender lid (to allow steam to escape); secure blender lid on blender. Place a clean towel over opening in blender lid (to avoid splatters). Blend until smooth. Sprinkle dip with parsley, if desired. Serve dip with warm artichokes.
If you’re interested in the things I may not devote an entire blog post to like: health articles, my favorite recipes, fun drinks, food facts, nutritional information, restaurant reviews, gadget reviews, photos and other things that make my mouth water, I have a community page on Facebook: https://www.facebook.com/ThisGirlLovesHerFood


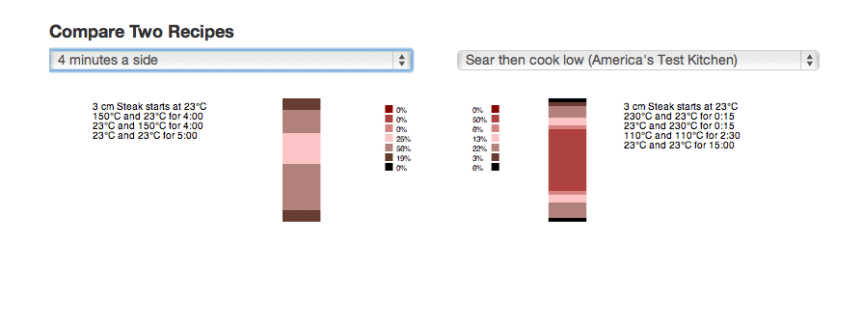
 The girls developed the tool by calculating heat diffusion in the meat at each time step with the
 We have a lot of family celebrations that come in a very short time, which means a lot of heavy big dinners either out at restaurants or at one family gathering or another. By the time we hit our wedding anniversary in late February (which is the same day as my sister-in-law’s birthday) and, a week later, my husband’s birthday, we are about food-ed out!


 One look at this video and all I could think was, “Yum!” I was able to eyeball the measurements of the ingredients pretty accurately from the video but, just to be safe, a quick Google hunt led me to the recipe at


 Nobody likes to worry about cooking dinner after getting home from work on Monday night.


