#ThisGirlLovesToEat
33.428306
-117.608494

Adventures in Eating Out, Drinking Plenty of Wine & Spirits, and Cooking Hits & Misses

 The team at Thrillist have compiled a pretty good list of options for those living a #KetoLifestyle who occasionally have to seek sustenance when only fast food dining options are available! www.thrillist.com/eat/nation/keto-fast-food-options
 Deciding how you spend your carb allowance, when you are following a #KetoLifestyle, presents you with many options, depending on what stage of Keto you are at. When you are in your induction and weight loss phase, smoothies are generally not the way to spend your day’s allotted carbohydrates, but this one tops out at 9 Net Carbs so it can be included from day 1. This light and frothy smoothie a great #PickMeUp for that late afternoon slump plus it gives you a big protein, vitamin and fiber boost without piling on the calories.
Once you’ve hit maintenance phase smoothies packed with a higher berry to spinach ratio are a great way to get your fruits and veggies in with relatively little impact on your carb count.
Starting with your water, put all of your ingredients, except your ice, into your blender or Vitamix. If you have a smoothie setting, like I do on my Vitamix, include the ice, switch to that mode and hit start. Your Vitamix will stop when it’s ready. Otherwise, start on a low setting until ingredients are combined then turn your machine up to medium high and blend until smooth. Without turning your machine off, Open your ingredient addition port (hole in top of blender lid) and add in the ice until desired consistency.
Now that I’ve gone to #2ADays with original recipes plus a little something extra, I thought the perfect way to start is with this breakfast to grab and go!
Make this twist on the McGriddle for an easy keto-friendly breakfast. pic.twitter.com/LjT71vfqvs
— Women’s Health (@WomensHealthMag) June 24, 2019
#ThisGirlLovesToEat
 I love anything New Orleans fare and the Muffaletta sandwich is no exception. Unfortunately, when you are following a Keto lifestyle, Muffaletta sandwiches, on big French rolls, are out of the question. Luckily, almost any sandwich can be made into a salad, and the Muffaletta is one of them that makes a great one.
It has a lot of ingredients, and involves a lot of chopping, but the end result is SO worth it! #ThisGirlLovesToEat
First, whisk together your dressing so it can chill while you are prepping the salad. The dressing is a great one to have extra of for regular salads and even marinating chicken with, so I usually double or triple the recipe when I’m making this salad. So I can store the extra for easy use later, I use an OXO Good Grips Salad Dressing Shaker:
To create the salad, combine and toss the following in a large bowl:
Once your salad is prepared, drizzle all of the dressing over the salad and toss thoroughly. Serve cold.
Nutrition Information (Serves 6 Main Course Servings):
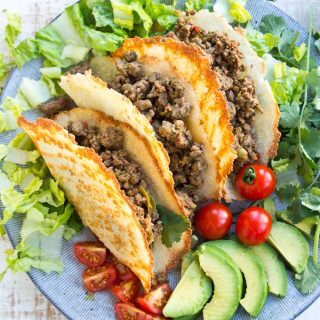
Tomorrow is #CincoDeMayo and, if you’re Keto like me, you can feel left out. This recipe for Keto taco shells changes that in a flash! Most people just make a taco shell from cheese, much like the #FatBomb cheese crisps I love, but Sugar Free Londoner made a shell that’s crispy and more like a hard shell, with 1.1 net grams of carbs per shell, that I’m pretty excited about. #ThisGirlLovesToEat
Preheat the oven to 175 Celsius / 350 Fahrenheit.
Mix all ingredients in a food processor or with an electric mixer until they resemble small crumbs.
Line a baking sheet with parchment paper. Draw circles of 6 inch / 15 cm diameter on the parchment. I traced around a small saucepan lid, but you can use any round object that size.
Scoop 1/4 cup of the taco shell mix onto each circle and spread out inside the circle.
Place a second parchment paper on top and press down the dough with your hands or use a rolling pin. Press down well – you want it nice and compacted
Remove the top parchment paper and bake in the oven for 7 minutes or until the edges of each taco have browned.
Remove from the oven and hang each taco shell over the side of a large saucepan until cooled. I like to use something a little bit wider than a pan edge, like a piece of sanded, clean 1/2″ dowling, so that there’s more room inside to stuff with fillings.


Amount Per Serving 1 Taco Shell (23 g)
 I’m all-in on my #KetoLifestyle, but there are certain things I enjoy, like bread and pasta, that I miss incredibly. I love zucchini, but I can’t accept zoodles as a legitimate replacement for pasta. Trader Joe’s makes a great cauliflower gnocchi, but it’s not Keto friendly, so I set out to adapt a regular gnocchi recipe to one that fits into my Keto lifestyle. It’s also a great recipe for anyone following a Gluten Free diet.
Combine the flour, salt, garlic powder and basil in a bowl and set aside.
Remove the stem from the cauliflower and cut it into florets. You want 5 cups of florets. Put the cauliflower florets in a food processor (I use my Vitamix) and pulse until it’s riced into crumbles.
 Using a microwave-safe steamer (I use the Sistema 6 Cup [Large] Microwave Steamer) cook the cauliflower 7+1/2 to 10 minutes on high – you want the cauliflower done but not soggy.
TIP: If you don’t have a microwave steamer: Place all of the cauliflower in a microwave-safe bowl and cover it with a paper towel. Microwave for 5 minutes. Remove the cauliflower and spread it on a towel to cool. Once cauliflower is cool enough to work with, wrap in a towel and squeeze the water out.
Place the cauliflower back in the food processor (Vitamix). Blend until creamy.
Put the drained cauliflower into a large bowl (I used my stand mixer with the dough hook attachment) and add the dry ingredients. Mix together until your dough comes together. TIP: Do not add more flour – it’s OK that the dough is sticky at this point.
Transfer the dough to a floured bread board or counter top. To make the dough easier to work with, you’ll want to add an additional tablespoon or two (no more than that) of flour as you roll the dough. Shape it into a ball, then wrap it in a piece of waxed paper and refrigerate the dough for about 15 minutes. Take the dough out of the refrigerator and slice it into 4 equal sections.
Roll each section out until you have a rope about 1-inch thick. Slice the dough into 1/2″ squares with a sharp knife.
I do a two part cooking process. First I boil the gnocchi in rapidly boiling, salted water for 6 minutes. Next you have the choice of how (if at all) you want to brown up your gnocchi. I prefer to brown it to give the gnocchi a nice seal – you can decide on the degree of brownness you like.
To Sauté the gnocchi: Using olive oil cooking spray (for the least added calories and fat), generously spray a skillet and, working in batches, place a single layer of gnocchi in the pan and then give them a light coating of olive oil spray on the exposed side. Cook about 5 minutes per side if you like them crisp and deep brown. You can reduce the time for lighter brown, less crispy, more traditional gnocchi.
To Oven Roast the gnocchi: Line a cookie sheet with foil and lightly spray it with olive oil cooking spray. Place your boiled gnocchi down in rows, spray the tops with olive oil spray and lightly season with salt & pepper. In a preheated 425° F oven, bake for 12 minutes then turn the gnocchi over, return to the oven and continue cooking for an additional 10-12 minutes. This will give you a nice, crispy, medium brown gnocchi.


To Serve: I melt some butter in a skillet and add some freshly chopped basil and garlic to the butter and sauté for about 3 minutes over medium heat until the butter just starts to brown a bit. Drizzle the sauce over the piles of gnocchi and serve immediately. Alternatively, these hold up great in a spicy marinara sauce with some freshly grated Parmesan cheese too. #ThisGirlLovesToEat
Nutrition Information per serving (Serves 4)
Don’t get me wrong, I am incredibly proud of the 44 pounds I have lost since I decided to convert to a #KetoLifestyle in November of 2018. By being mostly good, I have lost all but 5 of the pounds since I got married 19 years ago. But I was really skinny when I got married, and that wasn’t my goal at all. It’s certainly been a really nice benefit to need to have all of my clothes taken in though! My goals actually were:
Happily going #Keto did all of that, but no good thing comes without a cost. In my case, the cost is that I am a serious bread, cracker and pasta-a-holic and I hate every recipe I’ve tasted for the, so called, lo-carb replacements. They came out pretty much tasteless and, to be completely honest, they blow. #IMissBread but even more, #IMissPizza
I set out on a quest to solve that problem and discovered Bob’s Red Mill Paleo Baking Flour!

Preheat oven to 350°F and set aside a baking sheet or pizza pan.
In a small bowl, combine Paleo Baking Flour, baking soda and salt. In a large bowl, whisk together eggs, water and oil. Add flour blend and mix thoroughly. Let rest for 5 minutes.
Roll out and shape dough between two pieces of oiled parchment paper. Remove and discard top piece of parchment and slide bottom parchment and crust onto the baking sheet or pizza pan.
Bake for 7 minutes. Remove from oven and add your favorite toppings, then bake for an additional 5–7 minutes. Increase the heat to 400°F for the last 5 minutes for a well-done.
Now I just need to remember, everything in moderation. Just because Bob’s Red Mill Paleo Baking Flour is Low Carb, doesn’t mean I can wolf down the entire pizza in one sitting. 😉 #ThisGirlLovesToEat
 While there aren’t many of them left around near me, the worst part of going to Outback Restaurant was having to pass up their Blooming Onion because of the 155 whopping grams of fat and 123 grams of Carbs from the corn starch and flour they have in them from the deep frying. Thankfully there is a work around now that there’s the Dash air fryer, using this slimmed down recipe, that results in a total of 8 grams of fat and 10 grams of carbs per serving! That makes this a treat I can add to my #KetoLifestyle on occasion, which makes me very happy!

Peel and cut your onion: 1. Cut off 1/2 inch from the pointy stem end of the onion, then peel. 2. Place the onion cut-side down. Starting 1/2 inch from the root, make a downward cut all the way through to the board. 3. Repeat to make four evenly spaced cuts around the onion. 4. Continue slicing between each section until you have 16 evenly spaced cuts. 5. Turn the onion over and use your fingers to gently separate the outer pieces.
In one bowl mix the beer, 1/2 cup of the flour, and the egg. In a second bowl mix the remaining flour and the seasonings.
Dip the onion in the beer batter first and be sure to get in between all of the petals, next dip the onion in the flour and spice mixture making sure that there is coverage in between every petal. I wear rubber gloves and use a separate hand for wet and dry.
Spray the entire onion with Olive Oil Cooking Spray and Air fry for 13-15 minutes or until golden brown and done in all of the crevices.
While the onion is cooking prepare the sauce. Combine:
Cover and refrigerate until ready to serve.
Serve the onion piping hot with the sauce. #ThisGirlLovesToEat

Anyone who thinks living a #KetoLifestyle or following a #KetoDiet to lose weight has to be boring and consists only of mass quantities of cheese, bacon, and butter, couldn’t possibly be more wrong!
This chicken thigh recipe, adapted from one featured on The Food Network by Ina Garten, has every component of Keto covered (High Protein, Moderate/High Fat, Low Carb) with flavor to spare! Served alongside a pile of arugula & spinach tossed with lemon juice, olive oil, cracked black pepper & shaved Parmesan and a mound of creamy ricotta mashed cauliflower, it’s certainly far from boring! #ThisGirlLovesToEat
Liberally season both sides of the chicken with the sea salt and pepper.
Heat 2 TBLS garlic olive oil over medium heat, in either a 10-12″ cast-iron pan or stove top dutch oven. I used a 5.75 qt Le Creuset dutch oven. When the oil is hot, place the chicken in the pan in one layer, skin side down. Cook over medium heat for 15 minutes without moving, until the skin is golden brown. If skin gets too brown before the cooking time is up, lower the heat slightly.
Turn the chicken, add the onions to the pan, it’s ok to add some under the chicken, and cook over medium heat for another 15 minutes, stirring the onions occasionally, until the thighs are cooked to 155 to 160 degrees and the onions are browned. Transfer the chicken (not the onions) to a plate and allow to rest uncovered while you make the sauce. If the onions aren’t browned, cook them for another minute. TIP: I took the chicken and moved it to a smaller dutch oven so that I could make this before the sides and keep it warm with the lid until it was time to serve.
In a 2 Cup bowl/mixing cup, stir together the mustards, Crème Fraîche, and 2 TBLS of the wine. Set aside.
If you have an excess of chicken skin and/or onions that burned or stuck to the pan during the browning stage, deglaze the pan with the 1/4 Cup of white wine. Scrape up only any burned bits and scoop them, with the tainted wine, out of the pan and discard. Add the sauce ingredients to the pan, making sure to use a rubber spatula to get all of the flavor into the pan.


Cook and stir about 2 minutes, over medium heat, then immediately pour over the chicken you’ve moved to your smaller dutch oven OR return the chicken and the juices that settled back into the pan. Cover until ready to serve. Spoon sauce over chicken and sprinkle with chopped parsley when plating, if desired.


