A Lemon Bar That Won’t Derail Your Diet

6021601_SYYOL12299Most people who put themselves on diets at the beginning of each year wrongly assume that they have to deprive themselves of anything sweet and especially anything that falls under the category of dessert.  Thankfully they are wrong on both counts.

This week my main focus is finding low fat & calorie conscious ways to satisfy your sweet tooth whether you are dieting or not.

This recipe from Cooking Light Magazine cuts the sugar from a standard lemon bar recipe down from an estimated 36 g of sugar to 6 g of sugar and only 129 calories.

Tangy Lemon Cheesecake Bars

Crust:

  • 4 ounces whole-wheat pastry flour (about 1 cup)
  • 1/3 cup sliced almonds, toasted
  • 3 tablespoons powdered sugar
  • 1 tablespoon canola oil
  • 1/4 teaspoon kosher salt
  • 1/4 cup cold butter, cut into small pieces
  • Cooking spray

Filling:

  • 3/4 cup fat-free Greek yogurt
  • 1/3 cup granulated sugar
  • 1 tablespoon grated lemon rind
  • 1/3 cup plus 1 tablespoon fresh lemon juice
  • 1 teaspoon vanilla extract
  • 1/4 teaspoon kosher salt
  • 1 (8-ounce) package 1/3-less-fat cream cheese
  • 2 large eggs

Preparation

1. Preheat oven to 350° F.

2. To prepare crust, weigh or lightly spoon flour into a dry measuring cup; level with a knife. Place flour, almonds, powdered sugar, oil, and 1/4 teaspoon salt in a food processor; pulse until almonds are finely ground. Add butter; pulse until mixture resembles coarse meal. Pour mixture into an 11 x 7-inch glass baking dish coated with cooking spray. Pat mixture down into an even layer, patting firmly without compacting too tightly (which will make crust tough). Bake at 350° for 23 minutes or until lightly browned. Remove from oven; cool completely.

3. Reduce oven temperature to 325° F.

4. To prepare filling, rinse processor, and wipe dry. Place yogurt and next 6 ingredients (through cream cheese) in processor; process until smooth. Add eggs; process until smooth. Pour mixture over crust, spreading evenly. Bake at 325° for 30 minutes or until set.

5. Cool completely on a wire rack. Cover and refrigerate 3 hours or until chilled.

Nutritional Information

Calories 129     Fat 7.7 g       Sat fat 3.5 g      Mono fat 2.6 g
Poly fat 0.8 g   Protein 4 g  Carbohydrate 12 g
Fiber 1 g     Cholesterol 37 mg    Sodium 130 mg    Calcium 34 mg

Sugars 6 g     Est. Added Sugars 5

If you use Facebook and are interested in the things I may not devote an entire blog post to: things like health articles, my favorite recipes, fun drinks, food facts, nutritional information, restaurant reviews, photos and other things that make my mouth water, I have a very active page on Facebook you can visit too: https://www.facebook.com/ThisGirlLovesHerFood

Chocolate Stout Layer Cake

There is just something amazing about chocolate cake that’s made with beer!

This recipe from the archives of Bon Appétit (October 2009) looks like something I can throw together for a day of Super Bowl munching without investing too much time hunting down out of the ordinary ingredients.


Bon Appétit says, instead of cold milk, to serve this cake with glasses of the same beer you used in the cake batter. They even suggest making the stout into a float by dropping a couple of scoops of vanilla ice cream to the beer for a grown-up float.  Yum!

Unless we just want to skip the cake and drink stout floats, we’d probably better get to work making the cake. 😉

Chocolate Stout Layer Cake:

  • 3 ounces unsweetened chocolate, chopped
  • 2 1/4 cups all purpose flour
  • 2 teaspoons baking powder
  • 1/2 teaspoon baking soda
  • 1/2 teaspoon salt
  • 14 tablespoons (1 3/4 sticks) salted butter, room temperature
  • 1 1/4 cups plus 3 tablespoons sugar
  • 3 large eggs, separated
  • 3/4 cup chocolate stout, regular stout, or porter
  • 2/3 cup freshly brewed strong coffee

Bittersweet – Espresso Chocolate Frosting:

  • 1 pound bittersweet chocolate (54% to 60% cacao), chopped
  • 2 cups heavy whipping cream
  • 1 teaspoon instant espresso powder

Preparation

For cake:
Position rack in center of oven and preheat to 350°F. Butter and flour two 9-inch-diameter cake pans with 1 1/2-inch-high sides. Line bottom of each cake pan with parchment paper round; butter and flour parchment. Place chopped chocolate in medium metal bowl. Set bowl over saucepan of barely simmering water and stir until chocolate is melted and smooth. Remove bowl from over water and set aside.

Whisk flour, baking powder, baking soda, and salt in medium bowl to blend. Using electric mixer, beat butter and 11/4 cups sugar in large bowl until fluffy and pale yellow, about 2 minutes. Add egg yolks 1 at a time, beating until well blended after each addition. Beat in lukewarm melted chocolate, then stout and coffee. Beat flour mixture into chocolate mixture in 2 additions just until incorporated.

Using clean dry beaters, beat egg whites and remaining 3 tablespoons sugar in another medium bowl until stiff but not dry. Fold 1/3 of egg whites into cake batter to lighten, then fold in remaining egg whites in 2 additions. Divide batter between prepared cake pans (about 3 cups for each); smooth tops.

Bake cakes until tester inserted into centers comes out clean, about 30 minutes. Transfer cakes to racks and cool in pans 20 minutes. Invert cakes onto racks; remove parchment paper and cool completely.

DO AHEAD: Can be made 1 day ahead. Cover and store at room temperature.

For frosting:

Place chopped chocolate in medium heatproof bowl. Combine whipping cream and espresso powder in medium saucepan. Bring cream mixture to simmer over medium-high heat, whisking occasionally. Pour cream mixture over chopped chocolate; let stand 1 minute, then whisk until chocolate is melted and mixture is smooth. Chill chocolate frosting until slightly thickened and spreadable, stirring occasionally, about 2 hours (or for quick chilling, place frosting in freezer until thickened and spreadable, stirring occasionally, about 30 minutes).

Using a serrated knife, trim rounded tops from both cake layers so that tops are flat. Place 1 cake layer, trimmed side up, on 9-inch-diameter tart pan bottom or cardboard round, then place on rack set over baking sheet. Drop 1 1/4 cups frosting by large spoonfuls over top of cake layer; spread frosting evenly to edges with offset spatula or butter knife. Top with second cake layer, trimmed side down. Spread remaining frosting evenly over top and sides of cake.

DO AHEAD: Can be made up to 1 day ahead. Cover with cake dome and refrigerate. Let cake stand at room temperature at least 1 hour and up to 3 hours before serving.

Ingredient tip:

If you can find it (try Total Wine they have a great selection), use a chocolate stout (Brooklyn Brewery and Oregon’s Rogue Brewery for example) in the cake batter. The chocolaty flavors in the beer come from dark-roasting the malts. Some brewers even add a little chocolate to the beer as well. If you can’’t find chocolate stout, use another stout, such as Guinness. Sierra Nevada Porter and Samuel Adams Honey Porter would also work well in this recipe.

If you use Facebook and are interested in the things I may not devote an entire blog post to: things like health articles, my favorite recipes, fun drinks, food facts, nutritional information, restaurant reviews, photos and other things that make my mouth water, I have a very active page on Facebook you can visit too: https://www.facebook.com/ThisGirlLovesHerFood

Paula Deen’s Pumpkin Gooey Butter Cake

pumpkin-gooey-butter-cake-pauladeenI’m not someone that thinks pumpkin desserts are only for the fall.  I love pumpkin pie and get out of my way if there is a moist pumpkin bread in the building!

I don’t know if you have ever had Paula Deen’s Gooey Butter Cake, but if you haven’t, let me tell you it is a chunk (you cannot call a portion of this merely a piece) of heaven on earth!  Leave it to Paula to springboard off of that delight and create something even more decadent starring pumpkin and, of course, her favorite “heart stopping” ingredient, butter. 😉

Pumpkin Gooey Butter Cake

Ingredients

Cake:

  • 1  box yellow cake mix
  • 1 egg
  • 8 tablespoons butter, melted

Filling:

  • 1 (8-ounce) package cream cheese, softened
  • 1 (15-ounce) can pumpkin puree (NOT pumpkin pie filling)
  • 3 eggs
  • 1 teaspoon vanilla
  • 8 tablespoons butter, melted
  • 1 (16-ounce) box powdered sugar – equivalent to 3 3/4 cups (reserve 3 Tbsp for dusting)
  • 1 teaspoon cinnamon
  • 1 teaspoon nutmeg

Directions

  1. Preheat oven to 350° F.
  2. Combine the cake mix, egg, and 8 TBLS butter and mix well with an electric mixer.
  3. Pat the mixture into the bottom of a lightly greased 13 by 9-inch baking pan.
  4. In a large bowl, beat the cream cheese and pumpkin until smooth.
  5. Add the eggs, vanilla, and remaining 8 TBLS butter, and beat together.
  6. Add the powdered sugar, cinnamon, nutmeg, and mix well.
  7. Spread pumpkin mixture over cake batter and bake for 40 to 50 minutes.
  8. Check after about 35 minutes so you make sure not to overbake. The center should be a little gooey.
  9. Let the pan cool completely before you cut the squares.
  10. You could even pop the cooled pan in the fridge before cutting to get extra clean cuts.
  11. Dust squares with powdered sugar before serving.

I like to serve with a small scoop of vanilla ice cream and a sprig of fresh mint.  Yum

If you use Facebook and are interested in the things I may not devote an entire blog post to: things like health articles, my favorite recipes, fun drinks, food facts, nutritional information, restaurant reviews, photos and other things that make my mouth water, I have a very active page on Facebook you can visit too: https://www.facebook.com/ThisGirlLovesHerFood

Pet Treats People Can Eat Too!

carrotoatIn the event of a zombie apocalypse, you’re getting off the grid, bugging out, planning a hike or outdoor adventure and need to make dual duty rations for you and your canine companions, or if you just forget to grab snacks at the grocery store, these treats for your pups are a healthy snack you can feel good munching on too!  A word of caution:  if there’s any chance these might do double duty as emergency snacks, you might want to rethink the bone shaped cookie cutter. 😉

Apple, Carrot & Oat Dog Biscuits

  • 1/2 cup unsweetened applesauce
  • 2/3 cup chunky carrot juice
  • 3 tablespoons creamy peanut butter
  • 2 teaspoons pure vanilla extract
  • 2 large eggs
  • 3 cups all-purpose flour
  • 1/2 cup coarsely ground almond meal (roughly ground almond flour)
  • 1/2 cup rolled oats

Directions:

  1. Preheat the oven to 400 degrees F, with a rack in the center of the oven. Line a baking sheet with a silicone liner or parchment paper and set aside.
  2. Make your chunky carrot juice:  I take 3-4 carrots, cut the tops off, peel them carrotsand toss them into the Vitamix until they are pureed.  I then add a bit of water and blend again on high to get the consistency closer to a pulpy juice.  If the final product doesn’t measure 2/3 cup I add a bit more water until it does.
  3. Combine all ingredients in bowl of your stand mixer (or other large bowl) and stir to combine until a thick dough forms.
  4. Flour a wooden cutting board or similar surface well, and turn the dough out onto the board.
  5. Sprinkle flour on top of the dough and onto a rolling pin, and roll the dough to approximately 1/4″-1/2″ thickness. Be sure to use plenty of flour, as this dough is very sticky!bonecookiecutter
  6. When the dough is rolled out, dip a cookie cutter into flour and cut out the biscuits.cookiecutters
  7. Transfer the cut out biscuits to the prepared sheet pan, leaving about 1/4″ of an inch between each treat. These don’t spread out, so you can fit 30-40 onto a baking sheet at a time (depending on the size of your cookie cutter).
  8. Bake at 400 degrees F for 15 minutes, or until light golden brown.
  9. Remove the baking sheet from the oven and allow the biscuits to cool completely.
  10. Transfer the biscuits to an airtight container, where they will keep at room temperature for up to two weeks.

If you don’t use all of the dough you can freeze it for up to a year as long as you wrap it well with plastic wrap and place it in a freezer-safe Ziplock™ bag.  All you need to do is thaw it (still wrapped) in the refrigerator overnight and you’ll be good to go.

If you use Facebook and are interested in the things I may not devote an entire blog post to: things like health articles, my favorite recipes, fun drinks, food facts, nutritional information, restaurant reviews, photos and other things that make my mouth water, I have a very active page on Facebook you can visit too: https://www.facebook.com/ThisGirlLovesHerFood


Oreo Red Wine Nutella Cupcakes

red-wine-nutella-cupcakes-with-oreo-nutella-filling-and-red-wine-frosting-767x1024I was sourcing articles related to wine and the picture, almost as much as the title convinced me, although I am seriously deficient in the cupcake decorating department, to give these a try.

I’m not sure what appealed to me more, the wine or the chocolate, but I figured I could manage combining them without staining everything in my kitchen.  I might even be able to pipe on the frosting without too much problem, so I’m off to the store to make these grown up delights!

I found this little bit of deliciousness at a blog I saw on Pinterest: www.yummyaddiction.com.

One thing: I noticed the blogger didn’t specify what type of wine she used or recommend a type.  For my own personal taste, with the cocoa, cinnamon and brown sugar in the cake, I am going to go with a red wine with a similar flavor profile like a Zinfandel, Petite Syrah or maybe a Pinot Noir or Malbec.

Oreo Red Wine Nutella Cupcakes

Makes: 10 cupcakes
For the cupcakes:
  • 1 cup all-purpose flour
  • ¼ cup cocoa powder
  • 1 teaspoon baking soda
  • ½ teaspoon baking powder
  • ¼ teaspoon salt
  • ¼ teaspoon ground cinnamon
  • ¼ cup unsalted butter, at room temperature
  • ¼ cup brown sugar
  • 2 tablespoons granulated sugar
  • 1 egg
  • ¼ cup red wine, any kind you like
  • ½ teaspoon vanilla extract
  • ¼ cup Nutella
  • 10 Oreos
For the filling:
  • ½ cup Nutella
  • 5 Oreos
For the frosting:
  • 1 cup red wine, any kind you like
  • ¼ cup granulated sugar
  • ½ cup unsalted butter, at room temperature
  • 2 cups powdered sugar
  • 1 teaspoon vanilla extract
  • salt, to taste
  1. Preheat oven to 350 degrees F. Line 10 muffin cups with cupcake liners. Set aside.
  2. The cupcakes. In a medium bowl, sift together the flour, cocoa powder, baking soda, baking powder, salt, and cinnamon. In a large bowl, cream the butter and sugars together until fluffy. Add the egg and beat to combine. Scrape down the sides of the bowl as needed. Beat in the vanilla extract. Stir in Nutella and red wine until evenly combined. Slowly add the flour mixture to the wet ingredients and mix until just combined. Place an Oreo cookie on the bottom of each cupcake liner. Pour batter over each Oreo cookie and fill each cupcake liner about ¾ of the way full. Bake the cupcakes for about 20 minutes or until a toothpick inserted in the center comes out clean. Remove from oven and place on a wire rack to cool completely.
  3. The filling. In a ziplock bag, place the Oreos and use a mallet to crush the cookies into small pieces. In a small bowl, combine Nutella with crushed Oreos. Set aside.
  4. The frosting. In a small saucepan, combine red wine and sugar. Cook over mediumoreo-red-wine-nutella-cupcakes-center heat, stirring, until sugar dissolves and wine comes to a boil. Reduce heat and simmer for 20 minutes (until the liquid is reduced to about ¼ cup or a light syrup texture). Let cool.
  5. Beat the butter until until smooth and creamy. Slowly add in powdered sugar (1/2 cup at a time), vanilla, and ¼ cup of prepared wine syrup. Beat until no lumps remain. Taste the frosting and add salt to cut the sweetness, if you prefer.
  6. Assembling the cupcakes. Cut out the center of each cupcake with a sharp knife. Fill the cupcakes with Nutella & Oreo filling. Transfer the frosting to a piping bag fitted with a decorative tip. Pipe frosting into a swirl on each cupcake. Enjoy!

If you use Facebook and are interested in the things I may not devote an entire blog post to: things like health articles, my favorite recipes, fun drinks, food facts, nutritional information, restaurant reviews, photos and other things that make my mouth water, I have a very active page on Facebook you can visit too:https://www.facebook.com/ThisGirlLovesHerFood

Boozy Hot Cocoa

Last year the weather reports for California promised the El Niño was coming which was supposed to mean many many opportunities to stay in, warm and dry, and sip on hot drinks.  The weather reports couldn’t have been more wrong!  Instead of rain filling up our reservoirs, lakes, and packing our mountains with snow, it was one of the hottest years on record!  I barely had to wear more than a sweatshirt and my Uggs stayed clean and dry, unworn, in my closet.  Hardly the kind of weather for enjoying hot drinks.

This year the weather reports predicted a La Niña, an unusually dry winter.  Thankfully, once again, the forecasters have been completely wrong.  We are just 3 weeks past the official start of winter and already we’ve had more cold days & nights, more rain than we’ve seen in years, and there’s more to come.  Instead of bone dry reservoirs, we are seeing them refilling to levels of 75-80% of capacity.  Thank you #PineappleExpress!

That also means that I can finally whip out the recipes I have been sitting on for boozy hot cocoa.  Yes!

Mint Cocoa Hot Toddy

  • 1 oz Kahlua
  • 1 oz Peppermint Schnappsmintchocolatetoddy
  • 1 envelope hot cocoa mix
  • 6 oz hot water (or milk, if that’s what pkg calls for)
  • Miniature Marshmallows
  • Chocolate Shavings
  • Cinnamon Stick
  1. Make 6 oz. of hot cocoa in a 10 oz mug.
  2. Add the Kahlua and the Schnapps.
  3. Place 8 or so miniature marshmallows on top.
  4. Grate some chocolate over the marshmallows, and stir with a cinnamon stick.

Toasted Bailey’s Hot Cocoa

  • 3 cups Milk
  • 1/3 cup Half and Halfbroiledbaileyshotchocolate
  • 1 cup Semi-Sweet Chocolate Chips
  • 1/2 cup Bailey’s Irish Cream
  • Marshmallows
  1. In a small saucepan, add milk and half and half. Turn on medium heat and let mixture warm up. Add chocolate chips.
  2. Let chocolate chips melt in milk mixture, whisking frequently. Once the chocolate has fully combined, add Bailey’s. Stir to combine and transfer to mugs.
  3. Place marshmallows on top of hot chocolate and toast the tops of your marshmallows with your mini-torch. Once your marshmallows are browned and melty it’s time to enjoy!

Chocolate-Orange Hot Chocolate

  • 2/3 cups Milk
  • 1/4 cup Heavy Creamchocolate-orange-hot-chocolate
  • Zest of 1/2 and Orange
  • 2 oz Dark Chocolate chopped
  • 1 oz +/- Warmed Grand Marnier
  1. Heat the milk, cream and orange zest together in a saucepan until simmering then remove from the heat and pour through a sieve into a jug to remove the orange zest. Pour the infused milk mixture back into the pan and add the chocolate, stirring until the chocolate has melted and is really smooth.
  2. Put the pan back on the heat to warm through then add the orange liqueur. Pour into a mug and serve.

If you use Facebook and are interested in the things I may not devote an entire blog post to: things like health articles, my favorite recipes, fun drinks, food facts, nutritional information, restaurant reviews, photos and other things that make my mouth water, I have a very active page on Facebook you can visit too:https://www.facebook.com/ThisGirlLovesHerFood

Upside Down Banana Bread

udbb1
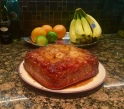
Since this New Year’s Day is “Upside Down,” you know, all of the official festivities happening on Monday, January 2, what better way to kick-off (no pun intended) our entire day of parade and football watching than with this upside down take on my favorite overripe fruit concoction?

Our whole holiday week between Christmas and New Year’s Day has been spent at home, except for an escape on Wednesday for my birthday dinner WITH a 102°F temperature, so I did no baking, we did no entertaining, and I’ve really done nothing but sleep and drink hot tea.  I’m trying to rally, despite being sick, and make some kind of effort for tomorrow, yet another day of being sick at home, but at least there will be something I might want to eat.

My husband (he who is Twitter challenged) managed to send this Buzzfeed video to me in a message a couple of months ago as a hint, then I saw it again last night.  It looks easy enough so why not?  I’ll give it a try.

Upside Down Banana Bread

4-5 ripe bananas
3 eggs
½ cup oil
½ cup granulated sugar
1 Tbsp. ground cinnamon
2 cups flour
½ cup butter
1 cup brown sugar
2-3 bananas, sliced
Vanilla ice cream

  • Preheat oven to 350°F/175°C.
  • In a large bowl, mash the ripe bananas.
  • Add the eggs, oil, sugar, and cinnamon, mixing until evenly incorporated.
  • Add the flour and mix until the batter has no large pockets of flour. Set aside.
  • In a pot over low heat, melt the butter, then mix in the brown sugar until dissolved.
  • Bring up the heat to medium, cooking until the mixture starts bubbling.
  • Remove the caramel from heat and pour into a greased 9×9 baking pan.
  • Lay the banana slices evenly on top of the caramel.
  • Spread the banana bread batter on top.
  • Bake 40-50 minutes.
  • Cool until the bottom is barely warm.
  • Use a knife to loosen the edges from the pan.
  • Place a plate upside-down on top of the pan, then invert the pan, flipping the banana bread onto the plate.
  • Slice, then serve with vanilla ice cream.

TIP**  It’s important to make sure you are using a 9 x 9 pan.  If you use an 8 x 8 pan, like I did my first try, you need to increase the baking time by about 10 minutes and be prepared, you’ll be cleaning up the brown sugar that will bubble up and spill over the sides and burn onto the bottom of your oven.  Trust me, the smoke alarms blaring, dogs running around barking and the cleanup weren’t worth not following the exact directions.  UG!

It’s very sweet, so you might want to start with a small square and go back for seconds. Who am I kidding?  Put it in a bowl and pile the ice cream on!  And, before you ask, “Yes, I do intend to start my day with glorified cake and ice cream!”  #TheDietStartsTuesday 

If you’re on Facebook and are interested in the things I may not devote an entire blog post to: my favorite recipes, drinks, food facts, nutritional information, photos and other things that make my mouth water, I have a page on Facebook you can visit too:https://www.facebook.com/ThisGirlLovesHerFood

Bedtime Red Wine Hot Cocoa

red-wine-cocoaRed wine to ease away the stress and tension from a day filled with kids, husbands, work, traffic, housework, bills, etc., then hot cocoa laced with more read wine to pave the way to bedtime?  Sounds too good to be true, but Scary Mommy says it’s so, so I believe!

Now, if you can keep yourself from chugging the entire bottle down you wino 😉 here is how you make your Bedtime Red Wine Hot Cocoa:

In a small saucepan combine:

  • 3 tsp unsweetened cocoa powder
  • 4 tsp sugar
  • 1/8th tsp salt

According to http://www.scarymommy.com, you are to, “Mix that shit together.”  Then stir in:

  • 2 to 3 TBLS milk
  • 1/4 Cup + a few more TBLS “to taste”
  • 1 tsp vanilla (if desired)
  • 1 cinnamon stick (if desired)

I like my wines to be hearty in body and bold in taste, so I use a Zinfandel, Meritage, Red Blend, Red Table Wine, Cabernet Sauvignon, Syrah or Petite Syrah.  Simmer until just warm.  You don’t want to cook off the alcohol!  I like to add a tsp of vanilla and a cinnamon stick to the pan while it’s simmering.  Top with some whipped cream and shaved chocolate if you’re feeling fancy.

Here’s another way to make it that’s even more decadent:

  • 3 Cups Dark Chocolate Chunks
  • 1+ ½ Cups Milk (Substitute Half & Half or Cream if desired)
  • 1 Cup Red Wine

red-wine-hot-chocolate-5In a saucepan over medium heat, combine milk and chocolate chips. Whisking constantly until chocolate is melted into milk and you have a thick and creamy chocolate milk. Pour in red wine and heat until everything is hot. Pour into 2 mugs and top with whipped cream.

You can also add in marshmallows, sprinkle more cocoa powder or cinnamon on top.  The possibilities are only limited by your imagination, how much you love wine, and/or how bad your day was.

If you’re on Facebook and are interested in the things I may not devote an entire blog post to: my favorite recipes, drinks, food facts, nutritional information, photos and other things that make my mouth water, I have a page on Facebook you can visit too:  https://www.facebook.com/ThisGirlLovesHerFood

Snickerdoodle Pumpkin Chiffon Pie

Don’t get me wrong, nothing says fall, Halloween and Thanksgiving more than pumpkin pie, but the same old pumpkin pie year in – year out can get boring.  I thought I’d shake things up a bit with a curveball and a bit of unexpected flavor that I hope we all will enjoy!

saraleepumpkinpie

I’ll still make a regular pumpkin pie, and if you are planning to make a regular pumpkin pie too, there is a hotline setup to help you in case you get in a bind: Sara Lee Pie Hotline 1-888-914-1247, Monday through Friday from 7 a.m. to 6 p.m. CST.  The hotline is open Thanksgiving Day from 7 a.m. to 1 p.m. CST.

Snickerdoodle Pumpkin Chiffon Piepumpchif

Assemble the Crust

  • 4 TBLS (1/2 stick) Unsalted Butter, at room temperature
  • 1 TBLS Unsalted Butter for greasing the pan
  • 2 TBLS Cinnamon
  • 1/2 Cup + 2 TBLS Sugar
  • 3/4 Cup Flour
  • 1/4 tsp Baking Soda
  • 1/4 tsp Salt
  • 1 Large Egg Yolk
  • 1 tsp Vanilla

Preheat the oven to 375°F and generously butter the bottom and sides of a 9″ regular (not deep dish) pie pan.

  1. Combine flour, salt and baking soda.  Set aside.
  2. Whisk together the cinnamon and 2 tablespoons of the sugar.
  3. Sprinkle 1/2 of the cinnamon-sugar mixture into the buttered pie pan and spread it around until the entire pan is well coated
  4. Beat the 1/2 stick of butter and 1/2 cup sugar for about 3 minutes until light and fluffy.
  5. Add egg yolk and vanilla. Beat until combined.
  6. Reduce speed to low and slowly add flour mixture beating just until well combined.
  7. Transfer dough to work surface covered with a very light coating of flour and cinnamon.  Flatten cookie dough into a disc and then press into the bottom and up the sides of the prepared pie pan.
  8. Sprinkle the remaining cinnamon and sugar all over the surface of the inside of the pie crust.
  9. Poke holes all over the bottom of the crust and put into the freezer for 15 minutes.
  10. Bake the crust about 12 minutes or until lightly browned.  Remove from oven and let cool completely before filling.

Prepare the Pie Filling

  • 4 ounces room temperature Cream Cheese
  • 1 Cup Pumpkin Pie Purée
  • 3/4 Cup Pure Maple Syrup
  • 3/4 Tsp Ground Ginger
  • 1/2 tsp freshly Ground Nutmeg
  • 1/4 tsp Salt
  • 3/4 tsp Cinnamon
  • 1 TBLS Bourbon
  • 1+3/4 tsp unflavored Gelatin
  • 1/4 Cup Water
  • 1/2 Cup Heavy Cream
  1. In small saucepan dissolve gelatin in the water over low heat.
  2. As soon as the gelatin is dissolved, remove from the heat and stir in the Bourbon.
  3. In the bowl of the stand mixer, mix the cream cheese until light and airy. Set aside.
  4. On medium-high speed, mix the pumpkin purée, maple syrup, ginger, nutmeg, salt, and cinnamon and beat until well combined.
  5. Add the cream cheese and beat on high until smooth.
  6. Stir gelatin mixture into the pumpkin mixture and move all into a large chilled mixing bowl.
  7. Clean and dry the stand mixer bowl.
  8. Beat 1/2 cup of the cream on high until stiff peaks form and then stir into the pumpkin mixture.
  9. Pour filling into crust and chill overnight.

To prepare for serving

  1. To prepare for serving, beat 1 cup whipping cream, 1/2 cup sugar and 1 tsp vanilla  until stiff peaks form
  2. Top pie with whipped cream and sprinkle with 1 tsp pumpkin pie spice

Make up to one day ahead and keep refrigerated until time to serve.

If you are on Facebook and are interested in the things I may not devote an entire blog post to, recipes, food facts, nutritional information, photos and other things that make my mouth water, I have a page on Facebook you can visit too:  https://www.facebook.com/ThisGirlLovesHerFood

Disneyland Peanut Butter Cookies

Last week I shared the recipe for Debbie Fields (A.K.A. Mrs. Fields) Peanut Butter Cookies and promised to find the recipe for the amazing Peanut Butter Cookies sold at Disneyland when I could find it.

peanut-butter-chunk-cookiesThere are many imposters and “copycat” recipes out there that were close, but none that I could find that were exactly like the cookies I remembered.  I finally came across a blog that focuses solely on the foods made and sold by the Disney Resorts.  Here I found out that Disney chefs do not bake the cookies, full of chunks of smooth peanut butter, they are made by Selma’s Cookies and packaged for Disney, but they are so good, does it really matter?

A little more Internet research led to a cookie blog linked to the Disney food blog that had great pictures and instructions for recreating the Disneyland Peanut Butter Cookie (with the added bonus of chocolate chunks!).

The important thing to making these cookies is to understand that you cannot simply put peanut butter chips into the cookies and expect them to taste like the cookies from peanut-butter-chunksGoofy’s Kitchen!  You have to take the added step (first) of making the peanut butter fudge that gets broken into chunks and pressed into the rolled cookie dough just before placing on the cookie sheets for baking.  It makes the difference between a good cookie and a great one!

As Close As You Can Get To Disneyland Peanut Butter Chunk Cookies

Peanut Butter Chunks:
  • 1/4 cup + 2 TBLS Peanut Butter Chips (Reese’s)
  • 1/4 cup + 2 TBLS Creamy Peanut Butter
  • 1+ 1/2 TBLS Butter
Cookie Dough:
  • 2 sticks (8 oz) Unsalted Butter, room temperature
  • 1 cup tightly packed brown sugar — (8 oz)
  • 1 cup Granulated Ssugar — (8 oz)
  • 1 + 1/4 cups Chunky or Smooth Peanut Butter — (11 7/8 oz jar)
  • 1/2 tsp Baking Powder
  • 1/2 tsp Baking Soda
  • 1/2 tsp Salt
  • 2 Large Eggs
  • 1/2 tsp Vanilla
  • 2 + 2/3 cups All-Purpose Flour
  • 1 cup Semi-Sweet Chocolate Chunks
 Instructions
  1. Make the peanut butter chunks first. Mix the peanut butter chips, peanut butter and butter in a small bowl and microwave on high for 30 seconds. Stir until smooth. If chips aren’t melted, heat for another 30 seconds.
  2. Make a small 2×5(ish) mold with foil (see photo). Pour the peanut butter mixture into the mold and chill it for about half an hour or until firm. Unmold the peanut butter log and cut into chunks.
  3. Proceed with the cookie dough. Cream butter and both sugars with an electric mixer. Beat in peanut butter, then baking powder, baking soda, and salt. Add eggs one at a time, beating on a lower speed, then beat in vanilla. By hand or using lowest speed of mixer, Stir in the flour. When flour is mixed in, stir in chocolate chunks.
  4. Chill the dough for about an hour.
  5. Preheat oven to 350° F. Using slightly less than a quarter cup measure, scoop up balls of dough and arrange on cookie sheet a few inches apart. Stick peanut butter chunkscookie-dough-ball into the already-scooped dough.
  6. Bake for 12-14 minutes, until set and brown around the edges. Remove from oven and cool on pan for about 10 minutes to set. Remove from pan and set on a rack to finish cooling.
  7. Makes 24 big cookies

I cannot wait to make these!  Can you imagine taking two of these and putting a scoop of vanilla ice cream between them?  Yum!

If you are on Facebook and are interested in the things I may not devote an entire blog post to, recipes, food facts, nutritional information, photos and other things that make my mouth water, I have a page on Facebook you can visit too:  https://www.facebook.com/ThisGirlLovesHerFood