Valentine’s Day Quick Carnitas Tacos

fullsizerender-3On a whim, I decided to make carnitas tacos for Valentine’s Day dinner at home.  I didn’t have to worry about not thinking ahead because my pressure cooker would cook the meat even if it wasn’t all the way thawed in time.  Whew!

Thankfully I’d thrown a pork shoulder in the freezer when they’d been on sale at the grocery store, so I’d just have to rummage through the refrigerator and cupboard to see what I could cobble together to make a meal.

Appetizer:  Spicy Pickled Carrots & Jalapenos

  • 6 Carrotsfullsizerender-4
  • 2 Large Jalapenos
  • 1 Medium Yellow Onion
  • 3 Cloves Garlic
  • 2 tsp Whole Peppercorns
  • 1 tsp Salt
  • 1 1/2 Cups Apple Cider Vinegar
  • 1 1/2 Cups Water

Boil the water and apple cider vinegar in a medium saucepan over medium-high heat.  When at a full rolling boil shut off the flame and immediately add the rest of the ingredients.  Stir once and let stand for about an hour.  Serve at room temperature, or if you have time, refrigerate to bring out even more flavor.  Store in a tightly sealed container in the refrigerator and eat within a week.

Now on to the main course.

Pressure Cooker Carnitas

  • 1 TBLS Olive Oil
  • 2 tsp Freshly Ground Sea Salt
  • 1 1/2 tsp Ground Cloves
  • Freshly Ground Pepper
  • 3 Pounds Pork Shoulder
  • 1/2 Yellow Onion, Sliced
  • 3 Cloves Garlic Peeled
  • 4-6 Sprigs Fresh Cilantro
  • 1 Large Fresh Lemon
  • 1 Jalapeño Sliced in Half
  • 1 1/3 Cup Chicken Broth

Preparation

  1. Set the pressure cook to brown setting
  2. Pour the oil into the pressure cooker
  3. Sprinkle the salt, pepper and cloves on all sides of the pork
  4. Place the pork in the pressure cooker and brown on all sides
  5. Squeeze the juice from the lemon over the pork, add the onion, garlic, cilantro, halved jalapeño, the squeezed lemons and the chicken broth
  6. Cover the pressure cooker, lock on the lid, and bring to high pressure
  7. Cook pork at high pressure for 45 minutes
  8. Turn off and allow pressure to release naturally
  9. Transfer pork to a baking sheet
  10. Preheat the broiler to high
  11. Shred pork with two forks on baking sheet
  12. Broil until the pork starts to crisp, about 3 minutes.
  13. Serve with warm corn tortillas, sliced avocado, shredded cabbage, pepper jack or cojito cheese, hot sauce and wedges of lime

A can of refried beans, a couple of street tacos and a beer and it’s a meal!

If you use Facebook and are interested in the things I may not devote an entire blog post to: things like health articles, my favorite recipes, fun drinks, food facts, nutritional information, restaurant reviews, photos and other things that make my mouth water, I have a very active page on Facebook you can visit too: https://www.facebook.com/ThisGirlLovesHerFood

Easy Roasted Tomato Soup

fellp20150820_lowCalifornia’s multiple personality disorder has reared it’s ugly head again.  The weather, which had been giving us a normal winter for a change, has turned on a dime and we have Santa Ana winds, sunshine and warm temperatures just a day after rain clouds and temperatures in the low 60’s.  Ugh!  This is really screwing with my pre-planned menus!

Screw it!  I planned to make soup for dinner and soup it will be.  I don’t care if it’s warm outside or not.  If anyone complains they can chill theirs like gazpacho.

Roasted Tomato Soup

  • 1 Poblano Chili (Stem and Seed Pod Removed if Desired)
  • 6 Large Tomatoes (Hard Stems Cut Out)
  • 1 Medium Sweet Yellow Onion (Peeled and Halved)
  • 5 Large Carrots (Peeled & Tops Removed)

Preheat oven to 350°F

Place the onion, cut side down, onto an oiled baking pan along with the peeled carrots, the poblano chili and the 6 tomatoes (cut tops up). Tip:  For added flavor, I roast my chili with the stem and seed pod in and remove them before throwing into the Vitamix.

Bake for 25-30 minutes or until the tomato skins begin to crack and peel.

Preparation Option 1 – VITAMIX:

If you have a Vitamix with a soup setting like I do (it’s on the Professional Series 750), the steps are simple from here.  All you do is throw all of the roasted vegetables into the container, place the lid on securely, turn the dial to the soup setting, depress the start button and wait for the cycle to end when it’s done chopping/blending and cooking the soup.

Preparation Option 2 -Blender or Food Processor and Stove Top:

Place the onion, chili and carrots into the blender/processor container and pulse to chop the vegetables up.  Then turn the blender to puree and mix until the vegetables are well chopped.  Add the tomatoes 1 at a time blending on high until all are well incorporated.  If you run out of room in your container, move 1/2 of your vegetable mixture to the pan you’ll be heating the soup in.  When all of the vegetables are blended/pureed, heat in a pan on the stove until warm enough to eat.

If you use Facebook and are interested in the things I may not devote an entire blog post to: things like health articles, my favorite recipes, fun drinks, food facts, nutritional information, restaurant reviews, photos and other things that make my mouth water, I have a very active page on Facebook you can visit too: https://www.facebook.com/ThisGirlLovesHerFood

Healthy Apple Dessert or Between Meal Snack

Dessert doesn’t have to be made of ingredients that are bad for your diet!

You can take something healthy, like an apple and add some sweet or salty ingredients and it can feel like the most decadent treat without throwing you off of your diet track.

Large Granny Smith or Fuji Apple

Peanut butter (or Nutella, any other nut, seed, or soy butter/spread)

Granola or peanuts (or other favorite nuts, coconut, or seeds)

Dried cranberries (or raisins, dried cherries, apricots, dates or other dried fruit)

  1. Core the apple with an apple corer or melon baller. 
  2. Lay the apple on its side and cut crosswise into 1/4-inch thick slices. 
  3. Spread a thin layer of peanut butter over the slices. 
  4. Top with a few chocolate chips, a few peanuts, and a few dried cranberries. 
  5. Drizzle with thin lines of caramel or chocolate ice cream topping if desired.
  6. Enjoy without any guilt!


If you use Facebook and are interested in the things I may not devote an entire blog post to: things like health articles, my favorite recipes, fun drinks, food facts, nutritional information, restaurant reviews, photos and other things that make my mouth water, I have a very active page on Facebook you can visit too: https://www.facebook.com/ThisGirlLovesHerFood

Broccoli and Chicken Noodle Soup

broccolichickensoup
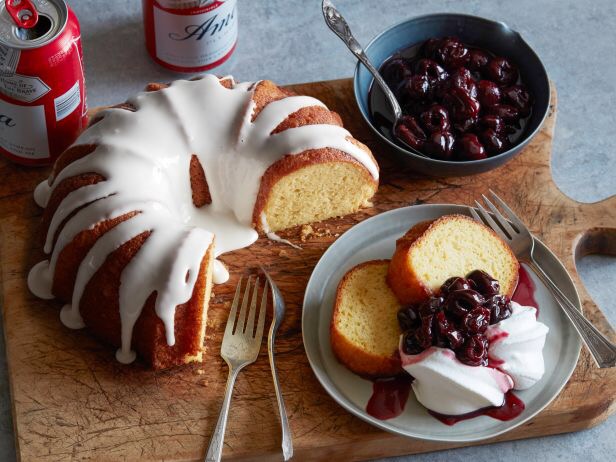
Cooking Light is my favorite “Go-To” resource for a quick and healthy weeknight meal.  It’s been cold and blustery this week and the last thing I wanted to do was put together a big fussy sit down meal, but I wanted something hearty enough to be filling.

This soup, that they did a recipe rescue on, has 40 percent fewer calories and 62 percent less fat than the heavy original.  It satisfied the need for something hearty and filling without completely blowing the diet while also giving a big sit down meal feel with some crusty bread and a glass of wine!

Broccoli and Chicken Noodle Soup

Ingredients

  • Cooking spray
  • 2 cups chopped onion
  • 1 cup pre-sliced mushrooms
  • 1 garlic clove, minced
  • 3 tablespoons butter
  • 1.1 ounces all-purpose flour (about 1/4 cup)
  • 4 cups 1% low-fat milk
  • 1 (14-ounce) can fat-free, less-sodium chicken broth
  • 4 ounces uncooked vermicelli, broken into 2-inch pieces
  • 2 cups (8 ounces) shredded light processed cheese (such as Velveeta Light)
  • 4 cups (1-inch) cubed cooked chicken breast
  • 3 cups small broccoli florets (8 ounces)
  • 1 cup half-and-half
  • 1 teaspoon freshly ground black pepper
  • 3/4 teaspoon salt

Preparation

  1. Heat a Dutch oven over medium-high heat.
  2. Coat pan with cooking spray.
  3. Add onion, mushrooms, and garlic to pan; sauté 5 minutes or until liquid evaporates, stirring occasionally.
  4. Reduce heat to medium; add butter to mushroom mixture, stirring until butter melts.
  5. Sprinkle mushroom mixture with flour; cook 2 minutes, stirring occasionally.
  6. Gradually add milk and broth, stirring constantly with a whisk; bring to a boil.
  7. Reduce heat to medium-low; cook 10 minutes or until slightly thick, stirring constantly.
  8. Add pasta to pan; cook 10 minutes.
  9. Add cheese to pan, and stir until cheese melts.
  10. Add chicken and remaining ingredients to pan; cook 5 minutes or until broccoli is tender and soup is thoroughly heated.

Nutritional Information

Calories 317 Fat 12.3g Sat fat 6.8g Mono fat 2.9g Poly fat .9g  Protein 27.5g Carbohydrate 23.8g Fiber 1.9g Cholesterol 74 mg Iron 1.6 mg Sodium 723 mg Calcium 179 mg

If you use Facebook and are interested in the things I may not devote an entire blog post to: things like health articles, my favorite recipes, fun drinks, food facts, nutritional information, restaurant reviews, photos and other things that make my mouth water, I have a very active page on Facebook you can visit too: https://www.facebook.com/ThisGirlLovesHerFood

A Lemon Bar That Won’t Derail Your Diet

6021601_SYYOL12299
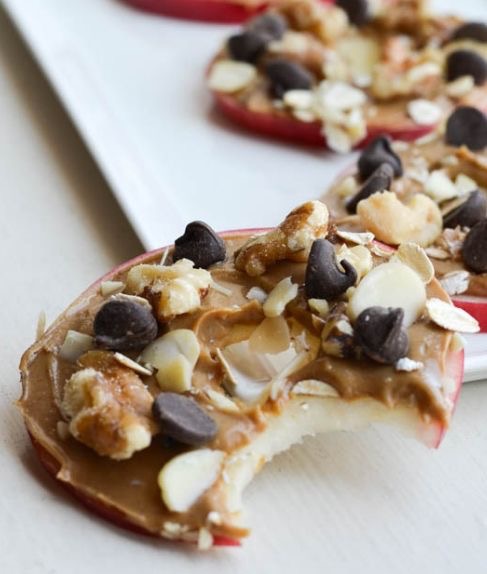
Most people who put themselves on diets at the beginning of each year wrongly assume that they have to deprive themselves of anything sweet and especially anything that falls under the category of dessert.  Thankfully they are wrong on both counts.

This week my main focus is finding low fat & calorie conscious ways to satisfy your sweet tooth whether you are dieting or not.

This recipe from Cooking Light Magazine cuts the sugar from a standard lemon bar recipe down from an estimated 36 g of sugar to 6 g of sugar and only 129 calories.

Tangy Lemon Cheesecake Bars

Crust:

  • 4 ounces whole-wheat pastry flour (about 1 cup)
  • 1/3 cup sliced almonds, toasted
  • 3 tablespoons powdered sugar
  • 1 tablespoon canola oil
  • 1/4 teaspoon kosher salt
  • 1/4 cup cold butter, cut into small pieces
  • Cooking spray

Filling:

  • 3/4 cup fat-free Greek yogurt
  • 1/3 cup granulated sugar
  • 1 tablespoon grated lemon rind
  • 1/3 cup plus 1 tablespoon fresh lemon juice
  • 1 teaspoon vanilla extract
  • 1/4 teaspoon kosher salt
  • 1 (8-ounce) package 1/3-less-fat cream cheese
  • 2 large eggs

Preparation

1. Preheat oven to 350° F.

2. To prepare crust, weigh or lightly spoon flour into a dry measuring cup; level with a knife. Place flour, almonds, powdered sugar, oil, and 1/4 teaspoon salt in a food processor; pulse until almonds are finely ground. Add butter; pulse until mixture resembles coarse meal. Pour mixture into an 11 x 7-inch glass baking dish coated with cooking spray. Pat mixture down into an even layer, patting firmly without compacting too tightly (which will make crust tough). Bake at 350° for 23 minutes or until lightly browned. Remove from oven; cool completely.

3. Reduce oven temperature to 325° F.

4. To prepare filling, rinse processor, and wipe dry. Place yogurt and next 6 ingredients (through cream cheese) in processor; process until smooth. Add eggs; process until smooth. Pour mixture over crust, spreading evenly. Bake at 325° for 30 minutes or until set.

5. Cool completely on a wire rack. Cover and refrigerate 3 hours or until chilled.

Nutritional Information

Calories 129     Fat 7.7 g       Sat fat 3.5 g      Mono fat 2.6 g
Poly fat 0.8 g   Protein 4 g  Carbohydrate 12 g
Fiber 1 g     Cholesterol 37 mg    Sodium 130 mg    Calcium 34 mg

Sugars 6 g     Est. Added Sugars 5

If you use Facebook and are interested in the things I may not devote an entire blog post to: things like health articles, my favorite recipes, fun drinks, food facts, nutritional information, restaurant reviews, photos and other things that make my mouth water, I have a very active page on Facebook you can visit too: https://www.facebook.com/ThisGirlLovesHerFood

Chocolate Stout Layer Cake

There is just something amazing about chocolate cake that’s made with beer!

This recipe from the archives of Bon Appétit (October 2009) looks like something I can throw together for a day of Super Bowl munching without investing too much time hunting down out of the ordinary ingredients.


Bon Appétit says, instead of cold milk, to serve this cake with glasses of the same beer you used in the cake batter. They even suggest making the stout into a float by dropping a couple of scoops of vanilla ice cream to the beer for a grown-up float.  Yum!

Unless we just want to skip the cake and drink stout floats, we’d probably better get to work making the cake. 😉

Chocolate Stout Layer Cake:

  • 3 ounces unsweetened chocolate, chopped
  • 2 1/4 cups all purpose flour
  • 2 teaspoons baking powder
  • 1/2 teaspoon baking soda
  • 1/2 teaspoon salt
  • 14 tablespoons (1 3/4 sticks) salted butter, room temperature
  • 1 1/4 cups plus 3 tablespoons sugar
  • 3 large eggs, separated
  • 3/4 cup chocolate stout, regular stout, or porter
  • 2/3 cup freshly brewed strong coffee

Bittersweet – Espresso Chocolate Frosting:

  • 1 pound bittersweet chocolate (54% to 60% cacao), chopped
  • 2 cups heavy whipping cream
  • 1 teaspoon instant espresso powder

Preparation

For cake:
Position rack in center of oven and preheat to 350°F. Butter and flour two 9-inch-diameter cake pans with 1 1/2-inch-high sides. Line bottom of each cake pan with parchment paper round; butter and flour parchment. Place chopped chocolate in medium metal bowl. Set bowl over saucepan of barely simmering water and stir until chocolate is melted and smooth. Remove bowl from over water and set aside.

Whisk flour, baking powder, baking soda, and salt in medium bowl to blend. Using electric mixer, beat butter and 11/4 cups sugar in large bowl until fluffy and pale yellow, about 2 minutes. Add egg yolks 1 at a time, beating until well blended after each addition. Beat in lukewarm melted chocolate, then stout and coffee. Beat flour mixture into chocolate mixture in 2 additions just until incorporated.

Using clean dry beaters, beat egg whites and remaining 3 tablespoons sugar in another medium bowl until stiff but not dry. Fold 1/3 of egg whites into cake batter to lighten, then fold in remaining egg whites in 2 additions. Divide batter between prepared cake pans (about 3 cups for each); smooth tops.

Bake cakes until tester inserted into centers comes out clean, about 30 minutes. Transfer cakes to racks and cool in pans 20 minutes. Invert cakes onto racks; remove parchment paper and cool completely.

DO AHEAD: Can be made 1 day ahead. Cover and store at room temperature.

For frosting:

Place chopped chocolate in medium heatproof bowl. Combine whipping cream and espresso powder in medium saucepan. Bring cream mixture to simmer over medium-high heat, whisking occasionally. Pour cream mixture over chopped chocolate; let stand 1 minute, then whisk until chocolate is melted and mixture is smooth. Chill chocolate frosting until slightly thickened and spreadable, stirring occasionally, about 2 hours (or for quick chilling, place frosting in freezer until thickened and spreadable, stirring occasionally, about 30 minutes).

Using a serrated knife, trim rounded tops from both cake layers so that tops are flat. Place 1 cake layer, trimmed side up, on 9-inch-diameter tart pan bottom or cardboard round, then place on rack set over baking sheet. Drop 1 1/4 cups frosting by large spoonfuls over top of cake layer; spread frosting evenly to edges with offset spatula or butter knife. Top with second cake layer, trimmed side down. Spread remaining frosting evenly over top and sides of cake.

DO AHEAD: Can be made up to 1 day ahead. Cover with cake dome and refrigerate. Let cake stand at room temperature at least 1 hour and up to 3 hours before serving.

Ingredient tip:

If you can find it (try Total Wine they have a great selection), use a chocolate stout (Brooklyn Brewery and Oregon’s Rogue Brewery for example) in the cake batter. The chocolaty flavors in the beer come from dark-roasting the malts. Some brewers even add a little chocolate to the beer as well. If you can’’t find chocolate stout, use another stout, such as Guinness. Sierra Nevada Porter and Samuel Adams Honey Porter would also work well in this recipe.

If you use Facebook and are interested in the things I may not devote an entire blog post to: things like health articles, my favorite recipes, fun drinks, food facts, nutritional information, restaurant reviews, photos and other things that make my mouth water, I have a very active page on Facebook you can visit too: https://www.facebook.com/ThisGirlLovesHerFood

Napalm Spicy Chicken Wings

napalmwings

I usually spend half the day to treat my family to my decadent buffalo chicken macaroni and cheese on Super Bowl Sunday.  This year we aren’t particularly interested in the game, so we won’t be having a crowd over and it’s far to much effort (and way too many high fat/high calorie leftovers) to make for just the two of us.

Don’t get me wrong.  We’ll watch the game, but we don’t have a vested cheering interest in the game and Budweiser has opted for a political ad in place of the usual feel-good puppy and Clydesdale buddy commercial, so we won’t be glued to the TV just mindlessly eating for 5 straight hours (hopefully).

That doesn’t mean we won’t be eating something amazing though. 😉

I came across this recipe for chicken wings that claim to be beyond “inferno” hot in, of all places, the December 2015 issue of  Wine Enthusiast Magazine.  The funniest part of the recipe, as written, is that there is nothing in it to make them “Napalm Hot.”  How hot you make them is based entirely on the heat level of the hot sauce you choose to add to the recipe, so the decision is entirely yours.  In my case, to make them scorchingly hot, I will be searching for a sauce that is based on Ghost Peppers or Habañero Peppers.  They will be far too hot for me to eat, but my husband will be more than happy to burn his face off eating them!

Napalm Spicy Chicken Wings

  • 3 pounds chicken wings, patted dry with paper towels
  • Coarse kosher salt
  • Freshly ground black pepper
  • 2 tablespoons peanut or vegetable oil, plus more to fry
  • 6 tablespoons unsalted butter
  • 2–3 tablespoons honey
  • ¼ cup hot sauce
  • 2 limes, zested and juiced, plus lime wedges for serving
DirectionsPlace the chicken wings in a large bowl and season generously with salt and pepper. Refrigerate, uncovered, for at least 30 minutes and up to 24 hours.

Preheat an oven to 400˚F. Spread the chicken wings on a rimmed baking sheet in a single layer and drizzle with 2 tablespoons of oil. Place in the oven and roast until the chicken wings are firm but not fully cooked through, about 20 minutes.

In a small saucepan over medium heat, melt the butter. Whisk in honey, hot sauce and lime zest, and let simmer for 1 minute. Stir in the lime juice and remove from heat. Season with salt and pepper.

Using a large pot, pour in enough of the vegetable oil to reach 5 inches up the sides. Place over high heat and heat the oil until it registers 375˚F on a deep-fry thermometer.

Working in small batches, fry the wings, turning occasionally, until they are crisp and golden brown, 5–7 minutes. Use a slotted spoon to remove the wings from the oil and drain on a paper towel–lined baking sheet. Put the wings in a large bowl and toss with the hot sauce butter. Transfer to a platter and serve hot with additional lime wedges.

If you use Facebook and are interested in the things I may not devote an entire blog post to: things like health articles, my favorite recipes, fun drinks, food facts, nutritional information, restaurant reviews, photos and other things that make my mouth water, I have a very active page on Facebook you can visit too: https://www.facebook.com/ThisGirlLovesHerFood

Food Network’s Can O’ Beer Cake


The named the recipe didn’t entice me, but the picture sure did!  The tiny air pockets in the cake, the luscious glaze and the dark cherry compote look too good to pass up, so this is definitely gracing my next dinner party table!

Can O’ Beer Cake

Ingredients

  • Nonstick baking spray, for preparing the pan
  • One 15-ounce box yellow cake mix (I am substituting a chocolate cake mix)
  • 1/3 cup vegetable oil
  • 3 large eggs
  • One 12-ounce can lager, such as Budweiser or Sam Adams
  • 1/4 cup granulated sugar
  • 1 1/2 cups confectioners’ sugar, sifted
  • One 12-ounce bag frozen cherries, thawed
  • Whipped cream for serving, optional

Directions

Preheat the oven to 350 degrees F and spray a 10-cup plain Bundt pan with nonstick baking spray.

Whisk the cake mix, oil, eggs and 1 cup beer in a large bowl until smooth and well-combined, at least 30 seconds. Pour the batter into the prepared pan, smoothing the top with a rubber spatula, then bake until a cake tester inserted in the center of the cake comes out clean, 45 to 50 minutes.

Meanwhile, pour 2 tablespoons beer in a heatproof glass bowl and microwave until hot, about 30 seconds. Stir in 2 tablespoons granulated sugar until dissolved.

Let the cake cool in the pan for 5 minutes, then invert it onto a cooling rack. Using a toothpick, poke several holes over the cake, then drizzle the beer syrup evenly over the cake until it soaks in. Let the cake cool completely.

Stir the confectioners’ sugar and 2 tablespoons beer together in a bowl until smooth. Add more beer, 1 teaspoon at a time, as needed to form a thick glaze. Drizzle the glaze evenly over the cake and let stand until set, about 10 minutes.

Meanwhile, combine the remaining beer and 2 tablespoons granulated sugar with the cherries in a medium saucepan. Bring to a simmer over medium heat and cook, stirring, until the cherries are warmed through and the liquid is reduced to a thick syrup, about 10 minutes. Transfer the cherries to a bowl and let cool completely.

Serve cake slices with the cherries on the side and a dollop of whipped cream, if using.

If you use Facebook and are interested in the things I may not devote an entire blog post to: things like health articles, my favorite recipes, fun drinks, food facts, nutritional information, restaurant reviews, photos and other things that make my mouth water, I have a very active page on Facebook you can visit too: https://www.facebook.com/ThisGirlLovesHerFood

Creamy Avocado Bomb Sauce

This sauce, found on Pinterest,  could be used on anything from salad, to tacos, quesadillas, taquitos, egg rolls, or just eaten with chips.  The best part is you won’t need to feel guilty, at least about the dip…

  • 1 avocado
  • 1/2 cup plain Greek yogurt
  • 1/2 to 1 jalapeno
  • 3 cloves garlic chopped
  • 1/2 bunch fresh cilantro
  • 1/2 fresh squeezed lime
  • Pinch of salt
  • Freshly ground pepper
  1. Wash ingredients well, especially the cilantro because it can hold in a lot of dirt.
  2. Cut lime and avocado in halves. 
  3. Remove the avocado seed
  4. Scoop the avocado from its shell in put into Vitamix or food processor.
  5. Add 1/2 cup plain Greek yogurt, 1/2 jalapeno, 3 garlic cloves, pinch of salt and 1/2 bunch of cilantro into Vitamix/food processor. 
  6. If you do not like your dip/dressing super spicy, remove seeds of jalapeno beforehand.
  7. If you want it extra spicy, add an entire jalapeno or substitute a habanero or hotter pepper.
  8. Squeeze 1/2 lime into mix. 
  9. Blend for 3 minutes.
  10. Do a taste test. You may need to add more salt, pepper or lime juice, depending on your personal taste. 
  11. If you would like a thinner sauce, if you are using as salad dressing, add just a touch of water to thin out. Start with a tablespoon and thin a bit at a time.
  12. Blend another 1-2 minutes.
  13. Pour into a sealed container, refrigerate until ready to eat.

If you use Facebook and are interested in the things I may not devote an entire blog post to: things like health articles, my favorite recipes, fun drinks, food facts, nutritional information, restaurant reviews, photos and other things that make my mouth water, I have a very active page on Facebook you can visit too: https://www.facebook.com/ThisGirlLovesHerFood

Paula Deen’s Pumpkin Gooey Butter Cake

pumpkin-gooey-butter-cake-pauladeenI’m not someone that thinks pumpkin desserts are only for the fall.  I love pumpkin pie and get out of my way if there is a moist pumpkin bread in the building!

I don’t know if you have ever had Paula Deen’s Gooey Butter Cake, but if you haven’t, let me tell you it is a chunk (you cannot call a portion of this merely a piece) of heaven on earth!  Leave it to Paula to springboard off of that delight and create something even more decadent starring pumpkin and, of course, her favorite “heart stopping” ingredient, butter. 😉

Pumpkin Gooey Butter Cake

Ingredients

Cake:

  • 1  box yellow cake mix
  • 1 egg
  • 8 tablespoons butter, melted

Filling:

  • 1 (8-ounce) package cream cheese, softened
  • 1 (15-ounce) can pumpkin puree (NOT pumpkin pie filling)
  • 3 eggs
  • 1 teaspoon vanilla
  • 8 tablespoons butter, melted
  • 1 (16-ounce) box powdered sugar – equivalent to 3 3/4 cups (reserve 3 Tbsp for dusting)
  • 1 teaspoon cinnamon
  • 1 teaspoon nutmeg

Directions

  1. Preheat oven to 350° F.
  2. Combine the cake mix, egg, and 8 TBLS butter and mix well with an electric mixer.
  3. Pat the mixture into the bottom of a lightly greased 13 by 9-inch baking pan.
  4. In a large bowl, beat the cream cheese and pumpkin until smooth.
  5. Add the eggs, vanilla, and remaining 8 TBLS butter, and beat together.
  6. Add the powdered sugar, cinnamon, nutmeg, and mix well.
  7. Spread pumpkin mixture over cake batter and bake for 40 to 50 minutes.
  8. Check after about 35 minutes so you make sure not to overbake. The center should be a little gooey.
  9. Let the pan cool completely before you cut the squares.
  10. You could even pop the cooled pan in the fridge before cutting to get extra clean cuts.
  11. Dust squares with powdered sugar before serving.

I like to serve with a small scoop of vanilla ice cream and a sprig of fresh mint.  Yum

If you use Facebook and are interested in the things I may not devote an entire blog post to: things like health articles, my favorite recipes, fun drinks, food facts, nutritional information, restaurant reviews, photos and other things that make my mouth water, I have a very active page on Facebook you can visit too: https://www.facebook.com/ThisGirlLovesHerFood