Mushroom & Chicken Risotto

mushroom-and-chicken-risotto
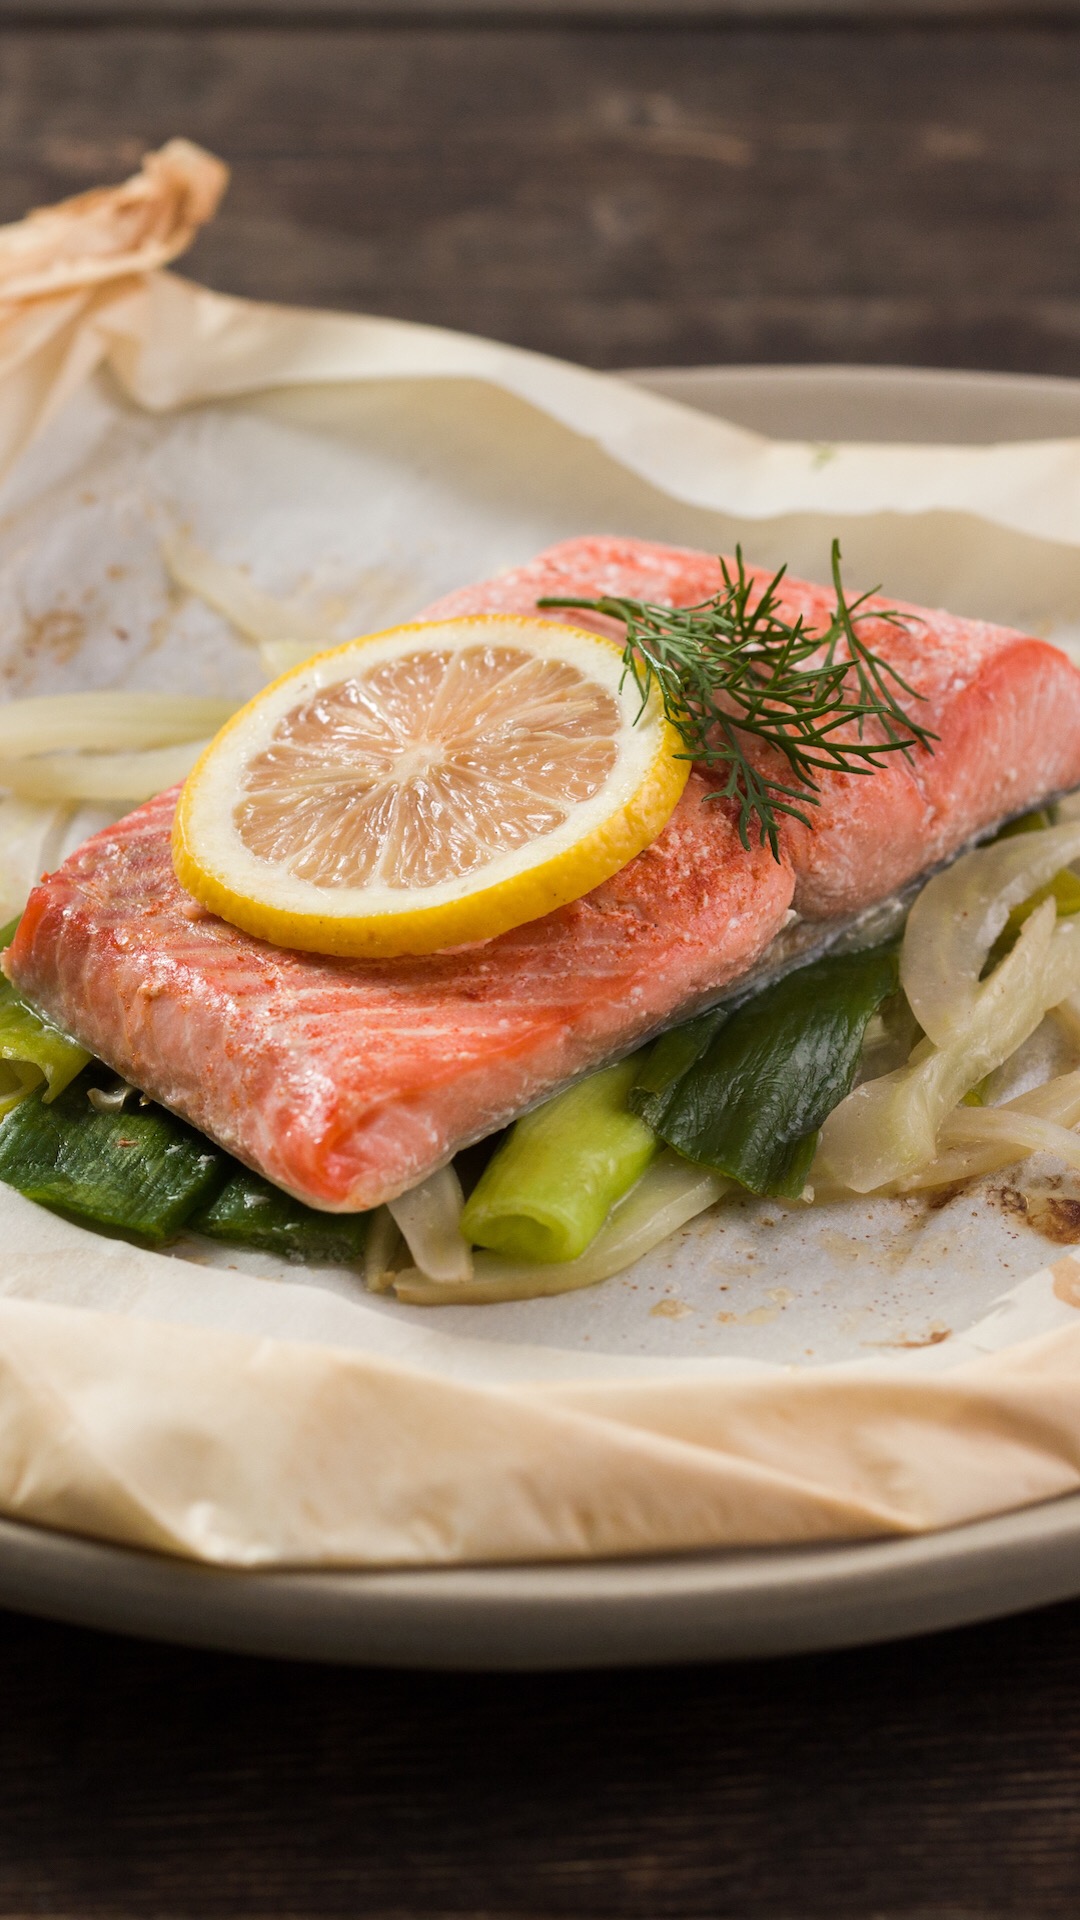
I am a sucker for a thick, creamy risotto, but hate the time it takes to stand by the stove and stir in the liquid it takes to get it that way. This recipe, from Food & Wine Magazine satisfies my need for a speedy prep without sacrificing taste or the texture I love!  An added bonus, for anyone who has an intolerance, it’s Gluten Free!

Mushroom and Chicken Risotto

  • 2 tablespoons butter
  • 1/2 pound mushrooms, cut into thin slices
  • 2/3 pound boneless, skinless chicken breasts (about 2), cut into 1/2-inch pieces
  • 1 teaspoon salt
  • 1/4 teaspoon fresh-ground black pepper
  • 5 1/2 cups canned low-sodium chicken broth or homemade stock, more if needed
  • 1 tablespoon cooking oil
  • 1/2 cup finely chopped onion
  • 1 1/2 cups arborio rice
  • 1/2 cup dry white wine
  • 1/2 cup shredded Parmesan cheese, plus more for serving
  • 2 tablespoons chopped fresh parsley
  1. In a large pot, heat the butter over moderate heat. Add the mushrooms. Cook, stirring frequently, until the mushrooms are browned, about 5 minutes. Add the chicken, 1/4 teaspoon of the salt, and the pepper. Cook until the chicken is just done, 3 to 4 minutes. Remove the mixture from the pan. In a medium saucepan, bring the broth to a simmer.
  2. In the large pot, heat the oil over moderately low heat. Add the onion and cook, stirring occasionally, until translucent, about 5 minutes. Add the rice and stir until it begins to turn opaque, about 2 minutes.
  3. Add the wine and the remaining 3/4 teaspoon salt to the rice. Cook, stirring frequently, until all of the wine has been absorbed. Add about 1/2 cup of the simmering broth and cook, stirring frequently, until it has been absorbed. The rice and broth should bubble gently; adjust the heat as needed. Continue cooking the rice, adding broth 1/2 cup at a time and allowing the rice to absorb it before adding the next 1/2 cup. Cook the rice in this way until tender, 25 to 30 minutes in all. The broth that hasn’t been absorbed should be thickened by the starch from the rice. You may not need to use all the liquid, or you may need more broth or some water.
  4. Stir in the chicken and mushrooms, the Parmesan, and the parsley and heat through. Serve the risotto with additional Parmesan.

SUGGESTED WINE PAIRING

The sweetness here will be nicely mirrored by an off-dry, aromatic white wine, such as Chenin Blanc, Riesling or Gewürztraminer from California.

If you use Facebook and are interested in the things I may not devote an entire blog post to: things like health articles, my favorite recipes, fun drinks, food facts, nutritional information, restaurant reviews, photos and other things that make my mouth water, I have a very active page on Facebook you can visit too: https://www.facebook.com/ThisGirlLovesHerFood

Easy Roasted Tomato Soup

fellp20150820_lowCalifornia’s multiple personality disorder has reared it’s ugly head again.  The weather, which had been giving us a normal winter for a change, has turned on a dime and we have Santa Ana winds, sunshine and warm temperatures just a day after rain clouds and temperatures in the low 60’s.  Ugh!  This is really screwing with my pre-planned menus!

Screw it!  I planned to make soup for dinner and soup it will be.  I don’t care if it’s warm outside or not.  If anyone complains they can chill theirs like gazpacho.

Roasted Tomato Soup

  • 1 Poblano Chili (Stem and Seed Pod Removed if Desired)
  • 6 Large Tomatoes (Hard Stems Cut Out)
  • 1 Medium Sweet Yellow Onion (Peeled and Halved)
  • 5 Large Carrots (Peeled & Tops Removed)

Preheat oven to 350°F

Place the onion, cut side down, onto an oiled baking pan along with the peeled carrots, the poblano chili and the 6 tomatoes (cut tops up). Tip:  For added flavor, I roast my chili with the stem and seed pod in and remove them before throwing into the Vitamix.

Bake for 25-30 minutes or until the tomato skins begin to crack and peel.

Preparation Option 1 – VITAMIX:

If you have a Vitamix with a soup setting like I do (it’s on the Professional Series 750), the steps are simple from here.  All you do is throw all of the roasted vegetables into the container, place the lid on securely, turn the dial to the soup setting, depress the start button and wait for the cycle to end when it’s done chopping/blending and cooking the soup.

Preparation Option 2 -Blender or Food Processor and Stove Top:

Place the onion, chili and carrots into the blender/processor container and pulse to chop the vegetables up.  Then turn the blender to puree and mix until the vegetables are well chopped.  Add the tomatoes 1 at a time blending on high until all are well incorporated.  If you run out of room in your container, move 1/2 of your vegetable mixture to the pan you’ll be heating the soup in.  When all of the vegetables are blended/pureed, heat in a pan on the stove until warm enough to eat.

If you use Facebook and are interested in the things I may not devote an entire blog post to: things like health articles, my favorite recipes, fun drinks, food facts, nutritional information, restaurant reviews, photos and other things that make my mouth water, I have a very active page on Facebook you can visit too: https://www.facebook.com/ThisGirlLovesHerFood

A Lemon Bar That Won’t Derail Your Diet

6021601_SYYOL12299Most people who put themselves on diets at the beginning of each year wrongly assume that they have to deprive themselves of anything sweet and especially anything that falls under the category of dessert.  Thankfully they are wrong on both counts.

This week my main focus is finding low fat & calorie conscious ways to satisfy your sweet tooth whether you are dieting or not.

This recipe from Cooking Light Magazine cuts the sugar from a standard lemon bar recipe down from an estimated 36 g of sugar to 6 g of sugar and only 129 calories.

Tangy Lemon Cheesecake Bars

Crust:

  • 4 ounces whole-wheat pastry flour (about 1 cup)
  • 1/3 cup sliced almonds, toasted
  • 3 tablespoons powdered sugar
  • 1 tablespoon canola oil
  • 1/4 teaspoon kosher salt
  • 1/4 cup cold butter, cut into small pieces
  • Cooking spray

Filling:

  • 3/4 cup fat-free Greek yogurt
  • 1/3 cup granulated sugar
  • 1 tablespoon grated lemon rind
  • 1/3 cup plus 1 tablespoon fresh lemon juice
  • 1 teaspoon vanilla extract
  • 1/4 teaspoon kosher salt
  • 1 (8-ounce) package 1/3-less-fat cream cheese
  • 2 large eggs

Preparation

1. Preheat oven to 350° F.

2. To prepare crust, weigh or lightly spoon flour into a dry measuring cup; level with a knife. Place flour, almonds, powdered sugar, oil, and 1/4 teaspoon salt in a food processor; pulse until almonds are finely ground. Add butter; pulse until mixture resembles coarse meal. Pour mixture into an 11 x 7-inch glass baking dish coated with cooking spray. Pat mixture down into an even layer, patting firmly without compacting too tightly (which will make crust tough). Bake at 350° for 23 minutes or until lightly browned. Remove from oven; cool completely.

3. Reduce oven temperature to 325° F.

4. To prepare filling, rinse processor, and wipe dry. Place yogurt and next 6 ingredients (through cream cheese) in processor; process until smooth. Add eggs; process until smooth. Pour mixture over crust, spreading evenly. Bake at 325° for 30 minutes or until set.

5. Cool completely on a wire rack. Cover and refrigerate 3 hours or until chilled.

Nutritional Information

Calories 129     Fat 7.7 g       Sat fat 3.5 g      Mono fat 2.6 g
Poly fat 0.8 g   Protein 4 g  Carbohydrate 12 g
Fiber 1 g     Cholesterol 37 mg    Sodium 130 mg    Calcium 34 mg

Sugars 6 g     Est. Added Sugars 5

If you use Facebook and are interested in the things I may not devote an entire blog post to: things like health articles, my favorite recipes, fun drinks, food facts, nutritional information, restaurant reviews, photos and other things that make my mouth water, I have a very active page on Facebook you can visit too: https://www.facebook.com/ThisGirlLovesHerFood

The Benefit of Green Peas

peafacts

I never minded cleaning my plate when I was a kid.  I actually liked eating my vegetables, but I never had any idea how much good they were doing!  I am especially amazed by the number of things that green peas can do for your health.

One of the most important things that peas provide us Vitamin K.  It plays a vital role in your body because it:

  • helps the blood clot – preventing excessive bleeding;
  • helps anchor calcium inside the bones which helps prevent osteoporosis; and
  • helps to restore strength to bones following steroid use.

Peas contain such high quality protein that commercial protein powders have begun using it as an alternative to soy or whey based protein.

  • Coumestrol, a phytonutrient in Peas, has been shown to reduce the risk of stomach cancers
  • The Pantothenic Acid in peas supports the energy producing cells in the body and play an important role in adrenal function
  • A cup of peas is just 81 calories, has no cholesterol, they are good source of soluble as well as insoluble fiber
  • A cup of peas provides 16% of RDA of folates. Folates are one of the B-complex vitamins required for DNA synthesis inside the cell
  • Fresh green peas are very high in Vitamin C.  A cup has 67% of the daily requirement.
  • Peas contain phytosterols, which helps lower cholesterol levels
  • A cup of peas is also high in antioxidants like carotenes, lutein and zea-xanthin as peas1well as vitamin-A (25.5% of RDA). Vitamin A is required for maintaining healthy membranes, skin and eye-sight, and protects against lung and oral cavity cancers
  • Peas are also good in many other essential B-complex vitamins such as niacin, thiamin, and pyridoxine. Furthermore, they are rich source of many minerals such as calcium, iron, copper, zinc, and manganese

Looks like I am going to mix a cup of green peas in with my quinoa for lunch tomorrow!  Yum!

If you use Facebook and are interested in the things I may not devote an entire blog post to: things like health articles, my favorite recipes, fun drinks, food facts, nutritional information, restaurant reviews, photos and other things that make my mouth water, I have a very active page on Facebook you can visit too: https://www.facebook.com/ThisGirlLovesHerFood


Creamy Avocado Bomb Sauce

This sauce, found on Pinterest,  could be used on anything from salad, to tacos, quesadillas, taquitos, egg rolls, or just eaten with chips.  The best part is you won’t need to feel guilty, at least about the dip…

  • 1 avocado
  • 1/2 cup plain Greek yogurt
  • 1/2 to 1 jalapeno
  • 3 cloves garlic chopped
  • 1/2 bunch fresh cilantro
  • 1/2 fresh squeezed lime
  • Pinch of salt
  • Freshly ground pepper
  1. Wash ingredients well, especially the cilantro because it can hold in a lot of dirt.
  2. Cut lime and avocado in halves. 
  3. Remove the avocado seed
  4. Scoop the avocado from its shell in put into Vitamix or food processor.
  5. Add 1/2 cup plain Greek yogurt, 1/2 jalapeno, 3 garlic cloves, pinch of salt and 1/2 bunch of cilantro into Vitamix/food processor. 
  6. If you do not like your dip/dressing super spicy, remove seeds of jalapeno beforehand.
  7. If you want it extra spicy, add an entire jalapeno or substitute a habanero or hotter pepper.
  8. Squeeze 1/2 lime into mix. 
  9. Blend for 3 minutes.
  10. Do a taste test. You may need to add more salt, pepper or lime juice, depending on your personal taste. 
  11. If you would like a thinner sauce, if you are using as salad dressing, add just a touch of water to thin out. Start with a tablespoon and thin a bit at a time.
  12. Blend another 1-2 minutes.
  13. Pour into a sealed container, refrigerate until ready to eat.

If you use Facebook and are interested in the things I may not devote an entire blog post to: things like health articles, my favorite recipes, fun drinks, food facts, nutritional information, restaurant reviews, photos and other things that make my mouth water, I have a very active page on Facebook you can visit too: https://www.facebook.com/ThisGirlLovesHerFood

Pet Treats People Can Eat Too!

carrotoatIn the event of a zombie apocalypse, you’re getting off the grid, bugging out, planning a hike or outdoor adventure and need to make dual duty rations for you and your canine companions, or if you just forget to grab snacks at the grocery store, these treats for your pups are a healthy snack you can feel good munching on too!  A word of caution:  if there’s any chance these might do double duty as emergency snacks, you might want to rethink the bone shaped cookie cutter. 😉

Apple, Carrot & Oat Dog Biscuits

  • 1/2 cup unsweetened applesauce
  • 2/3 cup chunky carrot juice
  • 3 tablespoons creamy peanut butter
  • 2 teaspoons pure vanilla extract
  • 2 large eggs
  • 3 cups all-purpose flour
  • 1/2 cup coarsely ground almond meal (roughly ground almond flour)
  • 1/2 cup rolled oats

Directions:

  1. Preheat the oven to 400 degrees F, with a rack in the center of the oven. Line a baking sheet with a silicone liner or parchment paper and set aside.
  2. Make your chunky carrot juice:  I take 3-4 carrots, cut the tops off, peel them carrotsand toss them into the Vitamix until they are pureed.  I then add a bit of water and blend again on high to get the consistency closer to a pulpy juice.  If the final product doesn’t measure 2/3 cup I add a bit more water until it does.
  3. Combine all ingredients in bowl of your stand mixer (or other large bowl) and stir to combine until a thick dough forms.
  4. Flour a wooden cutting board or similar surface well, and turn the dough out onto the board.
  5. Sprinkle flour on top of the dough and onto a rolling pin, and roll the dough to approximately 1/4″-1/2″ thickness. Be sure to use plenty of flour, as this dough is very sticky!bonecookiecutter
  6. When the dough is rolled out, dip a cookie cutter into flour and cut out the biscuits.cookiecutters
  7. Transfer the cut out biscuits to the prepared sheet pan, leaving about 1/4″ of an inch between each treat. These don’t spread out, so you can fit 30-40 onto a baking sheet at a time (depending on the size of your cookie cutter).
  8. Bake at 400 degrees F for 15 minutes, or until light golden brown.
  9. Remove the baking sheet from the oven and allow the biscuits to cool completely.
  10. Transfer the biscuits to an airtight container, where they will keep at room temperature for up to two weeks.

If you don’t use all of the dough you can freeze it for up to a year as long as you wrap it well with plastic wrap and place it in a freezer-safe Ziplock™ bag.  All you need to do is thaw it (still wrapped) in the refrigerator overnight and you’ll be good to go.

If you use Facebook and are interested in the things I may not devote an entire blog post to: things like health articles, my favorite recipes, fun drinks, food facts, nutritional information, restaurant reviews, photos and other things that make my mouth water, I have a very active page on Facebook you can visit too: https://www.facebook.com/ThisGirlLovesHerFood


Almonds Rock!

I love almonds!  They are easily thrown into my Vitamix to make almond meal, almond flour or almond butter to spread on my morning toast, added to my smoothies to add healthy fat & as a protein boost, and, as it turns out, they are great for your health!

I’m going into the kitchen now to grab a bowl to munch on during the football games.  A much healthier alternative to our usual chips & dip!


If you use Facebook and are interested in the things I may not devote an entire blog post to: things like health articles, my favorite recipes, fun drinks, food facts, nutritional information, restaurant reviews, photos and other things that make my mouth water, I have a very active page on Facebook you can visit too: https://www.facebook.com/ThisGirlLovesHerFood

Best Way To Cook Cauliflower Rice

how-to-make-cauliflower-rice-graterAnyone who has tried to diet, lose a few pounds, or who just wants to cut down on the many, many carbohydrates in the average American diet has likely heard of substituting white rice with cauliflower grated down into a low-calorie, gluten-free rice substitute that is also a good source of protein, fiber, and vitamins C, K, and B6.

I have yet to master “cauliflower rice.”  The methods I have used so far have left me with either a pile of mush (something close to Cream of Wheat) or rock hard mini chunks that in no way resemble rice…UG!

Thankfully the test kitchen at epicurious.com did the hard work of trying out the many methods we’ve all seen on pinterest and gave us the method that they found to be the best tasting and closest in consistency to rice so that home cooks like me can stop screwing it up so badly.  The one thing that they did note, for consistency, was that they added olive oil to all preparations (except raw).

cookingcaulirice

The following is taken directly from the article found at http://www.epicurious.com:  The Best Way to Make Cauliflower Rice; by   04.22.16

COOKING METHOD 1: NONE

They tasted the grated cauliflower in its natural state, as it is sometimes added to couscous-like salads raw and simply tossed with a rich, acidic dressing that helps break down some of its tough structure. But although the raw form is the easiest—no cooking required—it had a crunch that was too vegetable-like to approximate rice.

Epinion: Raw cauliflower rice is crunchy, and works to add texture to a salad, but it doesn’t mimic cooked rice.


COOKING METHOD 2: STEAMED IN CHEESECLOTH

Steaming the grated cauliflower is the most minimal cooking process. But since the cauliflower granules are so small, they had to use several layers of cheesecloth to hold the cauliflower in the steamer basket. The texture here was great, and the flavor was clean and fresh, very similar to the blank canvas of white rice. But removing the tiny cauliflower pieces from the cheesecloth was a pain, and some cauliflower rice was lost in the process.

Epinion: This process yields great results, but it’s too fussy.


COOKING METHOD 3: STEAMED IN WATER, THEN GRATED

They then tried steaming the whole cauliflower florets first, using a traditional steamer basket set into a medium-sized pot. Once cooled, the cooked cauliflower was grated. Although this greatly simplified the process, the cauliflower rice tasted waterlogged and was mushy.

Epinion: Steaming whole cauliflower florets doesn’t work.


COOKING METHOD 4: COOKED IN WATER

Next they tried cooking the grated cauliflower as if it were traditional rice: they added the grated cauliflower to a small amount of simmering water, covered the pan, and let the cauliflower cook until the water evaporated. Again, this yielded watery mush.

Epinion: Cauliflower rice shouldn’t be cooked the same way as rice.


COOKING METHOD 5: BOILED

Not wanting to give up on the ease of water-cooking, they tried dunking some of the grated cauliflower in a pot of boiling water and then in ice water to try out quick-blanching. But yet again, the cauliflower rice was wet and squishy.

Epinion: Water + tiny granules of cauliflower rice = soggy cauliflower.


COOKING METHOD 6: MICROWAVED

They placed the grated cauliflower into a microwave-safe bowl, stirred in the tablespoon of oil, covered the bowl tightly with plastic wrap, and cooked for about 3 minutes. And viola! Super easy, delicious texture with distinct rice kernels, and clean flavor, very similar to the steamed version, minus the mess of the cheesecloth.

Epinion: For the easiest and cleanest white-rice—esque cauliflower, use the microwave.


COOKING METHOD 7: SAUTÉED

Finally, they tested high-heat methods of cooking the cauliflower, heating up the olive oil in a pan and sautéing the grated cauliflower until lightly cooked. The taste was much richer than the microwaved cauliflower (or any of the boiled/steamed versions), but the cruciferous flavor was much stronger.

Epinion: For a sweeter, more cauliflower-forward rice, sautéing is a great option.


COOKING METHOD 8: ROASTED

For the final test, they tossed the grated cauliflower with the oil, then roasted it on a baking sheet at 400°F for about 12 minutes. This version had the sweetest flavor, thanks to the caramelization of the cauliflower. But again, that earthy, cauliflower funk was much more apparent than in other cooking methods. Cauliflower rice made this way makes a great side dish on its own, seasoned simply with butter, salt, pepper, and perhaps some cheese, but for a white rice alternative, the microwaved rice was the clear winner.

Epinion: For a quick-cooking, caramelized cauliflower side dish, roasting is the way to go.

I can see now that my mistakes were:

  • I wasn’t adding any olive oil when cooking
  • I was adding too much water
  • I was overcooking the riced cauliflower in the microwave

Knowing where I failed, plus taking the expert advice of the Epicurious test kitchen, convince me that my next attempt at cauliflower rice is going to be much better!

If you use Facebook and are interested in the things I may not devote an entire blog post to: things like health articles, my favorite recipes, fun drinks, food facts, nutritional information, restaurant reviews, photos and other things that make my mouth water, I have a very active page on Facebook you can visit too: https://www.facebook.com/ThisGirlLovesHerFood

Weeknight Salmon in Parchment

For all of us trying to get more fish, and heart-healthy Omega-3’s, into our diets, this quick and easy recipe from Tastemade (the link takes you to the video – which is handy if you have trouble folding the parchment) takes 15 minutes from prep to cook to table!

INGREDIENTS

  • 30-inch long piece of parchment paper
  • ½ bulb of fennel, thinly sliced
  • 1 large scallion, cut into 2-inch-long pieces
  • 4 oz salmon fillet
  • Salt
  • Paprika
  • 1 slice lemon
  • ¾ Tbsp butter
  1. Preheat oven to 425ºF.
  2. Fold parchment paper in half and cut out a large heart shape. Fold open the heart.
  3. In the middle of the right side of the heart, place 3–4 pieces of scallions and a few pieces of fennel. 
  4. Place the salmon skin-side down on top of the scallions and fennel. 
  5. Top salmon with salt, paprika and the lemon slice. Add the pat of butter on top.
  6. Fold the heart-shaped paper over the fish until the edges meet. (This means the crease will lift off the table.) Begin overlapping folds from the top left and work your way around to the bottom left, at which point you can twist it or paper clip it.
  7. Transfer to a baking sheet and place in oven for 8 minutes, or until meat thermometer reads 140ºF. Serve in the bag on a plate.

Toss a salad together while the salmon is baking and you’ve gotten a completely healthy meal on the table in under 30 minutes on a weeknight!

If you use Facebook and are interested in the things I may not devote an entire blog post to: things like health articles, my favorite recipes, fun drinks, food facts, nutritional information, restaurant reviews, photos and other things that make my mouth water, I have a very active page on Facebook you can visit too:https://www.facebook.com/ThisGirlLovesHerFood

Cold Outside? Warm Up Your Insides!

its-freezing-pnts-brrr-9666002I’ll be honest, cold is relative to where you are in the world.  Today I’m thankful to not be in Central or Eastern Europe, which is seeing temperatures as low as -30°C (-22°F).  Brrr

Here, in Irvine, CA today it is 62°F and raining which means I am under a warm blanket with my two Labrador Retrievers snuggled up beside me and the fireplace on as I sip on some coffee laced liberally with some Bailey’s Irish Cream.  I use the words, “I’m freezing” in nearly every conversation I have today, but I am loving this weather.  At this time last year, we were heading into what was billed as the hottest February on record with day after day of temperatures in the upper 90’s that led to 2016 being called one of the hottest, if not THE hottest year on record, so excuse my exaggeration with the term “freezing” as, in order to be cold last year, I had to have my air conditioner running.

Today I saw a picture at one of my favorite websites, www.bonappetit.com, for Chili Colorado, that made my mouth water.

colorado-chili-1-of-1

I hadn’t yet decided what to make for dinner, but, after seeing this picture, no further searching was needed.  This will definitely be dinner, and a couple of workday lunches as well!  I am not a big pork fan, so I’ll be making the beef option.

***Note I always trim all of the visible fat away so that the meat is as lean as possible.

Rick Martinez’s Mom’s Chili Colorado

  • 5 Dried Ancho Chilis
  • 2 Dried Pasilla Chilis
  • 2 Dried Guajillo Chilis
  • 8 Cups Chicken Stock (3 Cups + 5 Cups Separated)
  • 2-3 Pounds Boneless Pork Shoulder (or 2-3 Pounds Boneless Beef Shoulder)
  • Salt and Pepper
  • Oilve Oil (My substitution for Vegetable Oil)
  • 6 Cloves Garlic Chopped
  • 2 Bay Leaves
  • 1 TBLS Ground Cumin
  • 2 tsp Chopped Fresh Sage
  • 2 tsp Chopped Fresh Oregano

Now Let’s Cook!

  1. Remove the stems and seeds from all of your chilis.  Make sure you have chosen soft and pliable chilis.  If they are dry and brittle they are too old.  They will be tasteless and ruin your dish.
  2. Cover chiles with 3 cups of your chicken stock (it should already be boiling) and let them steam, covered with plastic wrap, for about 30 minutes until they are plump and tender. Put the chilis and all of the soaking liquid into a blender and purée until very smooth.
  3. Cut 2 to 3 pounds boneless pork shoulder (or boneless beef shoulder) into ½” pieces and season with salt and pepper.
  4. Brown the meat in a large, heavy pot over medium-high heat with a couple of TBLS of olive oil so meat doesn’t stick. 
  5. Chop your 6 cloves of garlic and throw it in the pot along with 2 bay leaves, 1 TBLS ground cumin, 2 tsp each of chopped fresh sage and chopped fresh oregano.  Stir that around for about a minute, or until very fragrant.
  6. Add in your remaining 5 cups of chicken stock and simmer uncovered for about an hour.
  7. Stir in the chile purée and simmer for another 45 minutes until the meat is very tender and the sauce is a thick, mahogany-red color.
  8. Season with additional salt and pepper.
  9. Serve with flour tortillas – you can serve rice and beans for a full, authentic Mexican meal, if you desire, as well.

Just imagine the love and attention you’ll get from your family when they come into the house and are surrounded by the smell of chili Colorado simmering on the stove 😉 !

If you use Facebook and are interested in the things I may not devote an entire blog post to: things like health articles, my favorite recipes, fun drinks, food facts, nutritional information, restaurant reviews, photos and other things that make my mouth water, I have a very active page on Facebook you can visit too:https://www.facebook.com/ThisGirlLovesHerFood