Thai Street Chicken

thaistreetchickenKeith Schroeder of Cooking Light Magazine wrote a book, and received a James Beard Foundation Focus on Health Book Award, Mad Delicious – The Science of Making Healthy Food Taste Amazing!, in 2014 that doesn’t just talk about the what and how of cooking great meals, but also the why.  This recipe is one that was featured in both his book and the magazine, and perfectly illustrates why guests at his table love every dish this Atlanta chef prepares!

If you replace the brown sugar with Sukrin Gold, this recipe can easily become a flavorful, Keto Friendly meal.

Thai Street Chicken

  • 1/2 Cup Cilantro Stems
  • 1/2 Cup Parsley Stems
  • 1 TBLS Brown Sugar
  • 2 tsp White Pepper
  • 2 TBLS Fish Sauce
  • 1 TBLS Oyster Sauce
  • 4 crushed garlic cloves (I use 4 tsp of jarred, crushed garlic)
  • 1 + 1/2 Pounds Boneless/Skinless Chicken Thighs (About 6)
  • Olive Oil Cooking SPray
  • 1 Cup Julienned Carrots
  • 2 Peeled/Scored/Sliced Cucumbers
  • 12 Sprigs Fresh Cilantro
  • 2 Limes Cut into Wedges

Put the parsley & cilantro stems into a gallon sized zip bag and, using a rolling pin or can of vegetables, bruise the stems by pushing down and rolling over the stems from outside the bag.  Add the brown sugar (or brown sugar alternative), the white pepper, the fish and oyster sauces, and the garlic and combine.  Add the chicken, zip the bag closed, and massage the marinade into the thighs.  Refrigerate for 30 minutes.

While the chicken is marinating, prepare the dipping sauce.

Thai Dipping Sauce

  • 6 TBLS White Vinegar
  • 6 TBLS Brown Sugar (or Brown Sugar Alternative)
  • 1/4 Cup Shaved Shallots
  • 4 TBLS Fresh Lime Juice
  • 1 tsp Fish Sauce
  • 2 Minced Thai Bird Chiles
  • 1 Clove Garlic, Crushed (1 tsp jarred crushed garlic)
  • 1/2 tsp White Pepper

In small saucepan, over medium heat, bring the vinegar, sugar and shallots to a boil.  Simmer for another 10 minutes then remove from heat.  Puree with an immersion blender (or in a blender).

Cool and then stir in the lime juice, fish sauce, chiles, garlic and white pepper.

After 30 minutes, removed the marinated chicken from the zip bag and discard the remaining marinade.  Put the chicken thighs on metal skewers.  Make sure your chicken is long and flat, you don’t want cubes with this style chicken.

Heat an oven safe (if cooking in your oven) grill pan, sprayed with Olive Oil cooking spray, over medium-high heat (or in a 300° oven).

Place the skewers on the hot grill and cook for 15 minutes.  Flip the skewers over and cook another 15 minutes.  You should be able to easily pull off a cooked piece of the chicken when it’s done.  Remove the skewers from the heat, slide the chicken off of the skewers and place on one side of a platter to rest for 10 minutes.

On the other side of the patter, in rows, line up the carrots, cucumber, cilantro springs, and lime wedges.  Serve with the dipping sauce.

Air Fryer Chicken Kebabs

chickenonrachOne way to meal prep for the week is to do kebabs in the air fryer.  Not only is it fast, but it’s a perfect way to measure out exactly what you’re eating.  Today I made chicken kebabs and put them together with 3 different sides for 3 different healthy meals this week.  These can easily be laid atop a bed of fresh spinach topped with olive oil and salt & pepper, beside a green salad, or on a mound of cauliflower mash.  Except for needing to remove and heat the kebabs separately with the salad, it’s a quick & easy minute in the microwave for a hearty weekday lunch or dinner.  #ThisGirlLovesToEat

Air Fryer Chicken Kebabs

  • 1 – 12 oz Chicken Breast, Trimmed (I used chicken breast fillets)
  • 1 Medium Zucchini, Cut into 1/2″ Slices
  • 18 Plum or Cherry Tomatoes
  • 6 Bamboo Skewers or metal skewers supplied with rack
  • 3 TBLS Low Carb BBQ Sauce

Cut the skewers (if using bamboo skewers & necessary) with a pair of kitchen shears, down to just short of the length of your Air Fryer Tray.  Soak the skewers in water for 10-15 minutes.

Cut your chicken into about 1″ Chunks and toss in 3 TBLS low carb BBQ sauce.

Thread each skewer with 3 slices Zucchini (About 1 oz), 3 plum or cherry tomatoes, 2 oz chicken breast cut into 4 chunks.  Start and end with a piece of zucchini for stability and alternate pieces of chicken and cherry tomato with a piece of zucchini in the middle.

If you have a rack for your air fryer (for holding skewers), place as many skewers as will fit without crowding (mine holds 3).  Cook for 9-10 minutes at 350° F then remove cooked skewers and finish cooking the rest.  Brush with more BBQ if desired.

Nutrition Information (Serving Size 2 Skewers)

  • 166  Calories
  • 1.2 g  Fat
  • 10 g  Carbs
  • 28 g  Protein

Low Carb Spinach Wraps

spinachwraps
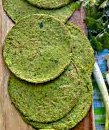
Since going Keto, I’ve missed sandwiches and wraps, so I’m always on the lookout for a low carb replacement.  Today I tripped across a simple recipe I could adapt for spinach based wraps that I can use for lunches or even burritos! #ThisGirlLovesToEat

Quick & Easy Spinach Wraps

  • 1/2 – of a 16 oz bag of Frozen Spinach (defrosted)
  • 3 Large Eggs
  • 1/2 tsp Psyllium Husk Powder
  • 1/4 tsp Xanthan Gum
  • 1/8 tsp Freshly Ground Sea Salt
  • 1/8 tsp Freshly Ground Black Pepper
  • 1/4 Cup Mozzarella Cheese
  • Olive Oil Cooking Spray
  1. Defrost spinach, then squeeze out all of the water.
  2. Put the spinach and all other ingredients in your blender or Vitamix.
  3. Process for 1-2 Minutes, gradually increasing your speed, until all ingredients are combined and very smooth.
  4. Add in 1/2 Cup Mozzarella Cheese.  Blend another 15-30 Seconds.
  5. Lightly spray a small skillet with the olive oil spray (I used a 6 1/3″ Le Crueset Skillet) and put on stove with flame set to medium-high heat.
  6. After about 30 seconds, lower heat to medium and pour about 1/2 of the batter in the middle of the pan.
  7. Using a spatula spread the batter out to make a tortilla shape – the mix will be thick but not unspreadable, just keep spreading until you have created an even, thin disc.
  8. Cook for 2-3 minutes, you should see bubbles popping like when cooking a pancake, or until the edges start to shrink away; check if cooked by lifting the edge: if it lifts easily, you can now flip your tortilla over and cook the other side for about another minute.
  9. Remove from pan, cool on a wire rack, and fill with your favorite sandwich or wrap fillings.

Cool completely and make sure wraps are dry before storing in a sealed container, between pieces of parchment or waxed paper, in the refrigerator.  Can be frozen in zip bags as well.

Nutrition Information per wrap (makes 3 large wraps):

  • 168  Calories
  • 6 g  Fat
  • 3 g  Carbs
  • 9 g  Protein

Skip the Take-Out Beef & Broccoli

Clean eating isn’t hard if you put a little thought into it.  I love Chinese take-out but hate all of the carb-heavy thickeners and calorie bomb, sugary sauces that are used in restaurant fare.  A few tweaks, and a little make-ahead prep, lets me put this weeknight staple on the table in under 15 minutes after work!  The substitutions I made are also #KetoFriendly, which is something this busy Keto girl definitely loves. #ThisGirlLovesToEat

BeefAndBroccoli

Keto Beef & Broccoli

  • 3 TBLS Low Sodium Soy Sauce
  • 2 TBLS Olive Oil (I used garlic infused)
  • 2 TBLS Toasted Sesame Oil
  • 2 TBLS Clam Juice
  • 1 TBLS Apple Cider Vinegar
  • 1 tsp Garlic Powder
  • 1 tsp Onion Powder
  • 1 tsp Freshly Grated Ginger
  • 1/2 tsp Red Pepper Flakes (or more to taste)
  • 1/2 tsp Xanthan Gum

In a small bowl, whisk together all ingredients EXCEPT the Xanthan gum and set aside.

  • 1 Pound Lean Beef Sirloin, Boneless Ribeye, Flat Iron, or Flank Steak, sliced very thinly across the grain
  • 2 Cups Broccoli Florets
  • 1 TLS Olive Oil
  • 2 Crushed Garlic Cloves (I use 2 tsp jarred crushed garlic)
  • 1/2 tsp Freshly Ground Sea Salt
  • 1/2 tsp Freshly Ground Black Pepper
  • 1 TBLS Sliced Green Onions  (Scallions)
  • 2 TBLS Sliced Almonds (if desired)
  • 1 TBLS Toasted Sesame Seeds (if desired)

Put the sliced beef and 1/3 of the marinade in a quart sized zip bag, seal and put in the refrigerator to marinate for 4-6 hours (while your’re at work all day) or overnight.

Do ahead tip:  Stir fry the broccoli until it’s just crisp-tender (3-4 minutes) in 1 – 2 TBLS olive oil over medium-high heat, then remove from pan to a large zip bag or covered bowl and put in the refrigerator.

When you are ready to assemble your dish, using a large skillet, (I use my 4.5 quart high sided Dutch oven) heat the olive oil over medium-high heat.  Discard the marinade and place the beef into your pan.  If you’ve sliced your beef nice and thin, it should take only 2-3 minutes per side to brown.  Remove the beef to the bowl with the broccoli and add the reserved 2/3 marinade, salt & pepper to the pan.  Cook for about 2 minutes then stir the Xanthan Gum into the sauce.  Cook another minute or two, or until the sauce has thickened to a desired consistency and add the meat & broccoli back to the pan to coat in the sauce and warm through.  Add the Green Onions in the last few seconds of cooking.

Serve over cooked cauliflower rice and top with sliced almonds & toasted sesame seeds if desired.

Nutrition Information (Serves 6)

  • 203 Calories
  • 14 g Fat
  • 1.3 g Carbs
  • 15.5 g Protein

Coconut Lime Cauliflower Rice

Lime-Coconut-Cauliflower-Rice

A new spin on a Keto staple.

This recipe is so versatile that it could be:


  • A side dish for chicken, seafood, beef, pork, or grilled vegetables
  • A base layer for a sweet flavored (like Keto Sweet & Sour Chicken) Asian inspired main dish bowl
  • A bed for kebabs
  • A layer in a cold chicken salad
  • A taco or burrito ingredient, or even
  • Chilled and served as a “rice pudding” type dessert.

Tip:  This dish is better a day (or at least a few hours) after it’s been made and refrigerated, then reheated.

Coconut Lime Cauliflower Rice

  • 1 TBLS Butter
  • 1 Clove Garlic, Crushed into a Paste (I use jarred, crushed garlic)
  • 1 Medium-Large Head Cauliflower, Riced (About 6 Cups)
  • 1/4 tsp Salt
  • 1 Cup Lite Coconut Milk
  • 1 TBLS Lime Juice
  • Zest from 1 Lime

Heat the butter and garlic in a skillet over medium heat.

Steam the riced cauliflower in a microwave steamer for 3 minutes.  Add the cauliflower rice to the skillet, sprinkle with salt and cook for 2 minutes before adding in the coconut milk and lime juice. Cook the rice for 8 minutes stirring frequently until the rice has completely softened and most of the liquid has evaporated.

Sprinkle the rice with lime zest before serving.  #ThisGirlLovesToEat

Nutrition Information per serving – 6 Servings

  • 68 Calories
  • 2.5 g Fat
  • 6 g Carbohydrates
  • 2 g Protein


Keto Sweet & Sour Chicken

Because many of the sauces are so full of sugar and corn starch and the dishes are so carb heavy, with rice or egg noodles as a bed for the featured protein, most traditional Chinese food is very unfriendly to those following a #KetoLifestyle.  This kid-pleasing dish is one of the few I’ve been able to adapt without ruining the spirit of the original.

1

Keto Sweet & Sour Chicken with Broccoli

  • Olive Oil Spray
  • 1 Pound Boneless, Skinless Chicken Breast
  • Juice and 1 + 1/2 tsp Grated Zest of 1 Medium Orange
  • 12 oz Small Broccoli Florets
  • 1 Orange or Red Bell Pepper cut into 1/2″ – 1″ chunks
  • 3 TBLS Rice Vinegar
  • 2 TBLS Low Sodium Soy Sauce
  • 1 TBLS Xanthan Gum
  • 2 TBLS Honey
  • 1 TBLS  Crushed Garlic
  • 1/4 tsp Dried Red Pepper Flakes
  • 1/2 tsp Sea Salt
  • 2 TBLS Sliced Almonds
  • 1 Green Onion, Chopped
  • White Sesame Seeds

Whisk vinegar, soy sauce, and Xanthan gum in a small bowl.  Stir in the salt and red pepper flakes and set aside.

Spray large skillet with Olive Oil Spray and heat over medium-high heat.  Add chicken and cook until browned and cooked through, 6-8 minutes.  Remove chicken from pan.

Add juice from the orange and cook for 15-30 seconds, stirring up any browned bits fro the pan.  Add broccoli & bell pepper and cook about 4 minutes, or until they’re just crisp-tender.

Add the honey and garlic to vinegar mixture, then add to the pan and bring to a boil.  Cook about 1 minute, stirring continuously until the sauce begins to thicken.  Return chicken to the pan and continue cooking for another minute, stirring to make sure that all of the broccoli and chicken are well coated with the sauce.  Remove from heat and stir in slivered almonds, chopped green onion, & orange zest.

Serve over steamed or stir-fried cauliflower rice.  Top each serving with a sprinkling of sesame seeds and, if you like more spice, additional red pepper flakes.

Nutrition Information (6 Servings)

  • 163 Calories
  • 3 g  Fat
  • 7 g Carbohydrates
  • 19 g Protein

Nutrition Information (4 Servings)

  • 244 Calories
  • 5 g  Fat
  • 11 g Carbohydrates
  • 29 g Protein

#ThisGirlLovesToEat

Cheesy Green Chili Keto Breakfast Casserole

Steve-Swartz-1392x928_editedI’ve been Missing in Action for the past two weeks.  My brother-in-law passed away unexpectedly and cooking has been the last thing on my mind.  Eating however, has continued thanks to the wonderful people of the community of San Clemente, California.  The San Clemente Sunrise Rotary and the neighbors in their Flora Vista community have kept meals on our table round the clock the entire two weeks.  I have never been more  thankful or humbled.  The generosity and outpouring of support has been beyond anything I could have imagined, and I am so very grateful.

Very grateful and now 6 pounds heavier, LOL!  They’ve brought so much comfort food, and what is comfort food typically made up of? Carbs…a Keto dieter’s biggest FOE!  So, it’s time for this girl, who LOVES to eat, to get back on track.

IMG_4545_edited

Cheesy Green Chile Keto Breakfast Casserole

  • 8 Large Eggs
  • 6 oz Trader Joe’s (or any brand) Shredded Swiss & Gruyère
  • 8 oz Shredded Sharp Cheddar Cheese
  • 1 – 4 oz Can Mild Diced Green Chiles (Ortega or any brand)
  • 2 TBLS Bob’s Red Mill Paleo Baking Flour
  • 1/2 Cup Heavy Whipping Cream
  • Freshly Ground Sea Salt & Pepper to taste

Preheat your oven to 350° F, and butter the bottom and sides of a 9 x 13 glass baking pan.

Using a whisk. combine 1/2 of your whipping cream with the flour in a large mixing bowl to make a thick paste, then whisk in the rest of your cream and your eggs and set aside.

Combine your cheeses and put about 1 Cup of it into the bottom of your buttered pan.

Evenly distribute the diced green chiles over the top of the cheese layer.

Give the egg mixture another quick whisk and pour over the top of the chile & cheese in the pan, then sprinkle the remaining cheese on top.

Bake for 25-30 minutes or until the eggs are set in the center.  Mine took about 29 minutes.

Allow the casserole to set about 5 minutes after removing from the oven then cut into 12 pieces.  Serve as is or top with salsa and/or sour cream and chopped green onion or chives if desired.  #ThisGirlLovesToEat

Nutritional Information (12 Servings)

  • 142 Calories
  • 12 g Fat
  • <1 g Carbohydrates
  • 8.5 g Protein

Garlic Cauliflower Gnocchi

4I’m all-in on my #KetoLifestyle, but there are certain things I enjoy, like bread and pasta, that I miss incredibly.  I love zucchini, but I can’t accept zoodles as a legitimate replacement for pasta.  Trader Joe’s makes a great cauliflower gnocchi, but it’s not Keto friendly, so I set out to adapt a regular gnocchi recipe to one that fits into my Keto lifestyle.  It’s also a great recipe for anyone following a Gluten Free diet.

Garlic Cauliflower Gnocchi

  • Medium Head Cauliflower
  • 1/2 Cup + 2 TBLS Bob’s Red Mill Paleo Baking Flour
  • 1/2 tsp salt
  • 1/4 tsp Garlic Powder
  • 1 tsp Dried Basil
  • Olive Oil Spray

Combine the flour, salt, garlic powder and basil in a bowl and set aside.

Remove the stem from the cauliflower and cut it into florets. You want 5 cups of florets.  Put the cauliflower florets in a food processor (I use my Vitamix) and pulse until it’s riced into crumbles.

SistemaLargeSteamerUsing a microwave-safe steamer (I use the Sistema 6 Cup [Large] Microwave Steamer) cook the cauliflower 7+1/2 to 10 minutes on high – you want the cauliflower done but not soggy.

TIP:  If you don’t have a microwave steamer:  Place all of the cauliflower in a microwave-safe bowl and cover it with a paper towel. Microwave for 5 minutes. Remove the cauliflower and spread it on a towel to cool.  Once cauliflower is cool enough to work with, wrap in a towel and squeeze the water out.

Place the cauliflower back in the food processor (Vitamix). Blend until creamy.

Put the drained cauliflower into a large bowl (I used my stand mixer with the dough hook attachment) and add the dry ingredients.  Mix together until your dough comes together.  TIP:  Do not add more flour – it’s OK that the dough is sticky at this point.

Transfer the dough to a floured bread board or counter top. To make the dough easier to work with, you’ll want to add an additional tablespoon or two (no more than that) of flour as you roll the dough. Shape it into a ball, then wrap it in a piece of waxed paper and refrigerate the dough for about 15 minutes.  Take the dough out of the refrigerator and slice it into 4 equal sections.

Roll each section out until you have a rope about 1-inch thick.  Slice the dough into 1/2″ squares with a sharp knife.

I do a two part cooking process.  First I boil the gnocchi in rapidly boiling, salted water for 6 minutes.  Next you have the choice of how (if at all) you want to brown up your gnocchi.  I prefer to brown it to give the gnocchi a nice seal – you can decide on the degree of brownness you like.

To Sauté the gnocchi:  Using olive oil cooking spray (for the least added calories and fat), generously spray a skillet and, working in batches, place a single layer of gnocchi in the pan and then give them a light coating of olive oil spray on the exposed side.  Cook about 5 minutes per side if you like them crisp and deep brown.  You can reduce the time for lighter brown, less crispy, more traditional gnocchi.

To Oven Roast the gnocchi:  Line a cookie sheet with foil and lightly spray it with olive oil cooking spray.  Place your boiled gnocchi down in rows, spray the tops with olive oil spray and lightly season with salt & pepper.  In a preheated 425° F oven, bake for 12 minutes then turn the gnocchi over, return to the oven and continue cooking for an additional 10-12 minutes.  This will give you a nice, crispy, medium brown gnocchi.

To Serve:  I melt some butter in a skillet and add some freshly chopped basil and garlic to the butter and sauté for about 3 minutes over medium heat until the butter just starts to brown a bit.  Drizzle the sauce over the piles of gnocchi and serve immediately.  Alternatively, these hold up great in a spicy marinara sauce with some freshly grated Parmesan cheese too.  #ThisGirlLovesToEat

Nutrition Information per serving (Serves 4)

  • Calories   100
  • Net Carbs 6.75 grams
  • Fat             2.5 grams
  • Protein    5 grams

Banana Muffin Tops

muffintops2I’m in the maintenance phase of Keto, where I have more leeway with the number of carbs I’m eating, which makes me a lot happier.  I’ve missed bread & pizza the most, but don’t want to completely erase my positive health gains by going back to high carbohydrate baked goods.  That leaves me few choices because, frankly, I have been very unimpressed with #KetoApproved recipes for breads.  It’s been really frustrating.

I’m stubborn though, so I keep trying.  I am still working to modify my recipes to create  #KetoFriendly baked goods that don’t taste like cardboard, have a too-dense, unenjoyable texture, and that I’d want to eat more than once.  This one was a win!

Banana Muffin Tops

  • 1 Cup Bob’s Red Mill Rolled Oats (they’re Gluten Free)
  • 1/2 Cup Ground Flax Seed
  • 1/2 tsp Cinnamon
  • 1/2 tsp Salt
  • 1 tsp Baking Powder
  • 2 Large Eggs
  • 1 tsp Vanilla Extract
  • 1/4 tsp Liquid Stevia
  • 1/2 Cup Milk
  • 2 Medium Ripe Bananas (6″-7″), mashed
  • Chopped Macadamia Nuts, Walnuts, Sugar Free Dark Chocolate Chips, Unsweetened Coconut Flakes (if desired)

Preheat oven to 350° F and lightly spray a baking sheet or muffin top pan with cooking spray (TIP: Don’t use an Olive Oil based spray – it will change the flavor of your muffin tops).

Combine oats, flax seed, cinnamon, salt, and baking powder in a bowl and set aside.

In the bowl of your stand mixer, lightly beat the eggs, then mix in vanilla, stevia, milk, and mashed bananas.  (TIP:  If you are adding unsweetened coconut to your muffin tops, add it into the wet mixture)  Leave mixer on low and slowly add dry ingredients until well combined.  Let the batter sit for 5 minutes.

If you are using a muffin top pan: Divide the batter equally between 12 top-cups.  Make sure you mound the batter – don’t smooth the batter flat. (TIP:  If you are adding nuts or chocolate chips, etc., to your muffin tops, gently press those items on top of your mounded batter)  Bake for 20 minutes and allow to sit in the pan to cool for 5 minutes before removing to cooling racks.

If you are using a cookie sheet: Divide the batter into 6 equal mounds per sheet remembering not to smooth the batter flat.  Tops will spread a little bit, so space them out on the baking sheet.  Bake for 18 – 20 minutes and allow to sit on the pan to cool for 5 minutes before removing to cooling racks.

Store the muffin tops in a tightly sealed container in the refrigerator.  These are great plain, but you can also spread peanut butter or cream cheese on them for an extra decadent treat.  #ThisGirlLovesToEat

Pizza Egg Cups

5

I love bacon, but this #KetoGirl needs to switch things up once and a while to avoid breakfast boredom.  Enter pepperoni and breakfast is a whole new ballgame.

These are easy to prepare and a nice change from routine bacon and egg cups!  I only make a few at a time because they are a stronger flavor that I don’t really want to eat for breakfast every day during the week.  When I make these I change up breakfast with hard boiled eggs, berries and fat-free Greek yogurt, a 2 egg-veggie scramble, or breakfast pizzas.

Pepperoni Pizza Egg Cups

  • 12 Slices Unsulphured Deli Pepperoni, cut in half (I buy a pound at a time from the butcher at Whole Foods)
  • 2 Large Eggs
  • 2 TBLS Milk or Heavy Cream
  • 1 Slice Provolone Cheese, cut in quarters
  • 1 TBLS Diced Green Onion
  • 2 TBLS Shredded Cheddar Cheese

Preheat oven to 400° F.

Line 4 cups in a 12 hole muffin tin with the pieces of pepperoni.  Place the muffin tin in the oven and cook for 5 minutes.  Remove pan from the oven and move the semi formed pepperoni cups to new holes.  Sop up the grease from the holes they cooked in.

Place one 1/4 piece of the cheese within each pepperoni cup and the green onion between the 4 cups.  Put the pan back into the oven for 3 minutes.

Lightly beat the eggs with the milk and divide them between the 4 cups.  Sprinkle the top of each with the cheddar cheese.  Bake for an additional 9 – 10 minutes, or until the eggs are cooked through, and then remove from the oven.

Immediately loosen and remove the egg cups from the pan.  Serve immediately or store in a tightly covered container.  Reheat in microwave for 30-45 seconds.  #ThisGirlLovesToEat