Paula Deen’s Pumpkin Gooey Butter Cake

pumpkin-gooey-butter-cake-pauladeenI’m not someone that thinks pumpkin desserts are only for the fall.  I love pumpkin pie and get out of my way if there is a moist pumpkin bread in the building!

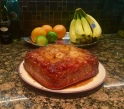
I don’t know if you have ever had Paula Deen’s Gooey Butter Cake, but if you haven’t, let me tell you it is a chunk (you cannot call a portion of this merely a piece) of heaven on earth!  Leave it to Paula to springboard off of that delight and create something even more decadent starring pumpkin and, of course, her favorite “heart stopping” ingredient, butter. 😉

Pumpkin Gooey Butter Cake

Ingredients

Cake:

  • 1  box yellow cake mix
  • 1 egg
  • 8 tablespoons butter, melted

Filling:

  • 1 (8-ounce) package cream cheese, softened
  • 1 (15-ounce) can pumpkin puree (NOT pumpkin pie filling)
  • 3 eggs
  • 1 teaspoon vanilla
  • 8 tablespoons butter, melted
  • 1 (16-ounce) box powdered sugar – equivalent to 3 3/4 cups (reserve 3 Tbsp for dusting)
  • 1 teaspoon cinnamon
  • 1 teaspoon nutmeg

Directions

  1. Preheat oven to 350° F.
  2. Combine the cake mix, egg, and 8 TBLS butter and mix well with an electric mixer.
  3. Pat the mixture into the bottom of a lightly greased 13 by 9-inch baking pan.
  4. In a large bowl, beat the cream cheese and pumpkin until smooth.
  5. Add the eggs, vanilla, and remaining 8 TBLS butter, and beat together.
  6. Add the powdered sugar, cinnamon, nutmeg, and mix well.
  7. Spread pumpkin mixture over cake batter and bake for 40 to 50 minutes.
  8. Check after about 35 minutes so you make sure not to overbake. The center should be a little gooey.
  9. Let the pan cool completely before you cut the squares.
  10. You could even pop the cooled pan in the fridge before cutting to get extra clean cuts.
  11. Dust squares with powdered sugar before serving.

I like to serve with a small scoop of vanilla ice cream and a sprig of fresh mint.  Yum

If you use Facebook and are interested in the things I may not devote an entire blog post to: things like health articles, my favorite recipes, fun drinks, food facts, nutritional information, restaurant reviews, photos and other things that make my mouth water, I have a very active page on Facebook you can visit too: https://www.facebook.com/ThisGirlLovesHerFood

Oreo Red Wine Nutella Cupcakes

red-wine-nutella-cupcakes-with-oreo-nutella-filling-and-red-wine-frosting-767x1024I was sourcing articles related to wine and the picture, almost as much as the title convinced me, although I am seriously deficient in the cupcake decorating department, to give these a try.

I’m not sure what appealed to me more, the wine or the chocolate, but I figured I could manage combining them without staining everything in my kitchen.  I might even be able to pipe on the frosting without too much problem, so I’m off to the store to make these grown up delights!

I found this little bit of deliciousness at a blog I saw on Pinterest: www.yummyaddiction.com.

One thing: I noticed the blogger didn’t specify what type of wine she used or recommend a type.  For my own personal taste, with the cocoa, cinnamon and brown sugar in the cake, I am going to go with a red wine with a similar flavor profile like a Zinfandel, Petite Syrah or maybe a Pinot Noir or Malbec.

Oreo Red Wine Nutella Cupcakes

Makes: 10 cupcakes
For the cupcakes:
  • 1 cup all-purpose flour
  • ¼ cup cocoa powder
  • 1 teaspoon baking soda
  • ½ teaspoon baking powder
  • ¼ teaspoon salt
  • ¼ teaspoon ground cinnamon
  • ¼ cup unsalted butter, at room temperature
  • ¼ cup brown sugar
  • 2 tablespoons granulated sugar
  • 1 egg
  • ¼ cup red wine, any kind you like
  • ½ teaspoon vanilla extract
  • ¼ cup Nutella
  • 10 Oreos
For the filling:
  • ½ cup Nutella
  • 5 Oreos
For the frosting:
  • 1 cup red wine, any kind you like
  • ¼ cup granulated sugar
  • ½ cup unsalted butter, at room temperature
  • 2 cups powdered sugar
  • 1 teaspoon vanilla extract
  • salt, to taste
  1. Preheat oven to 350 degrees F. Line 10 muffin cups with cupcake liners. Set aside.
  2. The cupcakes. In a medium bowl, sift together the flour, cocoa powder, baking soda, baking powder, salt, and cinnamon. In a large bowl, cream the butter and sugars together until fluffy. Add the egg and beat to combine. Scrape down the sides of the bowl as needed. Beat in the vanilla extract. Stir in Nutella and red wine until evenly combined. Slowly add the flour mixture to the wet ingredients and mix until just combined. Place an Oreo cookie on the bottom of each cupcake liner. Pour batter over each Oreo cookie and fill each cupcake liner about ¾ of the way full. Bake the cupcakes for about 20 minutes or until a toothpick inserted in the center comes out clean. Remove from oven and place on a wire rack to cool completely.
  3. The filling. In a ziplock bag, place the Oreos and use a mallet to crush the cookies into small pieces. In a small bowl, combine Nutella with crushed Oreos. Set aside.
  4. The frosting. In a small saucepan, combine red wine and sugar. Cook over mediumoreo-red-wine-nutella-cupcakes-center heat, stirring, until sugar dissolves and wine comes to a boil. Reduce heat and simmer for 20 minutes (until the liquid is reduced to about ¼ cup or a light syrup texture). Let cool.
  5. Beat the butter until until smooth and creamy. Slowly add in powdered sugar (1/2 cup at a time), vanilla, and ¼ cup of prepared wine syrup. Beat until no lumps remain. Taste the frosting and add salt to cut the sweetness, if you prefer.
  6. Assembling the cupcakes. Cut out the center of each cupcake with a sharp knife. Fill the cupcakes with Nutella & Oreo filling. Transfer the frosting to a piping bag fitted with a decorative tip. Pipe frosting into a swirl on each cupcake. Enjoy!

If you use Facebook and are interested in the things I may not devote an entire blog post to: things like health articles, my favorite recipes, fun drinks, food facts, nutritional information, restaurant reviews, photos and other things that make my mouth water, I have a very active page on Facebook you can visit too:https://www.facebook.com/ThisGirlLovesHerFood

Darkest Chocolate Cake With Red Wine Glaze

chocolate-red-wine-cake-101916

I keep old copies of Bon Appétit, Gourmet, Cooking Light, Food and Wine, and other cooking magazines for when I want to break out of a recipe rut.  Lately I have been experimenting with wine more in my cooking and baking, but wasn’t happy with the texture of the last couple of cakes I’d made, so I thumbed through in search of professional guidance so I’d be able to share something decadent at an upcoming dinner party.

I found exactly what I was after in the February 2014 edition of Bon Appétit.  

**Tip:  I always read the reviews of those who have made the recipes, paying particular attention to those who have made them more than once.  Those changes have been included in the recipe below.

Darkest Chocolate Cake With Red Wine Glaze

  1. Cake:
    • 1 cup (2 sticks) unsalted butter, cut into pieces, plus more for pan
    • 1/3 cup all-purpose flour, plus more for pan
    • 8 ounces unsweetened cocoa or 100% cacoa baking chocolate chopped
    • 1 cup sugar
    • 6 large eggs
    • 3/4 teaspoons kosher salt
  2. Glaze and assembly:
    • 8 ounces bittersweet chocolate (at least 70% cacao), finely chopped
    • 1/4 cup (1/2 stick) unsalted butter, cut into small pieces
    • 1/2 teaspoon kosher salt
    • 1/2 cup powdered sugar
    • 1/2 cup red wine (such as Pinot Noir)
    • Blackberries, Raspberries and/or Strawberries (1-2 baskets total) washed, stemmed (if necessary) and laid on paper towels to dry
    • Special equipment: A 9″ Springform pan
  1. For cake:
    1. Preheat oven to 325°F. Lightly butter and (powdered) sugar the pan.
    2. Melt the chocolate and the butter.
    3. Separate the 6 eggs.
    4. Whisk the egg yolks and sugar together until the eggs are thick and pale in appearance.
    5. Pour a little of the chocolate mixture into eggs to temper it and then add the egg mixture to the chocolate and mix well.
    6. Add the flour and the salt and mix til combined.
    7. Beat the egg whites until soft peaks form.
    8. Add a bit to the batter and gently mix in.
    9. Add the rest of the egg whites to the batter and gently fold until completely incorporated into the batter.
    10. Pour batter into pan, it should go almost all the way to the top.
    11. Bake for 43-45 minutes, check with toothpick for doneness, if it comes out clean–it’s done.
    12. Transfer pan to a wire rack and let cake cool completely in pan before turning out.
    13. Cool completely before releasing pan.
    14. Glaze as directed and pair with some of the berries to balance out the chocolate.
  2. For glaze and assembly:
    1. Heat chocolate, butter, and salt in a heatproof bowl set over a saucepan of simmering water (bowl should not touch water), stirring, until chocolate and butter are melted, about 5 minutes. Whisk in powdered sugar.
    2. Meanwhile, bring wine just to a boil in a small saucepan.
    3. Remove chocolate mixture from heat and whisk in wine; let cool until slightly thickened and a rubber spatula leaves a trail in mixture when stirring, 8–10 minutes.
    4. Set cake on a wire rack set over a rimmed baking sheet. Pour glaze over cake and spread it across the top and over the edges with an offset spatula. Let cake stand at room temperature until glaze is set, 2–3 hours.
    5. DO AHEAD: Cake can be made and glazed 2 days ahead. Chill. Bring to room temperature before serving.

Alternative Preparation:  You an substitute an equal amount of Chambord Liqueur for the wine and you will get a sweeter dark raspberry taste to the chocolate glaze.

The cake is very rich.  Slice into very narrow pieces – you can easily serve 12-16 with this decadent cake!

If you use Facebook and are interested in the things I may not devote an entire blog post to: things like health articles, my favorite recipes, fun drinks, food facts, nutritional information, restaurant reviews, photos and other things that make my mouth water, I have a very active page on Facebook you can visit too:https://www.facebook.com/ThisGirlLovesHerFood

Upside Down Banana Bread

udbb1Since this New Year’s Day is “Upside Down,” you know, all of the official festivities happening on Monday, January 2, what better way to kick-off (no pun intended) our entire day of parade and football watching than with this upside down take on my favorite overripe fruit concoction?

Our whole holiday week between Christmas and New Year’s Day has been spent at home, except for an escape on Wednesday for my birthday dinner WITH a 102°F temperature, so I did no baking, we did no entertaining, and I’ve really done nothing but sleep and drink hot tea.  I’m trying to rally, despite being sick, and make some kind of effort for tomorrow, yet another day of being sick at home, but at least there will be something I might want to eat.

My husband (he who is Twitter challenged) managed to send this Buzzfeed video to me in a message a couple of months ago as a hint, then I saw it again last night.  It looks easy enough so why not?  I’ll give it a try.

Upside Down Banana Bread

4-5 ripe bananas
3 eggs
½ cup oil
½ cup granulated sugar
1 Tbsp. ground cinnamon
2 cups flour
½ cup butter
1 cup brown sugar
2-3 bananas, sliced
Vanilla ice cream

  • Preheat oven to 350°F/175°C.
  • In a large bowl, mash the ripe bananas.
  • Add the eggs, oil, sugar, and cinnamon, mixing until evenly incorporated.
  • Add the flour and mix until the batter has no large pockets of flour. Set aside.
  • In a pot over low heat, melt the butter, then mix in the brown sugar until dissolved.
  • Bring up the heat to medium, cooking until the mixture starts bubbling.
  • Remove the caramel from heat and pour into a greased 9×9 baking pan.
  • Lay the banana slices evenly on top of the caramel.
  • Spread the banana bread batter on top.
  • Bake 40-50 minutes.
  • Cool until the bottom is barely warm.
  • Use a knife to loosen the edges from the pan.
  • Place a plate upside-down on top of the pan, then invert the pan, flipping the banana bread onto the plate.
  • Slice, then serve with vanilla ice cream.

TIP**  It’s important to make sure you are using a 9 x 9 pan.  If you use an 8 x 8 pan, like I did my first try, you need to increase the baking time by about 10 minutes and be prepared, you’ll be cleaning up the brown sugar that will bubble up and spill over the sides and burn onto the bottom of your oven.  Trust me, the smoke alarms blaring, dogs running around barking and the cleanup weren’t worth not following the exact directions.  UG!

It’s very sweet, so you might want to start with a small square and go back for seconds. Who am I kidding?  Put it in a bowl and pile the ice cream on!  And, before you ask, “Yes, I do intend to start my day with glorified cake and ice cream!”  #TheDietStartsTuesday 

If you’re on Facebook and are interested in the things I may not devote an entire blog post to: my favorite recipes, drinks, food facts, nutritional information, photos and other things that make my mouth water, I have a page on Facebook you can visit too:https://www.facebook.com/ThisGirlLovesHerFood

Snickerdoodle Pumpkin Chiffon Pie

Don’t get me wrong, nothing says fall, Halloween and Thanksgiving more than pumpkin pie, but the same old pumpkin pie year in – year out can get boring.  I thought I’d shake things up a bit with a curveball and a bit of unexpected flavor that I hope we all will enjoy!

saraleepumpkinpie

I’ll still make a regular pumpkin pie, and if you are planning to make a regular pumpkin pie too, there is a hotline setup to help you in case you get in a bind: Sara Lee Pie Hotline 1-888-914-1247, Monday through Friday from 7 a.m. to 6 p.m. CST.  The hotline is open Thanksgiving Day from 7 a.m. to 1 p.m. CST.

Snickerdoodle Pumpkin Chiffon Piepumpchif

Assemble the Crust

  • 4 TBLS (1/2 stick) Unsalted Butter, at room temperature
  • 1 TBLS Unsalted Butter for greasing the pan
  • 2 TBLS Cinnamon
  • 1/2 Cup + 2 TBLS Sugar
  • 3/4 Cup Flour
  • 1/4 tsp Baking Soda
  • 1/4 tsp Salt
  • 1 Large Egg Yolk
  • 1 tsp Vanilla

Preheat the oven to 375°F and generously butter the bottom and sides of a 9″ regular (not deep dish) pie pan.

  1. Combine flour, salt and baking soda.  Set aside.
  2. Whisk together the cinnamon and 2 tablespoons of the sugar.
  3. Sprinkle 1/2 of the cinnamon-sugar mixture into the buttered pie pan and spread it around until the entire pan is well coated
  4. Beat the 1/2 stick of butter and 1/2 cup sugar for about 3 minutes until light and fluffy.
  5. Add egg yolk and vanilla. Beat until combined.
  6. Reduce speed to low and slowly add flour mixture beating just until well combined.
  7. Transfer dough to work surface covered with a very light coating of flour and cinnamon.  Flatten cookie dough into a disc and then press into the bottom and up the sides of the prepared pie pan.
  8. Sprinkle the remaining cinnamon and sugar all over the surface of the inside of the pie crust.
  9. Poke holes all over the bottom of the crust and put into the freezer for 15 minutes.
  10. Bake the crust about 12 minutes or until lightly browned.  Remove from oven and let cool completely before filling.

Prepare the Pie Filling

  • 4 ounces room temperature Cream Cheese
  • 1 Cup Pumpkin Pie Purée
  • 3/4 Cup Pure Maple Syrup
  • 3/4 Tsp Ground Ginger
  • 1/2 tsp freshly Ground Nutmeg
  • 1/4 tsp Salt
  • 3/4 tsp Cinnamon
  • 1 TBLS Bourbon
  • 1+3/4 tsp unflavored Gelatin
  • 1/4 Cup Water
  • 1/2 Cup Heavy Cream
  1. In small saucepan dissolve gelatin in the water over low heat.
  2. As soon as the gelatin is dissolved, remove from the heat and stir in the Bourbon.
  3. In the bowl of the stand mixer, mix the cream cheese until light and airy. Set aside.
  4. On medium-high speed, mix the pumpkin purée, maple syrup, ginger, nutmeg, salt, and cinnamon and beat until well combined.
  5. Add the cream cheese and beat on high until smooth.
  6. Stir gelatin mixture into the pumpkin mixture and move all into a large chilled mixing bowl.
  7. Clean and dry the stand mixer bowl.
  8. Beat 1/2 cup of the cream on high until stiff peaks form and then stir into the pumpkin mixture.
  9. Pour filling into crust and chill overnight.

To prepare for serving

  1. To prepare for serving, beat 1 cup whipping cream, 1/2 cup sugar and 1 tsp vanilla  until stiff peaks form
  2. Top pie with whipped cream and sprinkle with 1 tsp pumpkin pie spice

Make up to one day ahead and keep refrigerated until time to serve.

If you are on Facebook and are interested in the things I may not devote an entire blog post to, recipes, food facts, nutritional information, photos and other things that make my mouth water, I have a page on Facebook you can visit too:  https://www.facebook.com/ThisGirlLovesHerFood

Disneyland Peanut Butter Cookies

Last week I shared the recipe for Debbie Fields (A.K.A. Mrs. Fields) Peanut Butter Cookies and promised to find the recipe for the amazing Peanut Butter Cookies sold at Disneyland when I could find it.

peanut-butter-chunk-cookiesThere are many imposters and “copycat” recipes out there that were close, but none that I could find that were exactly like the cookies I remembered.  I finally came across a blog that focuses solely on the foods made and sold by the Disney Resorts.  Here I found out that Disney chefs do not bake the cookies, full of chunks of smooth peanut butter, they are made by Selma’s Cookies and packaged for Disney, but they are so good, does it really matter?

A little more Internet research led to a cookie blog linked to the Disney food blog that had great pictures and instructions for recreating the Disneyland Peanut Butter Cookie (with the added bonus of chocolate chunks!).

The important thing to making these cookies is to understand that you cannot simply put peanut butter chips into the cookies and expect them to taste like the cookies from peanut-butter-chunksGoofy’s Kitchen!  You have to take the added step (first) of making the peanut butter fudge that gets broken into chunks and pressed into the rolled cookie dough just before placing on the cookie sheets for baking.  It makes the difference between a good cookie and a great one!

As Close As You Can Get To Disneyland Peanut Butter Chunk Cookies

Peanut Butter Chunks:
  • 1/4 cup + 2 TBLS Peanut Butter Chips (Reese’s)
  • 1/4 cup + 2 TBLS Creamy Peanut Butter
  • 1+ 1/2 TBLS Butter
Cookie Dough:
  • 2 sticks (8 oz) Unsalted Butter, room temperature
  • 1 cup tightly packed brown sugar — (8 oz)
  • 1 cup Granulated Ssugar — (8 oz)
  • 1 + 1/4 cups Chunky or Smooth Peanut Butter — (11 7/8 oz jar)
  • 1/2 tsp Baking Powder
  • 1/2 tsp Baking Soda
  • 1/2 tsp Salt
  • 2 Large Eggs
  • 1/2 tsp Vanilla
  • 2 + 2/3 cups All-Purpose Flour
  • 1 cup Semi-Sweet Chocolate Chunks
 Instructions
  1. Make the peanut butter chunks first. Mix the peanut butter chips, peanut butter and butter in a small bowl and microwave on high for 30 seconds. Stir until smooth. If chips aren’t melted, heat for another 30 seconds.
  2. Make a small 2×5(ish) mold with foil (see photo). Pour the peanut butter mixture into the mold and chill it for about half an hour or until firm. Unmold the peanut butter log and cut into chunks.
  3. Proceed with the cookie dough. Cream butter and both sugars with an electric mixer. Beat in peanut butter, then baking powder, baking soda, and salt. Add eggs one at a time, beating on a lower speed, then beat in vanilla. By hand or using lowest speed of mixer, Stir in the flour. When flour is mixed in, stir in chocolate chunks.
  4. Chill the dough for about an hour.
  5. Preheat oven to 350° F. Using slightly less than a quarter cup measure, scoop up balls of dough and arrange on cookie sheet a few inches apart. Stick peanut butter chunkscookie-dough-ball into the already-scooped dough.
  6. Bake for 12-14 minutes, until set and brown around the edges. Remove from oven and cool on pan for about 10 minutes to set. Remove from pan and set on a rack to finish cooling.
  7. Makes 24 big cookies

I cannot wait to make these!  Can you imagine taking two of these and putting a scoop of vanilla ice cream between them?  Yum!

If you are on Facebook and are interested in the things I may not devote an entire blog post to, recipes, food facts, nutritional information, photos and other things that make my mouth water, I have a page on Facebook you can visit too:  https://www.facebook.com/ThisGirlLovesHerFood

Hadley’s Famous Date Shake

I love fruit and most vegetables although I will readily admit that cauliflower, unless it’s swimming in butter, lemon and herbs or covered with a luscious cheese sauce, leaves a lot to be desired.  Don’t even get me started on the smell.  Gross!

My grandma was a health nut when I was growing up.  She bought off on every do-it-yourself or make-it-at-home heath trend and we were her willing samplers.

She always had cut up vegetables for us kids to snack on, although my dad and grandpa would be snacking on things she wouldn’t touch like Spam, Vienna sausages, deviled ham, pickled herring, creamed chipped beef, sardines, and really anything canned they could spread on a saltine or Triscuit cracker.

She bought a yogurt maker and fruit dehydrator but I think the amount of time it took to get a finished product, and the lack of enthusiasm her efforts were met with, led her to toss them into the garage with the other gadgets of brief interest.

hadleylogoOne thing that she did instill in all of her kids and grandkids though was a love of fruits and nuts.  Anytime we would be in the desert at one of their condos, a required stop was Hadley’s Fruit Orchard for nuts, fresh and dried fruits, and their specialty, a date shake.  Made with the sinfully delicious Deglet Noor Date, it’s pretty much heaven in a cup.

Hadley’s Famous Date Shakedate-shake-ingredients

  • 1/8 to 1/4 Cup Chopped Hadley’s Cooking Dates
  • 1/3 Cup 2% Milk
  • 1 Cup Vanilla Ice Cream
  • 1 Ripe Banana, a sprinkle of nutmeg or cinnamon (if desired –  additions on their menu, not part of the original recipe)

In a blender, combine dates with 1/4 cup of the milk. Blend to a creamy consistency. Add ice cream and the rest of the milk and blend to desired thickness. Serves 2.

deglet-noor-dates-californiaI am now about 2 hours away from Palm Springs, which puts me 2 hours away from Hadley’s but thankfully Hadley’s has entered the information age and I can order their fruits and nuts online!  Looks like I’ll be ordering some dates so I can indulge my need for a bit of memory refreshment. 😉

If you are on Facebook and are interested in the things I may not devote an entire blog post to, recipes, food facts, nutritional information, photos and other things that make my mouth water, I have a page on Facebook you can visit too:  https://www.facebook.com/ThisGirlLovesHerFood

Sunday Family Dinner

family_dinner_table
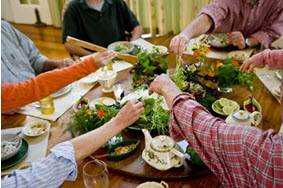
When I was a kid, we saw my mom’s parents all the time.  They lived just a few miles away so we often saw them during the week when they came to our various games.  On those nights, because Grandma always seemed to be on some new diet, Grandpa was excited to eat whatever junk food was being served at the snack bar, but at least twice a month, my grandparents would come to our house for a proper Sunday dinner.

My Mom didn’t have a big cooking repertoire, so dinner would be one of a four things:

  1. Roast on her counter top Farberware rotisserie;
  2. Flank or Top Sirloin Steak marinated with an envelope of Lawry’s tenderizing marinade for beef then grilled on the BBQ;
  3. Spaghetti.  Her Bolognese was one of the few things she made from scratch and my Grandpa Bob loved it; or
  4. Meatloaf.  Another basic meal that, inexplicably,  my grandparents loved coming over for.

Unless we were having spaghetti, we always had some version of the same side dishes:

  • Green salad tossed in Bob’s Bleu Cheese or Thousand Island Dressing bobsbcdressingbobs1000dressing
  • Some type of boxed potato she could throw in the oven
  • Rice-A-Roni
  • Peas, Broccoli with cheese sauce, or corn

I wasn’t kidding, cooking was not her thing.

If she was making dessert it was one of a very few things:

  • Basking Robbins Ice Cream
  • Frosted Cake
  • Cookies
  • Cherry Surprise

You may be asking yourself, what in the world is Cherry Surprise?  It was Mom’s go-to, minimal effort, no-bake, bring to any occasion dessert:

  • 2 Angel Food Loaf Cakes or 1 Angel Food Round Cake
  • 1 Large Box Instant Vanilla Pudding
  • 1 Cup of Milk
  • 16 oz Sour Cream
  • 2 Cans Comstock Cherry Pie Filling
  • Reddy-Whip Canned Whipped Cream or a Tub of Cool Whip Thawed

Assembly Directions

  1. Tear the angel food cake into small chunks and put the pieces into a 9″ x 12″ Pyrexafcake baking dish
  2. In a medium bowl (or the bowl of your stand mixer) combine the milk, sour cream, and pudding.  Mix on low until combined then switch to high and mix another 2 minutes, scraping bowl occasionally, until pudding is thick and fluffy.
  3. Using a rubber spatula, spread all of the pudding mixture over the cake layerpudding-layer.  Tap the baking dish against the counter to help the pudding settle into pockets between the pieces of cake.
  4. Pour the contents of both cans of cherry pie filling over the top of the pudding layer, spreading to evenly distribute the cherries
  5. Cover loosely and refrigerate for at least 2 hours
  6. Scoop portions onto plate and top with whipped creamcherry-delight

Simple, but always a crowd pleaser.

I try and do Sunday dinner but tonight didn’t even live up to Mom’s limited menus, I ordered pizza.  To be fair, we did eat it together as a family while watching Sunday night football. 😉

I’ll do better tomorrow.

If you are on Facebook and are interested in the things I may not devote an entire blog post to, recipes, food facts, nutritional information, photos and other things that make my mouth water, I have a page on Facebook you can visit too:  https://www.facebook.com/ThisGirlLovesHerFood

The Diet Can Start Tomorrow

pbamoresdipI was scrolling through Twitter this afternoon and saw a “food porn” video for something that made me want to ignore the fact that I really want to lose this post-surgery pudge and get myself into the kitchen using one of the three modes of transportation available to me:  my one legged scooter, wheelchair, or my crutches, so I can get into the kitchen to make some of this gooey deliciousness!

All four of the recipes in the video looked fabulous, but the first one, for the peanut butter cup s’mores dip looked too good to be true…

I tried imbedding their video, but nope, not happening.  Thank goodness for the internet.  Google came to my rescue once again and the recipe was soon found at www.pilsbury.com!

The recipe is so easy to make and has only 3 ingredients!

Peanut Butter Cup S’Mores Dip

  • 1 bag (12 oz) miniature chocolate-covered peanut butter cup candies, unwrapped
  • 2 1/2 cups miniature marshmallows (You can use the big marshmallows if you prefer)
  • 1 Box Graham Crackers

Heat oven to 450°F.   Place peanut butter cup candies in single layer in bottom of ungreased 10- or 12-inch cast-iron skillet; top with marshmallows. Bake 5 to 10 minutes or until marshmallows are golden brown and toasted. Serve immediately with graham cracker pieces for dipping.

Dip & Enjoy!

If you are on Facebook and are interested in the things I may not devote an entire blog post to, recipes, food facts, nutritional information, photos and other things that make my mouth water, I have a page on Facebook you can visit too:  https://www.facebook.com/ThisGirlLovesHerFood


Pumpkin Gingersnap Bars

pumpkingingersnapbarsFollowing the theme of all things pumpkin spice, here’s one that made my mouth water before I got beyond the picture!

I recently started following The Christian Science Monitor for another view on the upcoming Presidential election and came across their Culture – Food section where I was happy to see 22 new ways to use pumpkin in an article today.  I can’t wait to try these!

Pumpkin Gingersnap Bars With Cream Cheese Topping

By Amy DelineThe Gourmand Mom (From her Stir It Up Blog Nov. 13, 2013)

2 cups crushed gingersnap crumbs
6 tablespoons unsalted butter, melted
2 cups pumpkin puree fresh or canned (1 15-ounce can will do the trick)
1/2 cup white sugar
1/3 cup brown sugar
1-1/2 cups half-and-half
2 eggs
1 teaspoon vanilla
1 teaspoon cinnamon
1 teaspoon ginger
1/2 teaspoon salt
1/4 teaspoon nutmeg
Pinch of cloves
1 tablespoon cornstarch
6 ounces cream cheese, softened to room temperature
1/4 cup powdered sugar
Pinch of ground ginger
Extra gingersnap crumbs for garnish

1. Preheat oven to 375 degrees F.

2. Combine the crushed gingersnap crumbs with the melted butter. Press in an even layer into the bottom of a 13- by 9-inch baking dish. Bake for 7-8 minutes. Remove from the oven.

3. Meanwhile, whisk together the pumpkin, half-and-half, eggs, vanilla, cinnamon, ginger, salt, nutmeg, and cloves, until well blended. In a small dish, combine the cornstarch with about 1/4 cup of the pumpkin mixture, until the cornstarch is completely dissolved. Whisk the cornstarch mixture into the pumpkin mixture. Pour the pumpkin mixture over the gingersnap crust.

4. Bake for about 40 minutes.

5. Remove from the oven. Cool at room temperature until no longer hot. Then, cool completely in the refrigerator. Cut into small 1 to 1-1/2-inch squares.

6. Combine the cream cheese, powdered sugar, and a pinch of ground ginger. Use a pastry bag to pipe a bit of the cream cheese topping onto each square. Sprinkle with extra gingersnap crumbs.

If you are on Facebook and are interested in the things I may not devote an entire blog post to, recipes, food facts, nutritional information, photos and other things that make my mouth water, I have a page on Facebook you can visit too:  https://www.facebook.com/ThisGirlLovesHerFood