Almonds Rock!

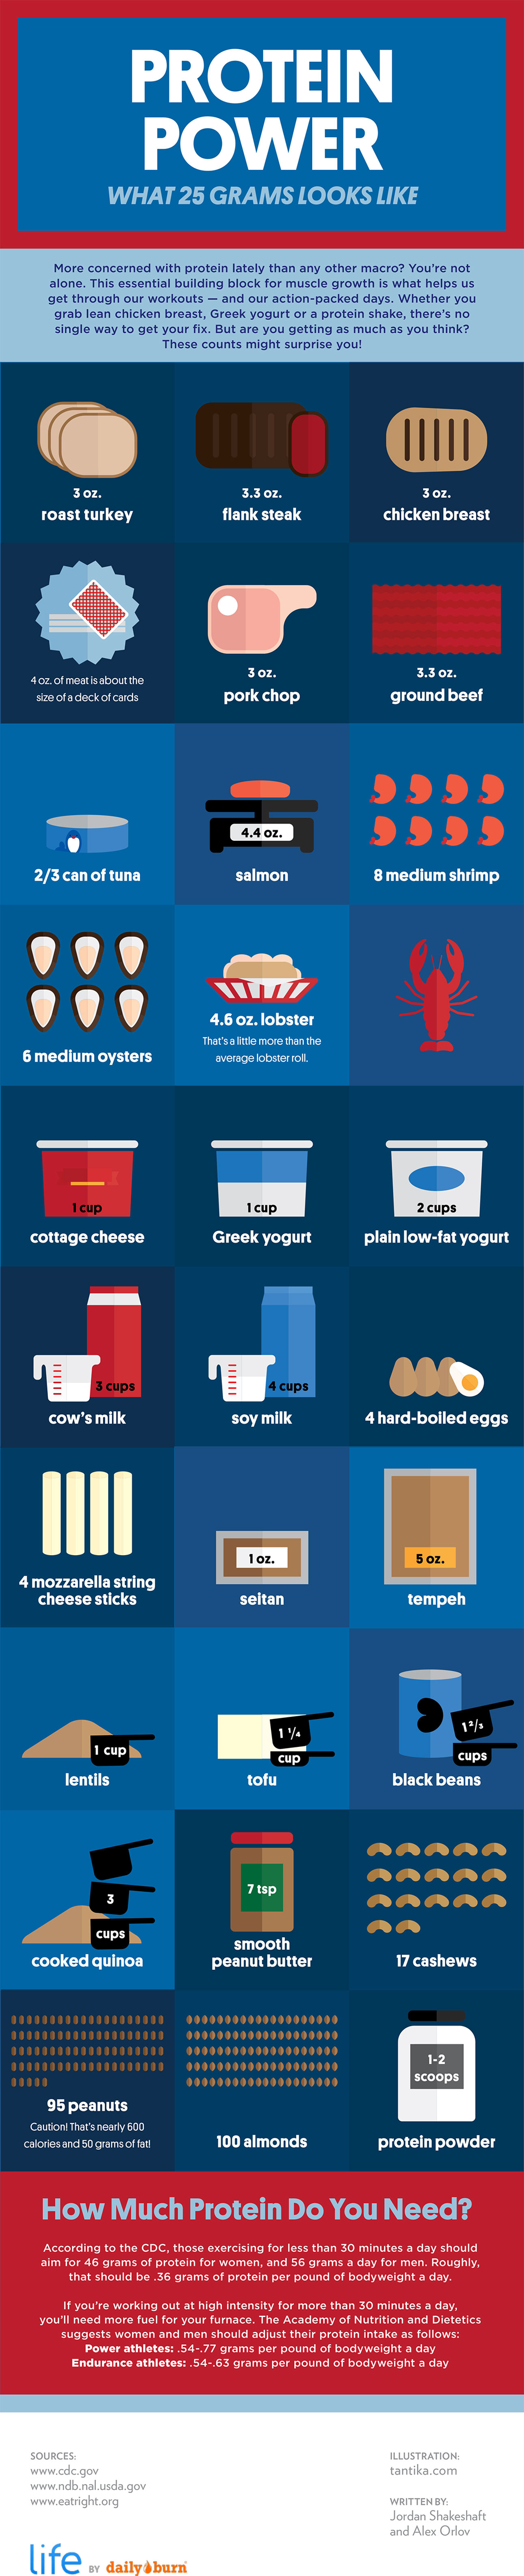
I love almonds!  They are easily thrown into my Vitamix to make almond meal, almond flour or almond butter to spread on my morning toast, added to my smoothies to add healthy fat & as a protein boost, and, as it turns out, they are great for your health!

I’m going into the kitchen now to grab a bowl to munch on during the football games.  A much healthier alternative to our usual chips & dip!


If you use Facebook and are interested in the things I may not devote an entire blog post to: things like health articles, my favorite recipes, fun drinks, food facts, nutritional information, restaurant reviews, photos and other things that make my mouth water, I have a very active page on Facebook you can visit too: https://www.facebook.com/ThisGirlLovesHerFood

Cauliflower Pizza Crust

Pizza is my weakness anytime I’m trying to lean out.  The ooey, gooey, cheesy goodness just warms my insides at the mere mention.  But I know it also will leave me bloated and sorry I gave in to my craving afterward.  This crust, from Eat. Drink. Smile. solves that problem!

CAULIFLOWER PIZZA CRUST RECIPE

INGREDIENTS:

  • 1 cup riced, then cooked cauliflower
  • 1/2 cup grated parmesan cheese
  • 1 egg, beaten
  • 1 tsp italian seasonings
  • 1/2 tsp crushed garlic
  • 1/2 tsp salt
  • 1/2 cup shredded mozzarella cheese (for topping)
  • pizza sauce & additional toppings of your choice

DIRECTIONS:

  1. To rice the cauliflower, cut florets into chunks and pulse in a food processor until you see rice-like bits. You could also use a cheese grater to produce the tiny pieces. Do not over process, you don’t want mush.
  2. Microwave the riced cauliflower in a bowl for 5-8 minutes depending on your microwave. No need to add water. After microwaving, transfer riced cauliflower to a fine mesh strainer and drain completely, gently pressing out excess water. Once drained, transfer riced cauliflower to a clean dish towel and wrap the sides around the cauliflower while gently pressing out excess water. This drying process is important!
  3. One large head of cauliflower will yield about 3 cups of riced cauliflower. Use it to make more pizzas immediately, or store in the refrigerator for 2-3 days.
  4. Preheat oven to 450 degrees. Spray a cookie sheet with non-stick cooking spray.
  5. In a medium bowl, combine 1 cup riced, cooked cauliflower, 1 egg and your parmesan cheese. Next, add Italian seasonings, crushed garlic and salt. Making sure everything is well mixed, place your “dough” on the cookie sheet and pat out a 9″ round. Be sure not to press it too thin as it’s easy to create holes.
  6. Bake your dough at 450 degrees for 15 minutes.
  7. Remove from oven. Add sauce, mozzarella cheese, and your favorite pre-cooked toppings to your pizza. Place pizza under broiler just until cheese is melted, be sure to keep an eye on it!

If you use Facebook and are interested in the things I may not devote an entire blog post to: things like health articles, my favorite recipes, fun drinks, food facts, nutritional information, restaurant reviews, photos and other things that make my mouth water, I have a very active page on Facebook you can visit too:https://www.facebook.com/ThisGirlLovesHerFood

Oreo Red Wine Nutella Cupcakes

red-wine-nutella-cupcakes-with-oreo-nutella-filling-and-red-wine-frosting-767x1024
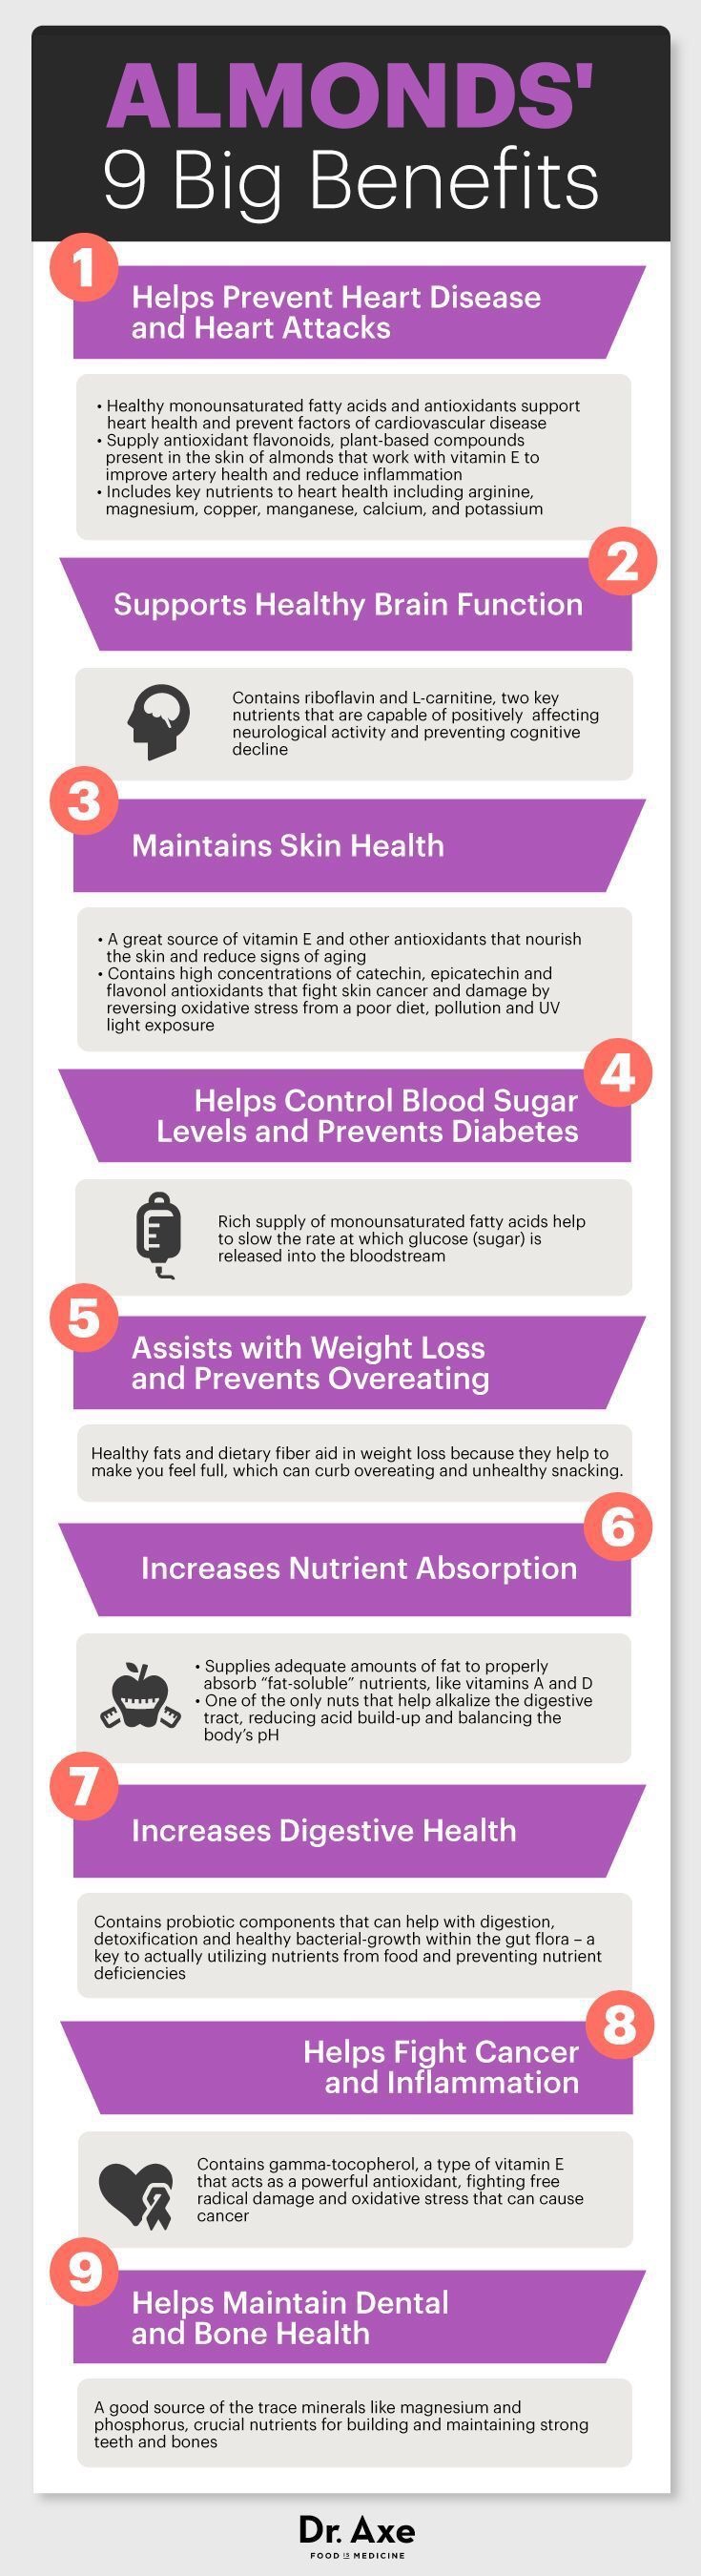
I was sourcing articles related to wine and the picture, almost as much as the title convinced me, although I am seriously deficient in the cupcake decorating department, to give these a try.

I’m not sure what appealed to me more, the wine or the chocolate, but I figured I could manage combining them without staining everything in my kitchen.  I might even be able to pipe on the frosting without too much problem, so I’m off to the store to make these grown up delights!

I found this little bit of deliciousness at a blog I saw on Pinterest: www.yummyaddiction.com.

One thing: I noticed the blogger didn’t specify what type of wine she used or recommend a type.  For my own personal taste, with the cocoa, cinnamon and brown sugar in the cake, I am going to go with a red wine with a similar flavor profile like a Zinfandel, Petite Syrah or maybe a Pinot Noir or Malbec.

Oreo Red Wine Nutella Cupcakes

Makes: 10 cupcakes
For the cupcakes:
  • 1 cup all-purpose flour
  • ¼ cup cocoa powder
  • 1 teaspoon baking soda
  • ½ teaspoon baking powder
  • ¼ teaspoon salt
  • ¼ teaspoon ground cinnamon
  • ¼ cup unsalted butter, at room temperature
  • ¼ cup brown sugar
  • 2 tablespoons granulated sugar
  • 1 egg
  • ¼ cup red wine, any kind you like
  • ½ teaspoon vanilla extract
  • ¼ cup Nutella
  • 10 Oreos
For the filling:
  • ½ cup Nutella
  • 5 Oreos
For the frosting:
  • 1 cup red wine, any kind you like
  • ¼ cup granulated sugar
  • ½ cup unsalted butter, at room temperature
  • 2 cups powdered sugar
  • 1 teaspoon vanilla extract
  • salt, to taste
  1. Preheat oven to 350 degrees F. Line 10 muffin cups with cupcake liners. Set aside.
  2. The cupcakes. In a medium bowl, sift together the flour, cocoa powder, baking soda, baking powder, salt, and cinnamon. In a large bowl, cream the butter and sugars together until fluffy. Add the egg and beat to combine. Scrape down the sides of the bowl as needed. Beat in the vanilla extract. Stir in Nutella and red wine until evenly combined. Slowly add the flour mixture to the wet ingredients and mix until just combined. Place an Oreo cookie on the bottom of each cupcake liner. Pour batter over each Oreo cookie and fill each cupcake liner about ¾ of the way full. Bake the cupcakes for about 20 minutes or until a toothpick inserted in the center comes out clean. Remove from oven and place on a wire rack to cool completely.
  3. The filling. In a ziplock bag, place the Oreos and use a mallet to crush the cookies into small pieces. In a small bowl, combine Nutella with crushed Oreos. Set aside.
  4. The frosting. In a small saucepan, combine red wine and sugar. Cook over mediumoreo-red-wine-nutella-cupcakes-center heat, stirring, until sugar dissolves and wine comes to a boil. Reduce heat and simmer for 20 minutes (until the liquid is reduced to about ¼ cup or a light syrup texture). Let cool.
  5. Beat the butter until until smooth and creamy. Slowly add in powdered sugar (1/2 cup at a time), vanilla, and ¼ cup of prepared wine syrup. Beat until no lumps remain. Taste the frosting and add salt to cut the sweetness, if you prefer.
  6. Assembling the cupcakes. Cut out the center of each cupcake with a sharp knife. Fill the cupcakes with Nutella & Oreo filling. Transfer the frosting to a piping bag fitted with a decorative tip. Pipe frosting into a swirl on each cupcake. Enjoy!

If you use Facebook and are interested in the things I may not devote an entire blog post to: things like health articles, my favorite recipes, fun drinks, food facts, nutritional information, restaurant reviews, photos and other things that make my mouth water, I have a very active page on Facebook you can visit too:https://www.facebook.com/ThisGirlLovesHerFood

Meal Prepping Made Easy

I came across a post on Twitter last night that is so simple, I can’t believe I haven’t seen it dozens of times before!

What is the one thing, besides tracking your meals and exercise, that all diets rate as a “must do” for weight loss success?Meal Planning.  Hand and hand with pre-planning what you’ll eat and when you’ll eat it, is making sure the food you’re supposed to be eating is ready and able to be eaten with minimal fuss to keep you from resorting to fast or unhealthy food choices.

Meal prep for the week is a great idea, but what is the most common complaint? Boredom.  One can only eat so much grilled chicken!  This brilliant idea from Fit Men Cook takes care of boredom without adding more than 5 or 10 minutes to your weekly meal prep time!


By simply using foil to create sections on a cookie sheet, you can create individually seasoned portions of the protein you’ll be adding to your lunches and dinners for the week and, by doing it when you pre-cook it, save time when you eat it during the week.  You can create different salad choices, bowl themes, stir fry mix-ins, fillings for lettuce wraps, toppings for zucchini noodles, the options are unlimited.

When you have a specific goal in mind (losing weight, adding muscle, or if you are an athlete) you need to consume specific amounts of protein.  Meal prepping using a scale, sectioned cookie sheet for baking, and zip bags or storage containers, is a great way to keep you on track.  

Most of us need at least 50 grams of protein a day, and significantly more if we’re working out a lot or trying to lose weight. This graphic shows what 25 grams of protein looks like in a variety of foods, so you can eat a few of these portions and know you’re on the right track.


If you use Facebook and are interested in the things I may not devote an entire blog post to: things like health articles, my favorite recipes, fun drinks, food facts, nutritional information, restaurant reviews, photos and other things that make my mouth water, I have a very active page on Facebook you can visit too:https://www.facebook.com/ThisGirlLovesHerFood

Upside Down Banana Bread

udbb1Since this New Year’s Day is “Upside Down,” you know, all of the official festivities happening on Monday, January 2, what better way to kick-off (no pun intended) our entire day of parade and football watching than with this upside down take on my favorite overripe fruit concoction?

Our whole holiday week between Christmas and New Year’s Day has been spent at home, except for an escape on Wednesday for my birthday dinner WITH a 102°F temperature, so I did no baking, we did no entertaining, and I’ve really done nothing but sleep and drink hot tea.  I’m trying to rally, despite being sick, and make some kind of effort for tomorrow, yet another day of being sick at home, but at least there will be something I might want to eat.

My husband (he who is Twitter challenged) managed to send this Buzzfeed video to me in a message a couple of months ago as a hint, then I saw it again last night.  It looks easy enough so why not?  I’ll give it a try.

Upside Down Banana Bread

4-5 ripe bananas
3 eggs
½ cup oil
½ cup granulated sugar
1 Tbsp. ground cinnamon
2 cups flour
½ cup butter
1 cup brown sugar
2-3 bananas, sliced
Vanilla ice cream

  • Preheat oven to 350°F/175°C.
  • In a large bowl, mash the ripe bananas.
  • Add the eggs, oil, sugar, and cinnamon, mixing until evenly incorporated.
  • Add the flour and mix until the batter has no large pockets of flour. Set aside.
  • In a pot over low heat, melt the butter, then mix in the brown sugar until dissolved.
  • Bring up the heat to medium, cooking until the mixture starts bubbling.
  • Remove the caramel from heat and pour into a greased 9×9 baking pan.
  • Lay the banana slices evenly on top of the caramel.
  • Spread the banana bread batter on top.
  • Bake 40-50 minutes.
  • Cool until the bottom is barely warm.
  • Use a knife to loosen the edges from the pan.
  • Place a plate upside-down on top of the pan, then invert the pan, flipping the banana bread onto the plate.
  • Slice, then serve with vanilla ice cream.

TIP**  It’s important to make sure you are using a 9 x 9 pan.  If you use an 8 x 8 pan, like I did my first try, you need to increase the baking time by about 10 minutes and be prepared, you’ll be cleaning up the brown sugar that will bubble up and spill over the sides and burn onto the bottom of your oven.  Trust me, the smoke alarms blaring, dogs running around barking and the cleanup weren’t worth not following the exact directions.  UG!

It’s very sweet, so you might want to start with a small square and go back for seconds. Who am I kidding?  Put it in a bowl and pile the ice cream on!  And, before you ask, “Yes, I do intend to start my day with glorified cake and ice cream!”  #TheDietStartsTuesday 

If you’re on Facebook and are interested in the things I may not devote an entire blog post to: my favorite recipes, drinks, food facts, nutritional information, photos and other things that make my mouth water, I have a page on Facebook you can visit too:https://www.facebook.com/ThisGirlLovesHerFood

Baked Cheese Puff Appetizer

My grandma called these cheese puffs, but if you prefer the French name, Bon Appétit calls them Gougères.

These delicate cheese puffs always impress. The dough takes a couple of times to get “just right,” but this is now one of my favorites to make for a crowd.

  • 1 Cup water
  • 6 TBLS (¾ stick) unsalted butter, cut into pieces
  • ¾ tsp kosher salt
  • Pinch of nutmeg
  • 1¼ Cups all-purpose flour (I cut the carbs by using Bob’s Red Mill Paleo Baking Flour)
  • 4 Large eggs (at room temperature)
  • 6 Ounces (1½ cups) grated Comté or Gruyère cheese
  • ½ tsp freshly ground black pepper
  • 1 Large egg yolk

Preparation

Preheat oven to 400°. Bring butter, salt, nutmeg, and 1 cup water to a boil in a medium saucepan, stirring until butter is melted. Remove from heat, add flour, and stir to combine.

Cook mixture over medium heat, stirring vigorously with a wooden spoon, until mixture pulls away from sides of pan and forms a ball, about 2 minutes. Continue to cook, stirring vigorously, until a dry film forms on bottom and sides of pan and dough is no longer sticky, about 2 minutes longer. Remove pan from heat and let dough cool slightly, about 2 minutes. Mix in whole eggs one at a time (I use my hands), incorporating fully between additions. Mix in cheese and pepper.

Scrape dough into a piping bag fitted with a ½” round tip (alternatively, use a plastic bag with a ½” opening cut diagonally from 1 corner). Pipe 1” rounds about 2” apart onto 2 parchment-lined baking sheets. Whisk egg yolk and 1 tsp. water in a small bowl; brush rounds with egg wash.

Bake gougères until puffed and golden and dry in the center (they should sound hollow when tapped), 20–25 minutes.

Tips** These go FAST!  I’d advise you make a double batch.  You can add a bit of spice to these by adding dried red pepper flakes or finely chopped jalapeño when you add in the cheese and pepper.

Dough can be made 4 hours ahead. Cover and chill.  Gougères can be baked 2 hours ahead; reheat before serving.

If you’re on Facebook and are interested in the things I may not devote an entire blog post to: my favorite recipes, drinks, food facts, nutritional information, photos and other things that make my mouth water, I have a page on Facebook you can visit too: https://www.facebook.com/ThisGirlLovesHerFood

Baked Jameson Cherry Brie Bites

I went looking for something simple but spectacular that would pair equally well with both cocktails and wine before dinner and came across this amazing photo by Spencer Burton for Las Vegas Weekly:

scaled-cherry_baked_brie_by_spencer_burton_h_t1000

It turns out that these are one of the most popular items on the appetizer menu at one of my favorite Las Vegas watering holes: Nine Fine Irishmen, located in the center of the casino at New York New York.

I pulled the dinner menu up on the internet and had to search for it.  I was looking for Baked Jameson Cherry Brie Bites but couldn’t find it.  Now that I’ve seen where they have it hidden at the bottom of the appetizers, it’s easy to see how I missed it the last time I stopped in for a pint of #Guinness and a splash of whiskey.

They list it simply as “Baked Brie” with an unimaginative description of: “Brie Cheese, Whiskey Marinated Cherries, Puff Pastry, Balsamic Reduction, Toasted Baguettes” and they don’t show the mouth watering picture.  Not a great sales job at all!

I’m much more intrigued by the glowing description that Brock Radke gave in his November 2013 article describing the, then new item as, “the perfect bite-sized delight for the holiday season. Bonus: Irish whiskey is involved.

I’m sold.  Point me to the kitchen!

Jameson Cherry Baked Brie Bites

  • 5-7 squares of puff pastry (5×5 inch, cut into four pieces)
  • 1½ lb. Brie cheese (cut into 1-inch cubes)
  • 1 cup dried tart cherries
  • ½ cup Jameson Irish Whiskey
  • 2 tbsp. light corn syrup
  • 2 eggs, beaten well
  • fresh ground pepper (to taste)

Now it’s time to prep the cherries:

  1. Soak cherries in Jameson overnight.
  2. Cook cherry-whiskey mixture in a small pot on low heat until fruit softens, then add corn syrup and mix well.
  3. Use a hand-mixer or blender to purée the mixture, then chill and let sit for 2 hours.

When your cherry mixture has finished chilling it’s time to assemble the bites:

  1. Heat oven to 425°F.
  2. Gently separate one square of puff pastry dough and spread a fingernail-sized portion of Brie in the middle.
  3. Add a small dollop of cherry purée and season with pepper.
  4. Fold dough so all corners are sealed.
  5. Spray a baking tray with nonstick cooking spray and place bites on tray in rows.
  6. Brush the top of each pasty pocket with egg.
  7. Bake for approximately 10 minutes or until golden brown.
  8. Let sit for two minutes before serving.

The part I’m missing in this recipe is that they don’t mention the balsamic reduction. Based on the picture it appears that they reserve some of the whiskey-cherry purée to add to the top for presentation with a couple of sprout leaves.

Helpful tip:  You can cut the preparation time by buying whiskey soaked cherries online or at your local Total Wine or Bevmo if they carry them.  I keep a jar on hand that are soaked in my favorite bourbon-whiskey, Maker’s Mark, and I’m sure that you can prepare the same a few days ahead and keep them well sealed in your refrigerator so that you can shorten the prep time.

If you’re on Facebook and are interested in the things I may not devote an entire blog post to: my favorite recipes, drinks, food facts, nutritional information, photos and other things that make my mouth water, I have a page on Facebook you can visit too:  https://www.facebook.com/ThisGirlLovesHerFood

Snickerdoodle Pumpkin Chiffon Pie

Don’t get me wrong, nothing says fall, Halloween and Thanksgiving more than pumpkin pie, but the same old pumpkin pie year in – year out can get boring.  I thought I’d shake things up a bit with a curveball and a bit of unexpected flavor that I hope we all will enjoy!

saraleepumpkinpie

I’ll still make a regular pumpkin pie, and if you are planning to make a regular pumpkin pie too, there is a hotline setup to help you in case you get in a bind: Sara Lee Pie Hotline 1-888-914-1247, Monday through Friday from 7 a.m. to 6 p.m. CST.  The hotline is open Thanksgiving Day from 7 a.m. to 1 p.m. CST.

Snickerdoodle Pumpkin Chiffon Piepumpchif

Assemble the Crust

  • 4 TBLS (1/2 stick) Unsalted Butter, at room temperature
  • 1 TBLS Unsalted Butter for greasing the pan
  • 2 TBLS Cinnamon
  • 1/2 Cup + 2 TBLS Sugar
  • 3/4 Cup Flour
  • 1/4 tsp Baking Soda
  • 1/4 tsp Salt
  • 1 Large Egg Yolk
  • 1 tsp Vanilla

Preheat the oven to 375°F and generously butter the bottom and sides of a 9″ regular (not deep dish) pie pan.

  1. Combine flour, salt and baking soda.  Set aside.
  2. Whisk together the cinnamon and 2 tablespoons of the sugar.
  3. Sprinkle 1/2 of the cinnamon-sugar mixture into the buttered pie pan and spread it around until the entire pan is well coated
  4. Beat the 1/2 stick of butter and 1/2 cup sugar for about 3 minutes until light and fluffy.
  5. Add egg yolk and vanilla. Beat until combined.
  6. Reduce speed to low and slowly add flour mixture beating just until well combined.
  7. Transfer dough to work surface covered with a very light coating of flour and cinnamon.  Flatten cookie dough into a disc and then press into the bottom and up the sides of the prepared pie pan.
  8. Sprinkle the remaining cinnamon and sugar all over the surface of the inside of the pie crust.
  9. Poke holes all over the bottom of the crust and put into the freezer for 15 minutes.
  10. Bake the crust about 12 minutes or until lightly browned.  Remove from oven and let cool completely before filling.

Prepare the Pie Filling

  • 4 ounces room temperature Cream Cheese
  • 1 Cup Pumpkin Pie Purée
  • 3/4 Cup Pure Maple Syrup
  • 3/4 Tsp Ground Ginger
  • 1/2 tsp freshly Ground Nutmeg
  • 1/4 tsp Salt
  • 3/4 tsp Cinnamon
  • 1 TBLS Bourbon
  • 1+3/4 tsp unflavored Gelatin
  • 1/4 Cup Water
  • 1/2 Cup Heavy Cream
  1. In small saucepan dissolve gelatin in the water over low heat.
  2. As soon as the gelatin is dissolved, remove from the heat and stir in the Bourbon.
  3. In the bowl of the stand mixer, mix the cream cheese until light and airy. Set aside.
  4. On medium-high speed, mix the pumpkin purée, maple syrup, ginger, nutmeg, salt, and cinnamon and beat until well combined.
  5. Add the cream cheese and beat on high until smooth.
  6. Stir gelatin mixture into the pumpkin mixture and move all into a large chilled mixing bowl.
  7. Clean and dry the stand mixer bowl.
  8. Beat 1/2 cup of the cream on high until stiff peaks form and then stir into the pumpkin mixture.
  9. Pour filling into crust and chill overnight.

To prepare for serving

  1. To prepare for serving, beat 1 cup whipping cream, 1/2 cup sugar and 1 tsp vanilla  until stiff peaks form
  2. Top pie with whipped cream and sprinkle with 1 tsp pumpkin pie spice

Make up to one day ahead and keep refrigerated until time to serve.

If you are on Facebook and are interested in the things I may not devote an entire blog post to, recipes, food facts, nutritional information, photos and other things that make my mouth water, I have a page on Facebook you can visit too:  https://www.facebook.com/ThisGirlLovesHerFood

Disneyland Peanut Butter Cookies

Last week I shared the recipe for Debbie Fields (A.K.A. Mrs. Fields) Peanut Butter Cookies and promised to find the recipe for the amazing Peanut Butter Cookies sold at Disneyland when I could find it.

peanut-butter-chunk-cookiesThere are many imposters and “copycat” recipes out there that were close, but none that I could find that were exactly like the cookies I remembered.  I finally came across a blog that focuses solely on the foods made and sold by the Disney Resorts.  Here I found out that Disney chefs do not bake the cookies, full of chunks of smooth peanut butter, they are made by Selma’s Cookies and packaged for Disney, but they are so good, does it really matter?

A little more Internet research led to a cookie blog linked to the Disney food blog that had great pictures and instructions for recreating the Disneyland Peanut Butter Cookie (with the added bonus of chocolate chunks!).

The important thing to making these cookies is to understand that you cannot simply put peanut butter chips into the cookies and expect them to taste like the cookies from peanut-butter-chunksGoofy’s Kitchen!  You have to take the added step (first) of making the peanut butter fudge that gets broken into chunks and pressed into the rolled cookie dough just before placing on the cookie sheets for baking.  It makes the difference between a good cookie and a great one!

As Close As You Can Get To Disneyland Peanut Butter Chunk Cookies

Peanut Butter Chunks:
  • 1/4 cup + 2 TBLS Peanut Butter Chips (Reese’s)
  • 1/4 cup + 2 TBLS Creamy Peanut Butter
  • 1+ 1/2 TBLS Butter
Cookie Dough:
  • 2 sticks (8 oz) Unsalted Butter, room temperature
  • 1 cup tightly packed brown sugar — (8 oz)
  • 1 cup Granulated Ssugar — (8 oz)
  • 1 + 1/4 cups Chunky or Smooth Peanut Butter — (11 7/8 oz jar)
  • 1/2 tsp Baking Powder
  • 1/2 tsp Baking Soda
  • 1/2 tsp Salt
  • 2 Large Eggs
  • 1/2 tsp Vanilla
  • 2 + 2/3 cups All-Purpose Flour
  • 1 cup Semi-Sweet Chocolate Chunks
 Instructions
  1. Make the peanut butter chunks first. Mix the peanut butter chips, peanut butter and butter in a small bowl and microwave on high for 30 seconds. Stir until smooth. If chips aren’t melted, heat for another 30 seconds.
  2. Make a small 2×5(ish) mold with foil (see photo). Pour the peanut butter mixture into the mold and chill it for about half an hour or until firm. Unmold the peanut butter log and cut into chunks.
  3. Proceed with the cookie dough. Cream butter and both sugars with an electric mixer. Beat in peanut butter, then baking powder, baking soda, and salt. Add eggs one at a time, beating on a lower speed, then beat in vanilla. By hand or using lowest speed of mixer, Stir in the flour. When flour is mixed in, stir in chocolate chunks.
  4. Chill the dough for about an hour.
  5. Preheat oven to 350° F. Using slightly less than a quarter cup measure, scoop up balls of dough and arrange on cookie sheet a few inches apart. Stick peanut butter chunkscookie-dough-ball into the already-scooped dough.
  6. Bake for 12-14 minutes, until set and brown around the edges. Remove from oven and cool on pan for about 10 minutes to set. Remove from pan and set on a rack to finish cooling.
  7. Makes 24 big cookies

I cannot wait to make these!  Can you imagine taking two of these and putting a scoop of vanilla ice cream between them?  Yum!

If you are on Facebook and are interested in the things I may not devote an entire blog post to, recipes, food facts, nutritional information, photos and other things that make my mouth water, I have a page on Facebook you can visit too:  https://www.facebook.com/ThisGirlLovesHerFood

Mrs. Fields Peanut Butter Cookies

pbcookieI love peanut butter cookies, something about them feels more special than a chocolate chip cookie.  Just like a sugar cookie tells me it’s Christmas, peanut butter cookies feel like a cold winter night with a warm cup of cocoa.  My mom wasn’t big on cooking dinner, but she did bake.  Cookies were easy, and peanut butter cookies were my dad’s favorite, so they were one that she made once in a while.

I’m not in bakeries often, but when I do get enticed by their heavenly smell and break down and buy them, I’m usually disappointed.  I’m impatient and can never wait to get home, I rarely even make it to the car, before I’m unfolding that waxed bakery bag and taking a big bite of salty peanut butter goodness.  More often than not, they are either too dry, too doughy or too greasy and leave me sorry that I bought them.

There have been very few exceptions, but among my favorite peanut butter cookies are: Mrs. Fields, French’s Bakery (Costa Mesa, Irvine, Mission Viejo, and Orange, CA), and Disneyland.

Lucky for all of us, Debbie Fields shared her recipe for her peanut butter cookies on her blog in 2012.  A bonus for the Gluten-Free crowd, there is no flour in it!

Mrs. Fields Peanut Butter Cookies

mfpbcookies1 cup peanut butter, creamy or chunky
1 cup sugar
1 large egg
1 teaspoon vanilla
coarse salt or sugar, your choice

Preheat oven to 350°.  In a large mixing bowl, combine peanut butter and sugar. In a small bowl, lightly beat the egg, then add vanilla directly to it and stir. Add egg mixture to peanut butter mixture and stir until well combined. Roll dough into walnut-sized balls and place on a prepared cookie sheet. Using the tines of a fork, create a crosshatch pattern, flattening the dough about half the thickness. Sprinkle the top of each cookie with a pinch of coarse salt or sugar, depending on your tastes. Bake for 10 minutes, or until barely golden brown around the edges. Makes 30 cookies

HINT:  A good-quality, natural peanut butter adds even richer flavor, but  you may need to add more sugar. Taste dough to determine.

HINT:  Kick these cookies up another notch by dipping cooled cookies in melted semi-sweet chocolate. Allow to cool completely before serving.

I never realized that there was no flour in these, which makes them gluten-free, but also explains why they never taste dry or doughy to me.

Next I’ll see if I can hunt down recipes for my other favorites so I can do an unscientific side by side taste test with my family to see which ones they prefer.

If you are on Facebook and are interested in the things I may not devote an entire blog post to, recipes, food facts, nutritional information, photos and other things that make my mouth water, I have a page on Facebook you can visit too:  https://www.facebook.com/ThisGirlLovesHerFood