Tart & Spicy Butternut Squash Soup

It’s finally cool enough in California, at least once the sun goes down, to justify getting the stock pot out to make a hearty soup that can serve as dinner with a big salad & crusty bread that can then live on as a couple of workday lunches too!  Great for the wallet AND the waistline!  This soup is so rich, and has such depth of flavor, that it seems like a cheat meal, which is a plus during the non-stop holiday feast season.

Tart & Spicy Butternut Squash Soup

  • 1  –  2 to 2+1/2 lb Butternut Squash (Peeled/Seeded/Chopped into about 1″ Cubes)
  • 1  –  Large Granny Smith Apple (Cut into about 1″ Pieces – seeds/core/stem removed)
  • 3  –  Large Ribs Celery Chopped
  • 3  –  Carrots (Peeled/Chopped into about 1″ Pieces)
  • 1  –  Medium Yellow Onion (Peeled/Chopped into about 1″ Pieces)
  • 4  –  TBLS Butter
  • 1  –  32 oz Container Organic Chicken Stock
  • 1+1/2 Cups Water
  • Freshly Grated Sea Salt (To Taste)
  • Freshly Cracked Pepper (To Taste)
  • Freshly Ground Nutmeg (1/4 tsp)
  • Cinnamon (1/2 to 1 tsp)
  • Cayenne Pepper (Pinch to 1/8th tsp)
  • Chopped Parsley (if desired)

Melt the butter in a medium stockpot and add the onions, carrot and celery.  Sauté over low heat about 10 minutes.  When onions just start to brown, add the squash, apple, salt, pepper, chicken stock and water.  Turn the heat up to medium-high and bring just to a boil.  When bubbles appear at the edges of the pan, reduce heat to low.  Cover pan tightly and simmer soup for 45 minutes until squash is completely softened.

Remove soup from heat and either process soup until smooth using your blender (I use my Vitamix) and returning to the pan after processed or an immersion blender as shown in the video.

Once soup is smooth, add the Nutmeg, Cinnamon and Cayenne.  Adjust spices to taste.

I came across a video that uses the same technique I use to make my soup, with slightly different measurements, and it’s much prettier, so I’ll give the standard #ShoutOut and #HighFive to Simply Recipes for producing a great (and quick) video that I can also use to demonstrate how to assemble my soup!

I’ve already been remiss at keeping up with my blog, so not having to produce a video is a definite bonus! #ThisGirlLovesToEat

Cook Your Meat Perfectly With Science

cowchart

I love beef of nearly any cut, but I can’t stand it if it’s overcooked! I saw a headline for a way to cook it to a perfect degree of doneness every time and clicked on it immediately.  I did get struck by the giggles at the name of the not-so-new online cooking tool created by three girls at MIT in 2013: Cook My Meat.

Come on, COOK MY MEAT?  It doesn’t give your inner 12 year old the giggles?

Alright, I’ll revert to my adult self.

  • #CookMyMeat was created by Kate Roe, Laura Breiman, and Marissa Stephens, students at MIT in 2013.
  • You fill in the cut of your meat, the temperature you’ll be cooking it at, then you’re shown an approximation of how your meat will turn out: red, pink or well-done/overcooked

cook-my-meat1

You can even compare two different cooking methods and get a side by side result of how the steaks (or turkey or tuna steak) will turn out: 

  • Flip every 4 minutes
  • Flip every 15 seconds
  • Sear then cook low
  • Sous Vide then Liquid Nitrogen
  • Enter your own parameters

cookmymeat2

On_Food_And_Cooking_UScover
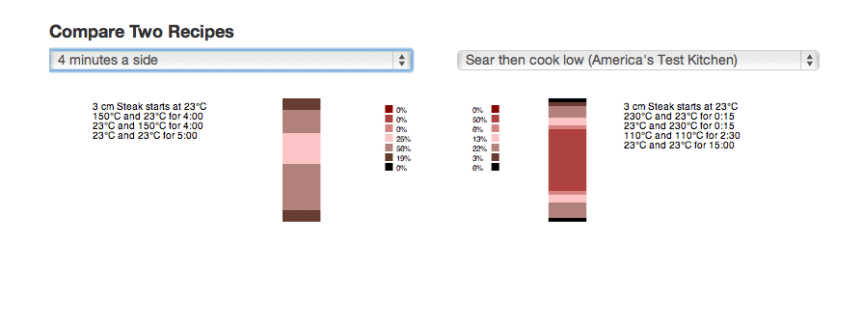
The girls developed the tool by calculating heat diffusion in the meat at each time step with the Crank-Nicolson method, using On Food and Cooking: The Science and Lore of the Kitchen as a guidepost for protein denaturaization temperatures.

The book, published in 1984, has been described by Alton Brown as “the Rosetta stone of the culinary world.”

I just wanted something simple to tell me how long to cook my steak so it comes out a bit more than medium-rare but not all the way to medium in that almost warm pink state.  This is a bit high tech and too much science, so I’ll be sticking to my instant read thermometer and my trusty steak knife & mag-light in the dark to make sure it’s not overcooked.  #ThisGirlLovesToEat

If you use Facebook and are interested in the things I may not devote an entire blog post to: things like health articles, my favorite recipes, fun drinks, food facts, nutritional information, restaurant reviews, photos and other things that make my mouth water, I have a very active page on Facebook you can visit too: https://www.facebook.com/ThisGirlLovesHerFood

Buffalo Spinach Artichoke Dip

Tasting Table is one of my favorite Twitter follows.  I love browsing their website for restaurant reviews, recipes, new spins on classic drinks, and guides to cities I am planning to travel to.

I was surfing their website today and came across an appetizer that included 4 of my favorite tastes in a single dish: bacon, Buffalo sauce, spinach and artichoke hearts!  Add to that the ability to make ahead, the reviewers rated it 100% make again, and it didn’t call for any hard to get ingredients and this girl who loves to eat was sold!

Note:  I did adapt the recipe from the original:

    1. I prefer a bit more bacon (and I buy mine from the butcher case, never pre-packaged because we don’t have great options in my stores);
    2. I made the blue cheese optional (it’s not a favorite of mine) and offered some substitution options; and
    3. I added a bit more hot sauce to mine.

bcartdip

Buffalo Spinach-Artichoke Dip

  • 3 slices (5 ounces) thick-cut bacon (I use 6 slices)
  • 3 garlic cloves, minced
  • ½ medium yellow onion, finely chopped
  • 9 ounces frozen artichoke hearts, thawed and finely chopped
  • 6 cups baby spinach, roughly chopped
  • 8 ounces cream cheese, softened
  • 4 ounces smoked blue cheese, softened (I don’t care for Blue Cheese, so I substitute Gorgonzola.  You can also use Goat Cheese, Feta, Stilton, or Brie)
  • 1½ cups grated Parmesan cheese, divided
  • ½ cup sour cream
  • 6 tablespoons Franks Red Hot Sauce (I like mine spicy so I add a couple TBLS more)
  • Kosher salt and freshly ground black pepper, to taste
  • ½ cup Panko bread crumbs
  • 1 tablespoon olive oil
  1. Preheat the oven to 400°.
  2. In a large skillet, heat the bacon over medium-high heat.  Cook, turning as needed, until the bacon is golden and the fat has rendered, 8 to 10 minutes.
  3. Transfer the bacon to a paper towel-lined plate to drain, then finely chop and set aside.
  4. Add the garlic and onions to the pan and cook, stirring often, until golden, 8 to 10 minutes.
  5. Add the artichoke hearts and spinach and cook until the spinach is lightly wilted, 2 to 3 minutes.
  6. Meanwhile, in a large bowl, stir the cream cheese, blue cheese (or whatever cheese you’ve substituted), 1 cup of the Parmesan, sour cream, and hot sauce until smooth.
  7. Fold in the spinach and artichoke mixture. Season with salt and pepper.
  8. Transfer to a 1½-quart casserole dish and smooth the top with a rubber spatula.
  9. In a small bowl, mix the remaining ½ cup of Parmesan with the chopped bacon, panko crumbs and olive oil.
  10. Sprinkle the panko crumb topping over the dip and place the casserole dish on a sheet pan in case any cheese bubbles over.
  11. Bake until golden brown and bubbling, 25 to 30 minutes, then serve.

tt_logo_image_1The recipe calls for serving with chips.  I like to eat this dip with really thick, freshly made tortilla chips, Triscuits, carrot chips, thick bell pepper slices or celery.

If you use Facebook and are interested in the things I may not devote an entire blog post to: things like health articles, my favorite recipes, fun drinks, food facts, nutritional information, restaurant reviews, photos and other things that make my mouth water, I have a very active page on Facebook you can visit too: https://www.facebook.com/ThisGirlLovesHerFood

Short Rib Mushroom Risotto

stuffedWe have a lot of family celebrations that come in a very short time, which means a lot of heavy big dinners either out at restaurants or at one family gathering or another.  By the time we hit our wedding anniversary in late February (which is the same day as my sister-in-law’s birthday) and, a week later, my husband’s birthday, we are about food-ed out!

Despite that, I make a big to-do and tonight, am making a new recipe I’ve been playing with for a dish I had made for me at my post-Christmas birthday at one of my favorite restaurants, The Winery in Tustin, CA.   I’m good enough in the kitchen to be dangerous so I’ve gathered the ingredients and am giving it a go tonight! If it sucks I can always order pizza, right? #ThisGirlLovesToEat

First a tip:  Start this recipe either the day before, early on the the day, or at least 2 hours before you want to eat.  You’ll want to prepare the short ribs first so that you’ll have the broth left from cooking them to use for the risotto.  Trust me on this. It makes a huge difference.

Short Rib Mushroom Risotto

Making the Ribs

  • 8-10 Strips Thick Cut Bacon – cut (with kitchen shears) into 1/2 – 1″ chunks
  • 3 to 4 Lbs Bone-in Short Ribs
  • 1 – 8oz Pkg Sliced Baby Bella Mushrooms
  • Freshly Ground Black Pepper
  • 1 TBLS Minced Garlic
  • 1 Cup Mushroom Broth (Sprouts carries this) or Low Sodium Beef Broth
  • 1 TBLS Light Brown Sugar
  • 1 tsp Ground Cloves
  • 1 TBLS Dried Herbes De Provence (McCormick)
  1. Set the Pressure Cooker to the brown setting with the lid open.
  2. Cut the bacon and cook it in the pressure cooker (with the lid open) until it just starts to get crisp. Remove and set aside.
  3. Put short ribs into the pressure cooker in the bacon grease, brown on all sides, in batches if needed, until all are browned.
  4. When all ribs are browned, put all back into the pressure cooker fattiest (if any) or bone side down.
  5. Put garlic, brown sugar, and broth into the spaces between the ribs.
  6. Sprinkle ribs with black pepper and lightly with ground cloves and Herbes De Provence.
  7. Add bacon and mushrooms on top of the ribs in the pressure cooker.
  8. Secure lid and set to pressure cook on high for 40 minutes.
  9. Let pressure release naturally for 10 minutes then do quick release.
  10. Remove ribs from the pressure cooker to a covered pot, and as you are moving them remove the bones – they should pull right out.
  11. When all ribs are deboned, use 2 forks and shred the meat while it is still hot.
  12. Add about 1/2 cup of the reserved broth from the pressure cooker to the meat and cover to keep warm and moist.

Making the Risotto

  • 1 TBLS Olive Oil + 1 TBLS Butter
  • 1/4 Cup Butter (1/2 Stick)
  • 1/2 Medium Yellow Onion Chopped
  • 1 – 8oz Pkg Sliced White Mushrooms (chop them)
  • Freshly Ground Black Pepper
  • 1 TBLS Minced Garlic
  • 1 Cup Mushroom (Sprouts carries this) or Low Sodium Beef Broth
  • 2 Cups Arborio Rice
  • 2/3 Cup White Wine (I used Sauvignon Blanc)
  • 4 1/2 – 5 Cups Beef Broth (use the reserved strained drippings/broth from the short ribs and add enough stock/broth to make up the total amount)
  • 2/3 Cup shredded Parmesan Cheese
  1. Using a fat separator, pour the remaining liquid from the pressure cooker through the strainer top and allow to slightly cool.  Once cooled pour off the broth only into a 6 cup measuring cup.  Discard the fat.
  2. Add enough broth (mushroom or low sodium beef) to equal 5 cups. Then put in a pan to simmer.
  3. In heavy gauge saucepan heat olive oil + 1 TBLS butter until melted.
  4. Add rice.  Cook and stir about 3 minutes until lightly browned.  Remove from heat and set aside.
  5. To prepare the mushrooms, clean the mushrooms by brushing them off (do not wash if possible) and roughly chop (stems may be left on).
  6. Sauté onions, garlic and butter in heavy gauge saucepan over medium-high heat until onions are translucent about 5 minutes.  Add mushrooms and saute until mushrooms are soft (about 4 minutes)
  7. Add the browned rice to the vegetables and stir to combine.
  8. Pour in the white wine and allow the liquid to boil and be absorbed into the rice. Then pour in 1/2 cup of stock to the rice, stirring constantly. (If necessary, adjust the heat under the pot – you want a medium simmer.)  Add more stock 1/2 cup at a time – adding more just as most but not all of the liquid is absorbed before adding in more stock.)
  9. Stir the rice and stock together in this manner for approximately 25 minutes or so – until the rice is tender but not mushy. Stir about 1/2 Cup of the shredded short ribs into the risotto with the final addition of broth.
  10. Turn the heat off when there is still some liquid remaining in the rice and stir in the Parmesan cheese.
  11. Remove from heat and cover.  Let stand 5 minutes before serving.

TIP:  Risotto may be reheated by adding in some additional mushroom or low sodium beef stock and stirring to incorporate into the risotto.

To serve:  I toss some fresh spinach in olive oil over medium heat until wilted, lay a small bead in the center of the plate then mound some risotto atop the spinach, pile some shredded short rib on top with a sprinkle of Parmesan cheese and add a slice of french bread with some butter for sopping up the juices.

My husband said it was better than The Winery!  Sorry Chef Yvon Goetz. 😉

If you use Facebook and are interested in the things I may not devote an entire blog post to: things like health articles, my favorite recipes, fun drinks, food facts, nutritional information, restaurant reviews, photos and other things that make my mouth water, I have a very active page on Facebook you can visit too: https://www.facebook.com/ThisGirlLovesHerFood

Bacon-Gouda Mac & Cheese

tjparmgoudaI love Trader Joe’s Parmesan Gouda so much I just had to figure out a way to incorporate it into my other favorite (besides a grilled cheese sandwich) Macaroni & Cheese!

A couple of trials later, finally a dish I can serve to guests!

Bacon-Gouda Macaroni & Cheese

Ingredients:

  • 16oz Cavatappi pasta (it’s very important to use the right pasta)
  • 8-10 Slices thick cut bacon (from the butcher)cavatappi
  • 2 1/4 cup skim milk
  • 1/4 C butter (4 TBLS) melted
  • 1/2 cup flour
  • 1 1/4 cup heavy cream
  • 2 tsp fresh ground kosher salt
  • 1 tsp fresh cracked black pepper
  • 1/2 tsp dry mustard
  • 2 tsp Worcestershire sauce
  • 16 oz Trader Joe’s Parmesan-Gouda cheese, shredded
  • 1/2 lb sharp cheddar cheese, shredded
  • 1 Sleeve Crushed Ritz Crackers
  • 1/4 C butter (4 TBLS) melted

Directions:

  1. Preheat oven to 375°F
  2. Butter a 13″ X 9″ Pyrex Baking Pan
  3. Prepare Cavatappi according to package directions. Drain and pour into a large mixing bowl – cover with foil to keep pasta warm.
  4. Cook bacon until crispy but not overcooked.  Drain, cool, crumble and set aside.
  5. Melt butter and whisk flour into it
  6. In large pot heat milk to nearly boiling.
  7. Reduce heat to medium and stir in flour/butter mixture.  Whisk vigorously over medium heat for 1-2 minutes. Mixture should be thick and boiling.
  8. Slowly whisk in cream.
  9. Add in salt, pepper, mustard and Worcestershire sauce.
  10. Reduce heat to low and continue to stir for about 5 minutes.
  11. Remove from heat and stir in shredded Parmesan-Gouda and Cheddar cheeses until completely melted.
  12. Pour sauce over cooked pasta in large mixing bowl.
  13. Add in 3/4 of the crumbled bacon. Combine using a rubber spatula.
  14. Transfer to prepared Pyrex baking dish.
  15. Combine the sleeve of crushed Ritz crackers and remaining crumbled bacon with the remaining 4 TBLS of melted butter. Sprinkle over pasta in Pyrex baking dish.
  16. Bake uncovered in a 375 degree oven for 25-30 minutes.

It’s rich, so a small side salad would be great alongside, or even nothing at all.  Except, of course, a glass of wine. 😉

If you use Facebook and are interested in the things I may not devote an entire blog post to: things like health articles, my favorite recipes, fun drinks, food facts, nutritional information, restaurant reviews, photos and other things that make my mouth water, I have a very active page on Facebook you can visit too: https://www.facebook.com/ThisGirlLovesHerFood

Cauliflower Pizza Crust

Pizza is my weakness anytime I’m trying to lean out.  The ooey, gooey, cheesy goodness just warms my insides at the mere mention.  But I know it also will leave me bloated and sorry I gave in to my craving afterward.  This crust, from Eat. Drink. Smile. solves that problem!

CAULIFLOWER PIZZA CRUST RECIPE

INGREDIENTS:

  • 1 cup riced, then cooked cauliflower
  • 1/2 cup grated parmesan cheese
  • 1 egg, beaten
  • 1 tsp italian seasonings
  • 1/2 tsp crushed garlic
  • 1/2 tsp salt
  • 1/2 cup shredded mozzarella cheese (for topping)
  • pizza sauce & additional toppings of your choice

DIRECTIONS:

  1. To rice the cauliflower, cut florets into chunks and pulse in a food processor until you see rice-like bits. You could also use a cheese grater to produce the tiny pieces. Do not over process, you don’t want mush.
  2. Microwave the riced cauliflower in a bowl for 5-8 minutes depending on your microwave. No need to add water. After microwaving, transfer riced cauliflower to a fine mesh strainer and drain completely, gently pressing out excess water. Once drained, transfer riced cauliflower to a clean dish towel and wrap the sides around the cauliflower while gently pressing out excess water. This drying process is important!
  3. One large head of cauliflower will yield about 3 cups of riced cauliflower. Use it to make more pizzas immediately, or store in the refrigerator for 2-3 days.
  4. Preheat oven to 450 degrees. Spray a cookie sheet with non-stick cooking spray.
  5. In a medium bowl, combine 1 cup riced, cooked cauliflower, 1 egg and your parmesan cheese. Next, add Italian seasonings, crushed garlic and salt. Making sure everything is well mixed, place your “dough” on the cookie sheet and pat out a 9″ round. Be sure not to press it too thin as it’s easy to create holes.
  6. Bake your dough at 450 degrees for 15 minutes.
  7. Remove from oven. Add sauce, mozzarella cheese, and your favorite pre-cooked toppings to your pizza. Place pizza under broiler just until cheese is melted, be sure to keep an eye on it!

If you use Facebook and are interested in the things I may not devote an entire blog post to: things like health articles, my favorite recipes, fun drinks, food facts, nutritional information, restaurant reviews, photos and other things that make my mouth water, I have a very active page on Facebook you can visit too:https://www.facebook.com/ThisGirlLovesHerFood

10 No Fuss Healthy Soups


If you use Facebook and are interested in the things I may not devote an entire blog post to: things like health articles, my favorite recipes, fun drinks, food facts, nutritional information, restaurant reviews, photos and other things that make my mouth water, I have a very active page on Facebook you can visit too:https://www.facebook.com/ThisGirlLovesHerFood

Cold Outside? Warm Up Your Insides!

its-freezing-pnts-brrr-9666002I’ll be honest, cold is relative to where you are in the world.  Today I’m thankful to not be in Central or Eastern Europe, which is seeing temperatures as low as -30°C (-22°F).  Brrr

Here, in Irvine, CA today it is 62°F and raining which means I am under a warm blanket with my two Labrador Retrievers snuggled up beside me and the fireplace on as I sip on some coffee laced liberally with some Bailey’s Irish Cream.  I use the words, “I’m freezing” in nearly every conversation I have today, but I am loving this weather.  At this time last year, we were heading into what was billed as the hottest February on record with day after day of temperatures in the upper 90’s that led to 2016 being called one of the hottest, if not THE hottest year on record, so excuse my exaggeration with the term “freezing” as, in order to be cold last year, I had to have my air conditioner running.

Today I saw a picture at one of my favorite websites, www.bonappetit.com, for Chili Colorado, that made my mouth water.

colorado-chili-1-of-1

I hadn’t yet decided what to make for dinner, but, after seeing this picture, no further searching was needed.  This will definitely be dinner, and a couple of workday lunches as well!  I am not a big pork fan, so I’ll be making the beef option.

***Note I always trim all of the visible fat away so that the meat is as lean as possible.

Rick Martinez’s Mom’s Chili Colorado

  • 5 Dried Ancho Chilis
  • 2 Dried Pasilla Chilis
  • 2 Dried Guajillo Chilis
  • 8 Cups Chicken Stock (3 Cups + 5 Cups Separated)
  • 2-3 Pounds Boneless Pork Shoulder (or 2-3 Pounds Boneless Beef Shoulder)
  • Salt and Pepper
  • Oilve Oil (My substitution for Vegetable Oil)
  • 6 Cloves Garlic Chopped
  • 2 Bay Leaves
  • 1 TBLS Ground Cumin
  • 2 tsp Chopped Fresh Sage
  • 2 tsp Chopped Fresh Oregano

Now Let’s Cook!

  1. Remove the stems and seeds from all of your chilis.  Make sure you have chosen soft and pliable chilis.  If they are dry and brittle they are too old.  They will be tasteless and ruin your dish.
  2. Cover chiles with 3 cups of your chicken stock (it should already be boiling) and let them steam, covered with plastic wrap, for about 30 minutes until they are plump and tender. Put the chilis and all of the soaking liquid into a blender and purée until very smooth.
  3. Cut 2 to 3 pounds boneless pork shoulder (or boneless beef shoulder) into ½” pieces and season with salt and pepper.
  4. Brown the meat in a large, heavy pot over medium-high heat with a couple of TBLS of olive oil so meat doesn’t stick. 
  5. Chop your 6 cloves of garlic and throw it in the pot along with 2 bay leaves, 1 TBLS ground cumin, 2 tsp each of chopped fresh sage and chopped fresh oregano.  Stir that around for about a minute, or until very fragrant.
  6. Add in your remaining 5 cups of chicken stock and simmer uncovered for about an hour.
  7. Stir in the chile purée and simmer for another 45 minutes until the meat is very tender and the sauce is a thick, mahogany-red color.
  8. Season with additional salt and pepper.
  9. Serve with flour tortillas – you can serve rice and beans for a full, authentic Mexican meal, if you desire, as well.

Just imagine the love and attention you’ll get from your family when they come into the house and are surrounded by the smell of chili Colorado simmering on the stove 😉 !

If you use Facebook and are interested in the things I may not devote an entire blog post to: things like health articles, my favorite recipes, fun drinks, food facts, nutritional information, restaurant reviews, photos and other things that make my mouth water, I have a very active page on Facebook you can visit too:https://www.facebook.com/ThisGirlLovesHerFood

Weeknight Steak Chili

steak-chili-with-red-kidney-beansThe wind is cold and it’s finally time to pull the jeans and sweaters out of the back of the closet.  It’s also time to let a pot of chili welcome the boys home after a long day.  This time it won’t have to cook all day, I have my handy dandy pressure cooker, which doubles as a enhanced slow cooker, to cut the usual cooking time in half!  If you don’t have a pressure cooker I’ve put the alternate instructions in red where they differ.

Pressure Cooker Steak Chili

  • 1 pound trimmed Chuck roast ( I buy mine Organic from Sprouts) chopped into 1/4″ chunks – it’s easiest to chop raw meat if you freeze it for 30 minutes or so
  • 1/2 of a medium onion chopped
  • 1 block XLNT chili con carne
  • 1 small can S&W low-sodium red beans drained of most of the liquid
  • 1 small can Hunt’s petite diced tomatoes
  • 1 large can store brand dark red kidney beans drained of most of the liquid (my store didn’t carry a large can of S&W)
  1. Turn your pressure cooker on to the brown setting and toss in the onions.
  2. For non-pressure cookers: heat a Stock Pot to medium-high heat with a splash of olive oil and add the onions, then follow the instructions below through #8.
  3. Allow to cook for about 2 minutes then give them a quick stir.
  4. Add chopped meat to the pressure cooker.
  5. Cook, stirring occasionally for about 8 minutes.
  6. Add the block of chili.  If thawed, stir into the meat and onion. If frozen, skip this step.
  7. Add both cans of beans and the can of tomatoes.
  8. Stir the mixture, getting chili block to the bottom if it’s frozen.
  9. Close the pressure cooker.
  10. Set to slow cooker setting (mine has one) – mine defaults to 2 hours of cooking time.  At the end of 2 hours my kidney beans needed a little bit more time, so I added an additional 30 minutes and they were perfect.
  11. If you don’t have a pressure cooker you can finish cooking 1 of 2 ways: Put everything into the crock pot and cook on low for about 4 hours (or 1 hour on high and 2 on low); or you can finish this chili on the stove top in your stock pot.  You will need to add some more liquid, in which case I would go with a beer and make sure that you are cooking it low and slow – you’ll need to simmer and stir occasionally for about 4 hours.

tjbsI grated some white cheddar cheese to sprinkle on top and grabbed a package of Trader Joe’s Cheesy Bread Sticks that toasted up perfectly in the oven in 6 minutes. No one was in the mood for a salad, but if you wanted a perfectly rounded meal a salad would do the trick!

If you’re on Facebook and are interested in the things I may not devote an entire blog post to, recipes, food facts, nutritional information, photos and other things that make my mouth water, I have a page on Facebook you can visit too:  https://www.facebook.com/ThisGirlLovesHerFood

Click Here!

All-American Meal

meatloaf

During the entire Election 2016, this admitted Political Junkie made every night of both conventions and each of the 3 debates, plus a few other random “big political news” nights, events for a special meal to eat in front of the television.

So, when my husband asked me what gourmet meal I’d be preparing I was surprised to find myself unprepared with a ready-to-answer menu.  Uh Oh!  He suggested meatloaf which I immediately shook off as not fancy enough for a night I anticipated would involve a lot of anticipatory butterflies for the historic, ultimate glass ceiling shattering moment in history I hoped would be happening for women while we’d be eating our dinner on the west coast.

As the day wore on I started to change my mind about the simple, unassuming meatloaf.

meatmashpeasWhat screams Americana more than the steady weeknight fare of everyone’s youth more than meatloaf, mashed potatoes and peas?  Nothing I could come up with.  Throw in an apple pie and the perfect Tuesday Election Night 2016 meal vote was cast! 😉

Simple Weeknight Meatloaf

  • 2 1/2 – 3 Pounds 85% Lean Ground Beef
  • 1 Sleeve Saltine Crackers Crushed
  • 1 Can Fire Roasted Diced Tomatoes
  • 2 Large Eggs
  • 1/3 Cup Ketchup or Jarred Spaghetti/Marinara Sauce

Preheat oven to 350°F.

  1. In bowl of stand mixer (or large mixing bowl if combining ingredients by hand) put (in this order) crackers, eggs, can of tomatoes (undrained), meat, and ketchup.
  2. Using bread hook attachment, turn stand mixer to lowest setting and mix until ingredients start to combine and form a loaf shape.
  3. Remove hook and using a large wooden spoon or rubber spatula, finish combining until no dry crackers show through the meat.
  4. Mound into a loaf pan but don’t pack too firmly.
  5. Put loaf pan into preheated oven and set timer for 1 hour and 20 minutes.  At about 30 minutes use a turkey baster and suction off any fat that has begun to accumulate along the edges of the loaf pan.  Also, use your ketchup or spaghetti/marinara sauce to top the meatloaf.
  6. At 60 minutes again suction the fat from the edges of the pan with a turkey baster.  I do this to avoid spillage into my oven and also to avoid having my meatloaf sit in fat during the entire baking time.
  7. At an hour and a twenty minutes, slide your meatloaf out of the oven and insert a meat thermometer into the middle, making sure not to let the tip of the thermometer touch the bottom of the pan.  Your meatloaf should read 160°F for medium in the center.
  8. If you want your center to be more medium well, put your meatloaf back into the oven for another 5 minutes or so and check the temperature again.  For medium-well it should read 165°F and the rest of your meatloaf will be more well done at or above 170°F.

If you want mashed potatoes to be ready when your meatloaf comes out you can throw some small red potatoes (skin on or off) into a pot of boiling water and cook them for 15 minutes.  Turn them off, drain the water and throw them into the bowl of your stand mixer with some milk, salt & pepper and butter.  Using the paddle attachment mix until well combined but don’t over mix.  Throw some foil over the top of the bowl and they’ll stay hot until you’re ready to eat.

If you are on Facebook and are interested in the things I may not devote an entire blog post to, recipes, food facts, nutritional information, photos and other things that make my mouth water, I have a page on Facebook you can visit too:  https://www.facebook.com/ThisGirlLovesHerFood