

 Since this New Year’s Day is “Upside Down,” you know, all of the official festivities happening on Monday, January 2, what better way to kick-off (no pun intended) our entire day of parade and football watching than with this upside down take on my favorite overripe fruit concoction?
Our whole holiday week between Christmas and New Year’s Day has been spent at home, except for an escape on Wednesday for my birthday dinner WITH a 102°F temperature, so I did no baking, we did no entertaining, and I’ve really done nothing but sleep and drink hot tea. I’m trying to rally, despite being sick, and make some kind of effort for tomorrow, yet another day of being sick at home, but at least there will be something I might want to eat.
My husband (he who is Twitter challenged) managed to send this Buzzfeed video to me in a message a couple of months ago as a hint, then I saw it again last night. It looks easy enough so why not? I’ll give it a try.
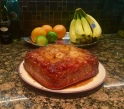
Upside Down Banana Bread
4-5 ripe bananas
3 eggs
½ cup oil
½ cup granulated sugar
1 Tbsp. ground cinnamon
2 cups flour
½ cup butter
1 cup brown sugar
2-3 bananas, sliced
Vanilla ice cream
- Preheat oven to 350°F/175°C.
- In a large bowl, mash the ripe bananas.
- Add the eggs, oil, sugar, and cinnamon, mixing until evenly incorporated.
- Add the flour and mix until the batter has no large pockets of flour. Set aside.
- In a pot over low heat, melt the butter, then mix in the brown sugar until dissolved.
- Bring up the heat to medium, cooking until the mixture starts bubbling.
- Remove the caramel from heat and pour into a greased 9×9 baking pan.
- Lay the banana slices evenly on top of the caramel.
- Spread the banana bread batter on top.
- Bake 40-50 minutes.
- Cool until the bottom is barely warm.
- Use a knife to loosen the edges from the pan.
- Place a plate upside-down on top of the pan, then invert the pan, flipping the banana bread onto the plate.
- Slice, then serve with vanilla ice cream.
TIP** It’s important to make sure you are using a 9 x 9 pan. If you use an 8 x 8 pan, like I did my first try, you need to increase the baking time by about 10 minutes and be prepared, you’ll be cleaning up the brown sugar that will bubble up and spill over the sides and burn onto the bottom of your oven. Trust me, the smoke alarms blaring, dogs running around barking and the cleanup weren’t worth not following the exact directions. UG!
It’s very sweet, so you might want to start with a small square and go back for seconds. Who am I kidding? Put it in a bowl and pile the ice cream on! And, before you ask, “Yes, I do intend to start my day with glorified cake and ice cream!” #TheDietStartsTuesday
If you’re on Facebook and are interested in the things I may not devote an entire blog post to: my favorite recipes, drinks, food facts, nutritional information, photos and other things that make my mouth water, I have a page on Facebook you can visit too:https://www.facebook.com/ThisGirlLovesHerFood


 Are you tired of serving the same champagne cocktails every New Year’s Eve? I’ll let you in on a secret. I’m tired of drinking them!
 A simple and classy option is to stick with a straight forward cocktail served “on-the-rocks” or “up” like a Martini, James Bond style. If your party is going to be one with low music and quiet conversation this is the type of drink to take it there.
 If you want to shake up your boring martini affair and add some life to your party, change your music to something a bit more upbeat and consider serving one (or more) of the following variations:

 It’s the time of year when we all exchange gifts with friends. If you’re college age to not-yet married or perpetually single and loving it, chances are you and your friends also love getting together for cocktails.
 napkins, an aerator, or a decanter. For a beer drinker there is always the bottle opener, pilsner glass, mason jar glasses, or even (for the guy who hasn’t outgrown college) beer pong supplies/table.
 $9.99 at Bed, Bath & Beyond
 Bath & Beyond
 glass, stainless steel strainer, wooden muddler, stainless steel spoon, and 3-piece stainless steel shaker $29.99 at Bed, Bath & Beyond


 Red wine to ease away the stress and tension from a day filled with kids, husbands, work, traffic, housework, bills, etc., then hot cocoa laced with more read wine to pave the way to bedtime? Sounds too good to be true, but
  In a saucepan over medium heat, combine milk and chocolate chips. Whisking constantly until chocolate is melted into milk and you have a thick and creamy chocolate milk. Pour in red wine and heat until everything is hot. Pour into 2 mugs and top with whipped cream.
 But once I shared the story of a friend’s attempt at a turkey shaped cupcake creation with a neck just a touch too broad and a
 shade too brown with feet on a pair of stones that ended up looking like a really well endowed man’s crown jewels adorned with flaming red, orange & yellow feathers (like Mardi Gras Plumage)….well, let’s just say the wine bottles emptied a little faster and the conversation went downhill from there. 😉
 Thrown things into the blender, turned it on and forgotten to put on lid or not put lid on tight enough; spent an hour cleaning the ceiling, cupboards and everywhere else
 Opened a can of Chef-Boy-R-Dee (No judging, we were all starving college students once), poured it into a bowl, set the microwave for 2 minutes (uh oh), and walked away. #CleanUpAisle5
 Thrown popcorn into the microwave, set the timer for too long and had to live with burned popcorn smell in the whole house or the office for days.


 One of the things I am in charge of this Thanksgiving is an appetizer. I was going to get fancy and knock myself out with something that would be difficult to keep warm and wouldn’t likely taste that great cold, but I’ve decided to take another tack.


 There are many imposters and “copycat” recipes out there that were close, but none that I could find that were exactly like the cookies I remembered. I finally came across a blog that focuses solely on the
 into the already-scooped dough.
