Chicken Parmesan Meatloaf

I wanted to make something healthy for an impromptu, no occasion, mid-week family gathering but didn’t want to spend all day in the kitchen prepping.  I thought about a simple ground sirloin meatloaf and a salad, but meatloaf, even with ground sirloin, screams, “Boring!”.

Having just gone to the grocery store yesterday, I was SO not in the mood to go again today.  Thankfully a dive into the freezer led to a discovery of 2 pounds of frozen ground chicken breast and 3 pounds of handmade gourmet chicken sausage I’d had to freeze due to family drama derailing a dinner a couple of weeks ago!  A quick check of the pantry confirmed that I still had a jar of the amazing Gia Russa Hot Sicilian Marinara I’d come across at World Market, I always have pasta, Parmesan & mozzarella and the makings for a green salad, so dinner is handled!  Whew…

chixparmml3

Spicy Chicken Parmesan Meatloaf

  • 1 TBLS Olive Oil or butter
  • 2 pounds ground chicken breast
  • 3 chicken “Italian” sausages
  • 2 eggs, lightly beaten
  • 1 – 14.5 ounce can fire roasted tomatoes, drained (these are a bit spicy, you can use diced tomatoes instead)
  • 3/4 cup seasoned Panko crumbs
  • 4-5 cloves garlic, minced
  • 1/2 cup Parmesan cheese
  • 1+1/2 cups marinara sauce (I use a spicy sauce)
  • 3/4 cup shredded mozzarella cheese

First Prepare the Sausages:

  1. Preheat oven to 400°F
  2. Place the sausages into a rimmed baking pan.
  3. Cook for 30-45 minutes (depending on how big the sausages are) until casings begin to brown.
  4. Remove sausages from the oven and set aside to cool.
  5. Reduce oven temperature to 350°F
  6. In the bowl of your stand mixer, with the paddle or dough hook attachment, combine the ground chicken, eggs, Panko, tomatoes, garlic, 1/4 Cup of the marinara sauce, and Parmesan cheese.
  7. Using a sharp / serrated knife, slice the sausage links into rounds.
  8. There isn’t much fat in the ground chicken breast, so, using about a tablespoon of le-creuset-heritage-covered-square-cherry-red-baking-disholive oil or butter, grease the bottom and sides of your chosen baking dish. NOTE:  I use a Le Cruset® square 3 QT Covered Baking Dish so I can keep it warm out of the oven and at the table.
  9. Take approximately 1/4 cup of the marinara sauce and spread it along the bottom of the pan then layer 1/2 of your sausage slices on top of the sauce.
  10. Mound 1/2 of your ground chicken mixture into the pan then layer the rest of your chixparmml1slices on top of that. (This is why I use the larger, square shaped pan.
  11. Mound the rest of the ground chicken mixture on top of the second layer of sausage slices then, using your hands (or a pair of rubber spatulas) shape the meat in from the sides to form a loaf mounding up towards the middle.
  12. Top the meatloaf with the rest of the marinara sauce allowing it to spill down the sides.  NOTE:  You can prepare up to this point, cover and store in the refrigerator until you are ready to cook.  If you are going to do that, allow to sit on the counter while you are waiting for the oven to preheat.chixparmml2
  13. Bake for 60-65 minutes or until chicken is cooked (insert instant read thermometer into the center of loaf should read 165°F).
  14. When done remove and add the mozzarella cheese on top.
  15. If you have extra marinara sauce, put into a small saucepan and warm to serve alongside slices if desired.
  16. Return the meatloaf to the oven until the cheese is melted.
  17. Remove from the oven and let the meatloaf rest for 5-10 minutes before serving.
  • Prepare some wide egg noodles, fettuccini, angel hair, spaghetti, or spaghettini.
  • Drain.
  • Toss warm pasta with some butter or olive oil and grated parmesan cheese.
  • Pile some pasta in the center of the plate, then lay a thick slice of the meatloaf atop the pasta.
  • If you have warmed some of the extra sauce, ladle a bit of it on top of the meat and grate a bit more fresh Parmesan (or shake some out of the green can) cheese on top.
  • Toss a crisp green salad and dinner is served. #ThisGirlLovesToEat

The meatloaf came out moist and didn’t end up needing the extra sauce.  When I reheated the extra slices in the microwave the next day I added the sauce.

If you are interested in the things I may not devote an entire blog post to like:  health articles, my favorite recipes, fun drinks, food facts, nutritional information, restaurant reviews, photos and other things that make my mouth water, I have a community page on Facebook you can visit: https://www.facebook.com/ThisGirlLovesHerFood

Cook Your Meat Perfectly With Science

cowchart

I love beef of nearly any cut, but I can’t stand it if it’s overcooked! I saw a headline for a way to cook it to a perfect degree of doneness every time and clicked on it immediately.  I did get struck by the giggles at the name of the not-so-new online cooking tool created by three girls at MIT in 2013: Cook My Meat.

Come on, COOK MY MEAT?  It doesn’t give your inner 12 year old the giggles?

Alright, I’ll revert to my adult self.

  • #CookMyMeat was created by Kate Roe, Laura Breiman, and Marissa Stephens, students at MIT in 2013.
  • You fill in the cut of your meat, the temperature you’ll be cooking it at, then you’re shown an approximation of how your meat will turn out: red, pink or well-done/overcooked

cook-my-meat1

You can even compare two different cooking methods and get a side by side result of how the steaks (or turkey or tuna steak) will turn out: 

  • Flip every 4 minutes
  • Flip every 15 seconds
  • Sear then cook low
  • Sous Vide then Liquid Nitrogen
  • Enter your own parameters

cookmymeat2

On_Food_And_Cooking_UScover
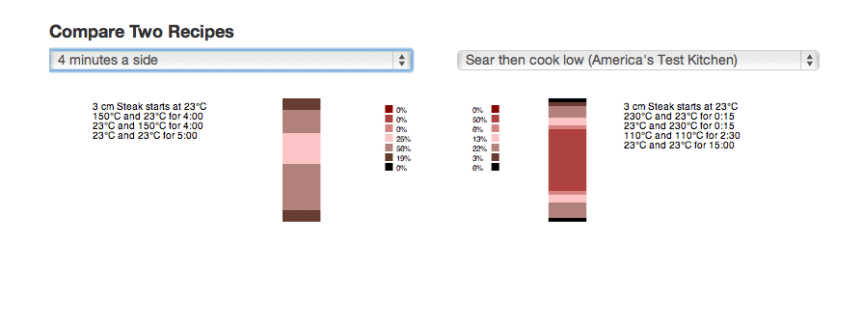
The girls developed the tool by calculating heat diffusion in the meat at each time step with the Crank-Nicolson method, using On Food and Cooking: The Science and Lore of the Kitchen as a guidepost for protein denaturaization temperatures.

The book, published in 1984, has been described by Alton Brown as “the Rosetta stone of the culinary world.”

I just wanted something simple to tell me how long to cook my steak so it comes out a bit more than medium-rare but not all the way to medium in that almost warm pink state.  This is a bit high tech and too much science, so I’ll be sticking to my instant read thermometer and my trusty steak knife & mag-light in the dark to make sure it’s not overcooked.  #ThisGirlLovesToEat

If you use Facebook and are interested in the things I may not devote an entire blog post to: things like health articles, my favorite recipes, fun drinks, food facts, nutritional information, restaurant reviews, photos and other things that make my mouth water, I have a very active page on Facebook you can visit too: https://www.facebook.com/ThisGirlLovesHerFood

Short Rib Mushroom Risotto

stuffedWe have a lot of family celebrations that come in a very short time, which means a lot of heavy big dinners either out at restaurants or at one family gathering or another.  By the time we hit our wedding anniversary in late February (which is the same day as my sister-in-law’s birthday) and, a week later, my husband’s birthday, we are about food-ed out!

Despite that, I make a big to-do and tonight, am making a new recipe I’ve been playing with for a dish I had made for me at my post-Christmas birthday at one of my favorite restaurants, The Winery in Tustin, CA.   I’m good enough in the kitchen to be dangerous so I’ve gathered the ingredients and am giving it a go tonight! If it sucks I can always order pizza, right? #ThisGirlLovesToEat

First a tip:  Start this recipe either the day before, early on the the day, or at least 2 hours before you want to eat.  You’ll want to prepare the short ribs first so that you’ll have the broth left from cooking them to use for the risotto.  Trust me on this. It makes a huge difference.

Short Rib Mushroom Risotto

Making the Ribs

  • 8-10 Strips Thick Cut Bacon – cut (with kitchen shears) into 1/2 – 1″ chunks
  • 3 to 4 Lbs Bone-in Short Ribs
  • 1 – 8oz Pkg Sliced Baby Bella Mushrooms
  • Freshly Ground Black Pepper
  • 1 TBLS Minced Garlic
  • 1 Cup Mushroom Broth (Sprouts carries this) or Low Sodium Beef Broth
  • 1 TBLS Light Brown Sugar
  • 1 tsp Ground Cloves
  • 1 TBLS Dried Herbes De Provence (McCormick)
  1. Set the Pressure Cooker to the brown setting with the lid open.
  2. Cut the bacon and cook it in the pressure cooker (with the lid open) until it just starts to get crisp. Remove and set aside.
  3. Put short ribs into the pressure cooker in the bacon grease, brown on all sides, in batches if needed, until all are browned.
  4. When all ribs are browned, put all back into the pressure cooker fattiest (if any) or bone side down.
  5. Put garlic, brown sugar, and broth into the spaces between the ribs.
  6. Sprinkle ribs with black pepper and lightly with ground cloves and Herbes De Provence.
  7. Add bacon and mushrooms on top of the ribs in the pressure cooker.
  8. Secure lid and set to pressure cook on high for 40 minutes.
  9. Let pressure release naturally for 10 minutes then do quick release.
  10. Remove ribs from the pressure cooker to a covered pot, and as you are moving them remove the bones – they should pull right out.
  11. When all ribs are deboned, use 2 forks and shred the meat while it is still hot.
  12. Add about 1/2 cup of the reserved broth from the pressure cooker to the meat and cover to keep warm and moist.

Making the Risotto

  • 1 TBLS Olive Oil + 1 TBLS Butter
  • 1/4 Cup Butter (1/2 Stick)
  • 1/2 Medium Yellow Onion Chopped
  • 1 – 8oz Pkg Sliced White Mushrooms (chop them)
  • Freshly Ground Black Pepper
  • 1 TBLS Minced Garlic
  • 1 Cup Mushroom (Sprouts carries this) or Low Sodium Beef Broth
  • 2 Cups Arborio Rice
  • 2/3 Cup White Wine (I used Sauvignon Blanc)
  • 4 1/2 – 5 Cups Beef Broth (use the reserved strained drippings/broth from the short ribs and add enough stock/broth to make up the total amount)
  • 2/3 Cup shredded Parmesan Cheese
  1. Using a fat separator, pour the remaining liquid from the pressure cooker through the strainer top and allow to slightly cool.  Once cooled pour off the broth only into a 6 cup measuring cup.  Discard the fat.
  2. Add enough broth (mushroom or low sodium beef) to equal 5 cups. Then put in a pan to simmer.
  3. In heavy gauge saucepan heat olive oil + 1 TBLS butter until melted.
  4. Add rice.  Cook and stir about 3 minutes until lightly browned.  Remove from heat and set aside.
  5. To prepare the mushrooms, clean the mushrooms by brushing them off (do not wash if possible) and roughly chop (stems may be left on).
  6. Sauté onions, garlic and butter in heavy gauge saucepan over medium-high heat until onions are translucent about 5 minutes.  Add mushrooms and saute until mushrooms are soft (about 4 minutes)
  7. Add the browned rice to the vegetables and stir to combine.
  8. Pour in the white wine and allow the liquid to boil and be absorbed into the rice. Then pour in 1/2 cup of stock to the rice, stirring constantly. (If necessary, adjust the heat under the pot – you want a medium simmer.)  Add more stock 1/2 cup at a time – adding more just as most but not all of the liquid is absorbed before adding in more stock.)
  9. Stir the rice and stock together in this manner for approximately 25 minutes or so – until the rice is tender but not mushy. Stir about 1/2 Cup of the shredded short ribs into the risotto with the final addition of broth.
  10. Turn the heat off when there is still some liquid remaining in the rice and stir in the Parmesan cheese.
  11. Remove from heat and cover.  Let stand 5 minutes before serving.

TIP:  Risotto may be reheated by adding in some additional mushroom or low sodium beef stock and stirring to incorporate into the risotto.

To serve:  I toss some fresh spinach in olive oil over medium heat until wilted, lay a small bead in the center of the plate then mound some risotto atop the spinach, pile some shredded short rib on top with a sprinkle of Parmesan cheese and add a slice of french bread with some butter for sopping up the juices.

My husband said it was better than The Winery!  Sorry Chef Yvon Goetz. 😉

If you use Facebook and are interested in the things I may not devote an entire blog post to: things like health articles, my favorite recipes, fun drinks, food facts, nutritional information, restaurant reviews, photos and other things that make my mouth water, I have a very active page on Facebook you can visit too: https://www.facebook.com/ThisGirlLovesHerFood

Slow Cooker Chicken Cacciatore

slow-cooker-chicken-cacciatoreNobody likes to worry about cooking dinner after getting home from work on Monday night.

The weekend was a non-stop whirlwind of activity.  Kids games, recitals, activities, parties, chores, and maybe some adult beverages have left you with no energy to plan a meal after your first day back at the grind of the work week.

Thankfully Cooking Light Magazine has come to the rescue with a YouTube video to guide us all through a “fix it and forget it” healthy and hearty weeknight meal that will bring the whole family to the table and make you look like a SUPERSTAR!

Slow Cooker Chicken Cacciatore

  • 1/2 cup water
  • 1 tablespoon all-purpose flour
  • 2 cups unsalted chicken stock
  • 1/2 cup white wine
  • 1/4 cup chopped fresh oregano
  • 1/4 cup drained capers
  • 1/2 teaspoon kosher salt
  • 1/2 teaspoon crushed red pepper
  • 8 garlic cloves, chopped
  • 1 (28-oz.) can diced tomatoes
  • 1 (8-oz.) pkg. cremini mushrooms, quartered
  • 8 (6-oz.) boneless-skinless chicken thighs
  • 2 tablespoons extra-virgin olive oil
  • 12 ounces uncooked spaghetti, broken in half
  • 5 ounces baby spinach
  • 2 ounces Parmesan cheese, grated (about 1/2 cup)
  1. Combine 1/2 cup water and flour in a 6-quart electric slow cooker, stirring with a whisk
  2. Stir in stock and next 8 ingredients (through mushrooms)
  3. Add chicken thighs to stock mixture; submerge in liquid
  4. Cover and cook on LOW 7 1/2 hours
  5. Remove chicken
  6. Add oil and pasta to slow cooker
  7. Cover and cook on HIGH 15 minutes or until pasta is done
  8. Stir in spinach until wilted
  9. Divide pasta mixture among 8 shallow bowls
  10. Top evenly with chicken
  11. Sprinkle with Parmesan cheese

If you use Facebook and are interested in the things I may not devote an entire blog post to: things like health articles, my favorite recipes, fun drinks, food facts, nutritional information, restaurant reviews, photos and other things that make my mouth water, I have a very active page on Facebook you can visit too: https://www.facebook.com/ThisGirlLovesHerFood

Mushroom & Chicken Risotto

mushroom-and-chicken-risottoI am a sucker for a thick, creamy risotto, but hate the time it takes to stand by the stove and stir in the liquid it takes to get it that way. This recipe, from Food & Wine Magazine satisfies my need for a speedy prep without sacrificing taste or the texture I love!  An added bonus, for anyone who has an intolerance, it’s Gluten Free!

Mushroom and Chicken Risotto

  • 2 tablespoons butter
  • 1/2 pound mushrooms, cut into thin slices
  • 2/3 pound boneless, skinless chicken breasts (about 2), cut into 1/2-inch pieces
  • 1 teaspoon salt
  • 1/4 teaspoon fresh-ground black pepper
  • 5 1/2 cups canned low-sodium chicken broth or homemade stock, more if needed
  • 1 tablespoon cooking oil
  • 1/2 cup finely chopped onion
  • 1 1/2 cups arborio rice
  • 1/2 cup dry white wine
  • 1/2 cup shredded Parmesan cheese, plus more for serving
  • 2 tablespoons chopped fresh parsley
  1. In a large pot, heat the butter over moderate heat. Add the mushrooms. Cook, stirring frequently, until the mushrooms are browned, about 5 minutes. Add the chicken, 1/4 teaspoon of the salt, and the pepper. Cook until the chicken is just done, 3 to 4 minutes. Remove the mixture from the pan. In a medium saucepan, bring the broth to a simmer.
  2. In the large pot, heat the oil over moderately low heat. Add the onion and cook, stirring occasionally, until translucent, about 5 minutes. Add the rice and stir until it begins to turn opaque, about 2 minutes.
  3. Add the wine and the remaining 3/4 teaspoon salt to the rice. Cook, stirring frequently, until all of the wine has been absorbed. Add about 1/2 cup of the simmering broth and cook, stirring frequently, until it has been absorbed. The rice and broth should bubble gently; adjust the heat as needed. Continue cooking the rice, adding broth 1/2 cup at a time and allowing the rice to absorb it before adding the next 1/2 cup. Cook the rice in this way until tender, 25 to 30 minutes in all. The broth that hasn’t been absorbed should be thickened by the starch from the rice. You may not need to use all the liquid, or you may need more broth or some water.
  4. Stir in the chicken and mushrooms, the Parmesan, and the parsley and heat through. Serve the risotto with additional Parmesan.

SUGGESTED WINE PAIRING

The sweetness here will be nicely mirrored by an off-dry, aromatic white wine, such as Chenin Blanc, Riesling or Gewürztraminer from California.

If you use Facebook and are interested in the things I may not devote an entire blog post to: things like health articles, my favorite recipes, fun drinks, food facts, nutritional information, restaurant reviews, photos and other things that make my mouth water, I have a very active page on Facebook you can visit too: https://www.facebook.com/ThisGirlLovesHerFood

Beef Stroganoff

beef-stroganoff

There are few things I enjoy more than a hearty, thick, rich beef stroganoff.  My grandma used to make this hearty Russian dish, finishing it with a dollop of sour cream.  I loved taking her in her later years to a local Marie Callendar’s restaurant who did a pretty good job with their version of this comforting dish.

I tore this recipe out of the September 1999 edition of Bon Appétit Magazine and it’s been my go-to ever since!

Ingredients

    • 1 + 1/2-pound piece beef tenderloin, well trimmed, meat cut into 2x1x1/2 inch strips (I prefer chunks)
    • 4 tablespoons olive oil
    • 12 tablespoons (1 + 1/2 sticks) butter
    • 1/2 cup finely chopped shallots
    • 1 pound small button mushrooms, thickly sliced
    • 2 cup canned beef broth
    • 4 tablespoons Cognac
    • 1 + 1/2 cup crème fraîche or whipping cream
    • 2 tablespoons Dijon mustard
    • 2 tablespoon chopped fresh dill
    • 12 ounces wide egg noodles
    • 1 tablespoon paprika

Preparation

    1. Pat meat dry with paper towels. Sprinkle with salt and pepper.
    2. Heat oil in heavy large skillet over high heat until very hot.
    3. Working in batches, add meat in single layer and cook just until brown on outside, about 1 minute per side.
    4. Transfer to rimmed baking sheet.
    5. Melt 4 tablespoons butter in same skillet over medium-high heat.
    6. Add chopped shallots and sauté until tender, scraping up browned bits, about 2 minutes.
    7. Add button mushrooms. Sprinkle with pepper and sauté until liquid evaporates, about 12 minutes.
    8. Add beef broth, then Cognac. Simmer until liquid thickens and just coats mushrooms, about 14 minutes.
    9. Stir in crème fraîche and Dijon mustard.
    10. Add meat and any accumulated juices from baking sheet.
    11. Simmer over medium-low heat until meat is heated through but still medium-rare, about 2 minutes.
    12. Mix 1-2 teaspoons cornstarch into 2 tablespoons cold water and stir into the sauce to thicken
    13. Stir in chopped dill.
    14. Season to taste with salt and pepper.
    15. Meanwhile, cook noodles in large pot of boiling salted water until tender, about 8 minutes.
    16. Drain.
    17. Transfer to bowl.
    18. Add remaining butter and toss to coat.
    19. Season with salt and pepper.
    20. Divide noodles among plates.
    21. Top with beef and sauce. Sprinkle generously with paprika.

If you use Facebook and are interested in the things I may not devote an entire blog post to: things like health articles, my favorite recipes, fun drinks, food facts, nutritional information, restaurant reviews, photos and other things that make my mouth water, I have a very active page on Facebook you can visit too: https://www.facebook.com/ThisGirlLovesHerFood

Valentine’s Day Quick Carnitas Tacos

fullsizerender-3On a whim, I decided to make carnitas tacos for Valentine’s Day dinner at home.  I didn’t have to worry about not thinking ahead because my pressure cooker would cook the meat even if it wasn’t all the way thawed in time.  Whew!

Thankfully I’d thrown a pork shoulder in the freezer when they’d been on sale at the grocery store, so I’d just have to rummage through the refrigerator and cupboard to see what I could cobble together to make a meal.

Appetizer:  Spicy Pickled Carrots & Jalapenos

  • 6 Carrotsfullsizerender-4
  • 2 Large Jalapenos
  • 1 Medium Yellow Onion
  • 3 Cloves Garlic
  • 2 tsp Whole Peppercorns
  • 1 tsp Salt
  • 1 1/2 Cups Apple Cider Vinegar
  • 1 1/2 Cups Water

Boil the water and apple cider vinegar in a medium saucepan over medium-high heat.  When at a full rolling boil shut off the flame and immediately add the rest of the ingredients.  Stir once and let stand for about an hour.  Serve at room temperature, or if you have time, refrigerate to bring out even more flavor.  Store in a tightly sealed container in the refrigerator and eat within a week.

Now on to the main course.

Pressure Cooker Carnitas

  • 1 TBLS Olive Oil
  • 2 tsp Freshly Ground Sea Salt
  • 1 1/2 tsp Ground Cloves
  • Freshly Ground Pepper
  • 3 Pounds Pork Shoulder
  • 1/2 Yellow Onion, Sliced
  • 3 Cloves Garlic Peeled
  • 4-6 Sprigs Fresh Cilantro
  • 1 Large Fresh Lemon
  • 1 Jalapeño Sliced in Half
  • 1 1/3 Cup Chicken Broth

Preparation

  1. Set the pressure cook to brown setting
  2. Pour the oil into the pressure cooker
  3. Sprinkle the salt, pepper and cloves on all sides of the pork
  4. Place the pork in the pressure cooker and brown on all sides
  5. Squeeze the juice from the lemon over the pork, add the onion, garlic, cilantro, halved jalapeño, the squeezed lemons and the chicken broth
  6. Cover the pressure cooker, lock on the lid, and bring to high pressure
  7. Cook pork at high pressure for 45 minutes
  8. Turn off and allow pressure to release naturally
  9. Transfer pork to a baking sheet
  10. Preheat the broiler to high
  11. Shred pork with two forks on baking sheet
  12. Broil until the pork starts to crisp, about 3 minutes.
  13. Serve with warm corn tortillas, sliced avocado, shredded cabbage, pepper jack or cojito cheese, hot sauce and wedges of lime

A can of refried beans, a couple of street tacos and a beer and it’s a meal!

If you use Facebook and are interested in the things I may not devote an entire blog post to: things like health articles, my favorite recipes, fun drinks, food facts, nutritional information, restaurant reviews, photos and other things that make my mouth water, I have a very active page on Facebook you can visit too: https://www.facebook.com/ThisGirlLovesHerFood

Easy Roasted Tomato Soup

fellp20150820_lowCalifornia’s multiple personality disorder has reared it’s ugly head again.  The weather, which had been giving us a normal winter for a change, has turned on a dime and we have Santa Ana winds, sunshine and warm temperatures just a day after rain clouds and temperatures in the low 60’s.  Ugh!  This is really screwing with my pre-planned menus!

Screw it!  I planned to make soup for dinner and soup it will be.  I don’t care if it’s warm outside or not.  If anyone complains they can chill theirs like gazpacho.

Roasted Tomato Soup

  • 1 Poblano Chili (Stem and Seed Pod Removed if Desired)
  • 6 Large Tomatoes (Hard Stems Cut Out)
  • 1 Medium Sweet Yellow Onion (Peeled and Halved)
  • 5 Large Carrots (Peeled & Tops Removed)

Preheat oven to 350°F

Place the onion, cut side down, onto an oiled baking pan along with the peeled carrots, the poblano chili and the 6 tomatoes (cut tops up). Tip:  For added flavor, I roast my chili with the stem and seed pod in and remove them before throwing into the Vitamix.

Bake for 25-30 minutes or until the tomato skins begin to crack and peel.

Preparation Option 1 – VITAMIX:

If you have a Vitamix with a soup setting like I do (it’s on the Professional Series 750), the steps are simple from here.  All you do is throw all of the roasted vegetables into the container, place the lid on securely, turn the dial to the soup setting, depress the start button and wait for the cycle to end when it’s done chopping/blending and cooking the soup.

Preparation Option 2 -Blender or Food Processor and Stove Top:

Place the onion, chili and carrots into the blender/processor container and pulse to chop the vegetables up.  Then turn the blender to puree and mix until the vegetables are well chopped.  Add the tomatoes 1 at a time blending on high until all are well incorporated.  If you run out of room in your container, move 1/2 of your vegetable mixture to the pan you’ll be heating the soup in.  When all of the vegetables are blended/pureed, heat in a pan on the stove until warm enough to eat.

If you use Facebook and are interested in the things I may not devote an entire blog post to: things like health articles, my favorite recipes, fun drinks, food facts, nutritional information, restaurant reviews, photos and other things that make my mouth water, I have a very active page on Facebook you can visit too: https://www.facebook.com/ThisGirlLovesHerFood

Broccoli and Chicken Noodle Soup

broccolichickensoupCooking Light is my favorite “Go-To” resource for a quick and healthy weeknight meal.  It’s been cold and blustery this week and the last thing I wanted to do was put together a big fussy sit down meal, but I wanted something hearty enough to be filling.

This soup, that they did a recipe rescue on, has 40 percent fewer calories and 62 percent less fat than the heavy original.  It satisfied the need for something hearty and filling without completely blowing the diet while also giving a big sit down meal feel with some crusty bread and a glass of wine!

Broccoli and Chicken Noodle Soup

Ingredients

  • Cooking spray
  • 2 cups chopped onion
  • 1 cup pre-sliced mushrooms
  • 1 garlic clove, minced
  • 3 tablespoons butter
  • 1.1 ounces all-purpose flour (about 1/4 cup)
  • 4 cups 1% low-fat milk
  • 1 (14-ounce) can fat-free, less-sodium chicken broth
  • 4 ounces uncooked vermicelli, broken into 2-inch pieces
  • 2 cups (8 ounces) shredded light processed cheese (such as Velveeta Light)
  • 4 cups (1-inch) cubed cooked chicken breast
  • 3 cups small broccoli florets (8 ounces)
  • 1 cup half-and-half
  • 1 teaspoon freshly ground black pepper
  • 3/4 teaspoon salt

Preparation

  1. Heat a Dutch oven over medium-high heat.
  2. Coat pan with cooking spray.
  3. Add onion, mushrooms, and garlic to pan; sauté 5 minutes or until liquid evaporates, stirring occasionally.
  4. Reduce heat to medium; add butter to mushroom mixture, stirring until butter melts.
  5. Sprinkle mushroom mixture with flour; cook 2 minutes, stirring occasionally.
  6. Gradually add milk and broth, stirring constantly with a whisk; bring to a boil.
  7. Reduce heat to medium-low; cook 10 minutes or until slightly thick, stirring constantly.
  8. Add pasta to pan; cook 10 minutes.
  9. Add cheese to pan, and stir until cheese melts.
  10. Add chicken and remaining ingredients to pan; cook 5 minutes or until broccoli is tender and soup is thoroughly heated.

Nutritional Information

Calories 317 Fat 12.3g Sat fat 6.8g Mono fat 2.9g Poly fat .9g  Protein 27.5g Carbohydrate 23.8g Fiber 1.9g Cholesterol 74 mg Iron 1.6 mg Sodium 723 mg Calcium 179 mg

If you use Facebook and are interested in the things I may not devote an entire blog post to: things like health articles, my favorite recipes, fun drinks, food facts, nutritional information, restaurant reviews, photos and other things that make my mouth water, I have a very active page on Facebook you can visit too: https://www.facebook.com/ThisGirlLovesHerFood

Bacon-Gouda Mac & Cheese

tjparmgoudaI love Trader Joe’s Parmesan Gouda so much I just had to figure out a way to incorporate it into my other favorite (besides a grilled cheese sandwich) Macaroni & Cheese!

A couple of trials later, finally a dish I can serve to guests!

Bacon-Gouda Macaroni & Cheese

Ingredients:

  • 16oz Cavatappi pasta (it’s very important to use the right pasta)
  • 8-10 Slices thick cut bacon (from the butcher)cavatappi
  • 2 1/4 cup skim milk
  • 1/4 C butter (4 TBLS) melted
  • 1/2 cup flour
  • 1 1/4 cup heavy cream
  • 2 tsp fresh ground kosher salt
  • 1 tsp fresh cracked black pepper
  • 1/2 tsp dry mustard
  • 2 tsp Worcestershire sauce
  • 16 oz Trader Joe’s Parmesan-Gouda cheese, shredded
  • 1/2 lb sharp cheddar cheese, shredded
  • 1 Sleeve Crushed Ritz Crackers
  • 1/4 C butter (4 TBLS) melted

Directions:

  1. Preheat oven to 375°F
  2. Butter a 13″ X 9″ Pyrex Baking Pan
  3. Prepare Cavatappi according to package directions. Drain and pour into a large mixing bowl – cover with foil to keep pasta warm.
  4. Cook bacon until crispy but not overcooked.  Drain, cool, crumble and set aside.
  5. Melt butter and whisk flour into it
  6. In large pot heat milk to nearly boiling.
  7. Reduce heat to medium and stir in flour/butter mixture.  Whisk vigorously over medium heat for 1-2 minutes. Mixture should be thick and boiling.
  8. Slowly whisk in cream.
  9. Add in salt, pepper, mustard and Worcestershire sauce.
  10. Reduce heat to low and continue to stir for about 5 minutes.
  11. Remove from heat and stir in shredded Parmesan-Gouda and Cheddar cheeses until completely melted.
  12. Pour sauce over cooked pasta in large mixing bowl.
  13. Add in 3/4 of the crumbled bacon. Combine using a rubber spatula.
  14. Transfer to prepared Pyrex baking dish.
  15. Combine the sleeve of crushed Ritz crackers and remaining crumbled bacon with the remaining 4 TBLS of melted butter. Sprinkle over pasta in Pyrex baking dish.
  16. Bake uncovered in a 375 degree oven for 25-30 minutes.

It’s rich, so a small side salad would be great alongside, or even nothing at all.  Except, of course, a glass of wine. 😉

If you use Facebook and are interested in the things I may not devote an entire blog post to: things like health articles, my favorite recipes, fun drinks, food facts, nutritional information, restaurant reviews, photos and other things that make my mouth water, I have a very active page on Facebook you can visit too: https://www.facebook.com/ThisGirlLovesHerFood