Foods That Keep You Hydrated

Pouring water into glass

We all know it’s important to drink plenty of fluids when it’s hot outside, but what you eat matters too.  When you become dehydrated, your body loses electrolytes in addition to water which can cause you to feel constipated, weak, dizzy, confused, and can cause drastic changes in mood and behavior.

“Our bodies are made up of more than half water and we use it for pretty much every bodily function — from regulating body temperature to removing waste to lubricating joints to carrying oxygen to the cells.” says Rachel Berman, a registered dietician and senior director of content at Verywell.

hydratingfoods

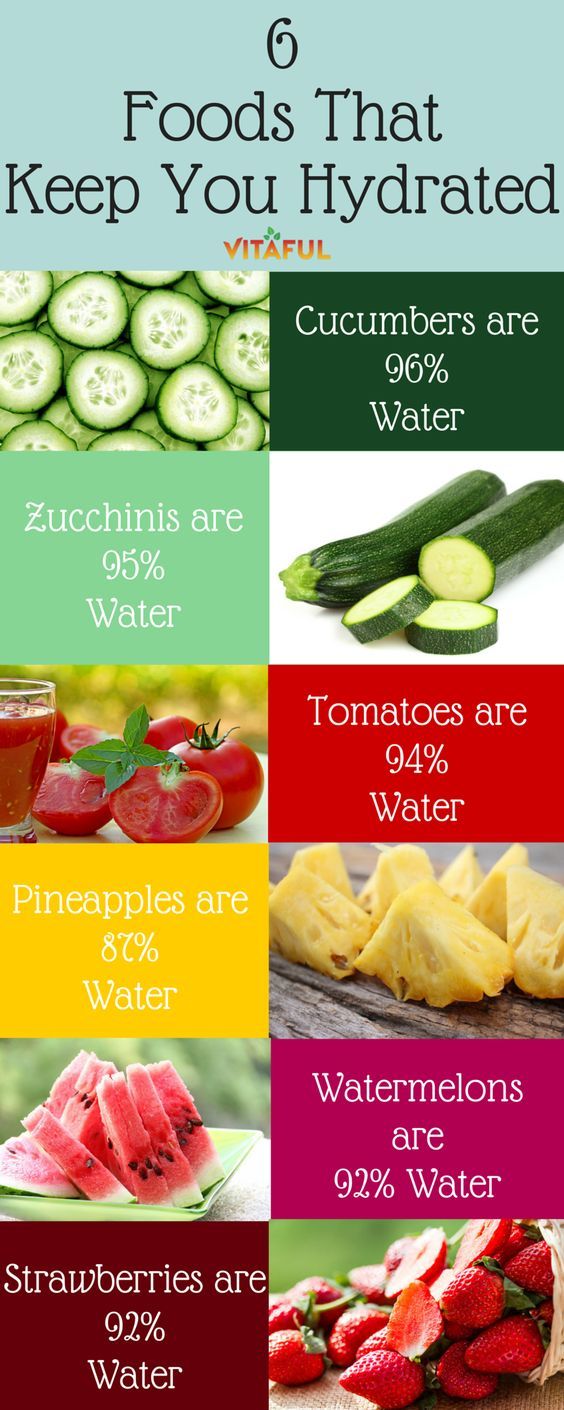
In addition to these six delicious foods that help meet your every day hydration needs, Shape Magazine adds 25 additional foods that help keep you hydrated when temperatures and humidity rise and you are losing your body’s water stores through a rise in body temperature and increased sweating as your body attempts to cool itself down.

  1. Cucumbers:  Primarily made up of water but also contains vitamin C and caffeic acid, both of which help soothe skin irritations and reduce swelling;
  2. Mixed Greens: Most lettuce greens contain 94% water, making it a low-energy density food. In other words, you’ll feel fuller on fewer calories and lose weight faster;
  3. Tomato Sauce:  Most store-bought tomato sauces are about 90% water. Plus, one 1/2 cup serving of tomato sauce has only 50 calories and 0 grams of fat;
  4. Chicken Noodle Soup:  Each cup has about 840 milligrams of sodium to help you retain the broth and 14 grams of carbohydrates to help you absorb it
  5. Eggplant:  They’re high in fiber and water but low in calories. Due to sponge-like texture it absorbs oil, so avoid preparations that include frying;
  6. Applesauce:  Unsweetened, natural applesauce is the best;
  7. Cantaloupe:  Packed with flavor, 90% water but just 56 calories per cup. One cup of cantaloupe also provides 103.2 percent of the daily value for vitamin A;
  8. Fruit Juice Popsicles:  They refill your fluids, cool you down, and boost energy;
  9. Bell Peppers:  92% water, and rich sources of  vitamin C, thiamine, vitamin B6, beta carotene, and folic acid;
  10. Pears:  6 grams of soluble fiber, which helps you feel fuller longer, which means it can help you lose weight;
  11. Romaine Lettuce:  Slightly less water content than iceberg lettuce, but 3 times more folate, 6 times more vitamin C, and 8 times the beta-carotene;
  12. Carrots:  87% water and more of the powerful antioxidant beta-carotene than any other vegetable or fruit. Studies have found that compounds in carrots help protect against skin, lung and oral cavity cancers;
  13. Mangoes:  135 calories and they’re a good source of vitamins A, B6, and C, plus fiber;
  14. Apples:  Linked to lower cholesterol levels, weight loss and preventing a host of chronic health woes—cardiovascular disease, asthma, diabetes, and even certain cancers;
  15. Grapefruit:  According to researchers at Scripps Clinic in California, the chemical properties of grapefruit lower insulin levels and help control appetite, which can lead to weight loss;
  16. Yogurt: With a substantial amount of potassium and sodium, it can help replace the lost electrolytes and re-energize your body;
  17. Naval Oranges:  Oranges are 87% water and contain more than 100% RDA of Vitamin C;
  18. Raw Broccoli: 91% water, Vitamin C, fiber, calcium, and few calories;
  19. Raspberries:  More fiber (8 grams per cup) than any other commonly consumed berry. Plus, they’re packed with ellagic acid, a powerful antioxidant that is thought to help prevent and fight cancer (particularly skin, breast, lung, bladder and esophagus);
  20. Celery:  96% water, but it also provides a combination of mineral salts, amino acids and vitamins that research shows may hydrate your body twice as effectively as a glass of water;
  21. Wild Blueberries:  Studies link blueberries to everything from cancer prevention and better heart health, to anti-aging and improved eyesight;
  22. Raw Spinach:  At seven calories per cup, hydrating spinach is undeniably a great food to fill up on when you want to lose weight. One cup provides more then 50 percent of your daily vitamin A needs, as well as being high in protein and vitamin C;
  23. Red Seedless Grapes:  The skins of red grapes contain resveratrol, a powerful antioxidant that has been shown to reduce risk for heart disease;
  24. Sugar Free Jello:  Sugar-free Jell-O is low in calories, sweet, and refreshing;
  25. Kiwifruit:  56 calories and 20 percent more vitamin C than an orange.

With all of these tasty choices, many of which that can be found year round (or frozen when bought in season) or at least bought online or frozen from Whole Foods, Sprouts and other organic type grocers when they aren’t, being uninspired by water is no reason to allow yourself to become dehydrated.

If you suffer from an allergy, have a truly impossible reason that you have difficulty finding many of these fruits, or just don’t care for many of these choices, you can always flavor plain water with any one of these items (or a combination) that satisfies your tastebuds like:

  • Lemons, Limes, Oranges, Grapefruits or other Citrus;
  • Mint
  • Cucumber
  • Sliced Grapes
  • Any type of Berry
  • Herbal Tea (Hot or Cold)
  • Gatorade or any other sport drink type drink mix packet
  • Crystal light or other zero calorie drink flavor additive
  • Anything else you can think of that doesn’t add tremendous sweetness or calories and weigh down the refreshment of the water

Cheers to healthy hydration!

Are you on Facebook?  You might be interested in the things I may not devote an entire blog post to: recipes, food facts, nutritional information, photos and other things that make my mouth water. I may not write a blog post every day, but there are daily updates to my This Girl Loves To Eat community at: https://www.facebook.com/ThisGirlLovesHerFood

Handy Guide To Chili Peppers

chile-primer-various-peppersMy husband and some of my friends see peppers as a challenge.  The hotter the better.  They love to burn the heck out of their mouths and sweat & suffer afterward.

Not me.  I like my food spicy, but I still like the ability to taste and enjoy my food after I feel the burn.  Not the “Bern” that Bernie Sanders supporters feel 😉 , but the burn that a zip of spicy pepper adds to a dish.

Peppers, like salt, acid and fat, are essential flavor building blocks upon which dishes are built.  In an article at www.bonappetit.com, Amiel Stanek encourages readers to “tease out” the subtle nuances of spice in the season’s crop of peppers using some very specific techniques.  As someone who likes the taste, but not necessarily the need for a fire extinguisher after a bite, I appreciate the guidance.

Stanek reminds home cooks that peppers aren’t just spicy.  They’re also flavor bombs hiding hints of fruitiness, floral notes, earthiness, and “funk.”  To begin to experiment with these hidden flavors, a cook must first work on mellowing the pepper’s spice a bit:

  1. Remove the seeds – Using a paring knife or the edge of a spoon, remove the seed pod beneath the stem and white membranes that hold the rest of the seeds within.
  2. Char – You can do this whole on the grill, under the broiler, or directly on a stovetop gas burner and peel off the burnt layer before seeding them.
  3. Soak – Capsaicin, the compound that makes a pepper hot, is alcohol soluble. When using the hottest peppers, remove membranes and seeds, muddle, and soak in vodka for anywhere from a few hours up to a couple of days.

For a great, printable reference of the varied types of peppers and their levels of spiciness, from mild to “grab a fire extinguisher,” click on this link.

A recipe I shared earlier this year was for one of my favorite cocktail hour snacks on steak and salad night:  Blistered Shishito Peppers.  Take my advice and make a double batch!  These suckers are addicting and one batch is never enough.  If you have any left, put them in a re-sealable container or zip bag and toss in the refrigerator.  These are easily revived in a hot pan with a splash of olive oil a day or two later.

Are you on Facebook?  You might be interested in the things I may not devote an entire blog post to: recipes, food facts, nutritional information, photos and other things that make my mouth water. I may not write a blog post every day, but there are daily updates to my This Girl Loves To Eat community at: https://www.facebook.com/ThisGirlLovesHerFood

Luscious Lemorancello

I am still up to my eyeballs in fresh citrus, so I found a new project from which I will be able to make some really fun desserts!

slicecake_w_lemons11Have you ever been to an Italian restaurant and seen Limoncello on the after dinner drink menu or seen some type of Limoncello Cake on the dessert menu?   Limoncello is a syrupy liqueur that is smooth and sweet with an intense lemon flavor.  It can be sipped on its own, mixed into sparkling water, or shaken into cocktails.

I had no idea that Limoncello is the second most popular liqueur in Italy.  Considering that both my family and my husband’s have Northern Italian roots, I was amazed to realize neither of us had ever tried this particular yummy treat!  I think that counts as some kind of neglect or child abuse 😉

The process to make homemade Limoncello (or in this case, since I am combining blood orange and Meyer lemon peels:  Lemorancello) is quite easy and much less expensive than buying a smaller bottle of the commercially bottled version.

Lisa’s Luscious Lemorancello

  • 1 – 750 ml Bottle Vodka (80 Proof is fine, but 100 Proof is even better)
  • 5 – Medium Sized Meyer Lemons
  • 5 – Medium Sized Oranges (I have Blood Oranges, So I am using those)
  1. Remove the peels from the lemons and oranges.  Put the fruit in a zip bag to freeze for later use.  I peel them whole and then use a spoon to scrape away the pith, but you can also use a vegetable peeler.  It’s important to leave as little of the bitter white pith as possible.
  2. Once you have peeled the fruit and removed the pith from the skins, slice the peels into narrow strips and put the peel into a 32 oz container with a lid then pour the vodka over the peels.  I prefer glass so that any dormant odors don’t transfer from plastic into the vodka.
  3. Seal the container tightly and put aside in a cabinet – or at least on a counter out of direct sunlight.
  4. Infuse your blood orange & lemon peels in the vodka for at least 1 week to a month or longer. Most of the fruit flavor is extracted in the first few days, the longer you let it sit the bolder the flavor will be.  I’m going to let mine sit undisturbed for 6 weeks.

You don’t need to worry about mold or bacteria growing while it is infusing.  The alcohol prevents any mold or other bacteria from growing on the fruit.

When you decide that you just can’t wait to enjoy your treat any longer, it’s time to strain out the fruit peels and combine the infused vodka with simple syrup.

TIP:  You can use any amount 1 C Water to 1 C Sugar up to 4 Cups Water to 4 Cups Sugar.  More water will dilute the alcohol percentage and make the liqueur milder.

  1. Make your simple syrup:  In a saucepan, combine 1 cup sugar (I use superfine baker’s sugar) with 1 cup water and stir over low heat until the sugar is completely dissolved.
  2. Add this to the infused vodka, taste, and add more simple syrup if you need it sweeter.

When you have reached your perfect ratio and your Lemorancello is ready to enjoy, you can store it in a cleaned 750 ml vodka bottle (there will be more than 1 bottle worth of liqueur) or in pretty oil/vinegar type bottles with hinged or screw sealed tops.

The liqueur can be kept in the freezer for at least a year, and likely much longer. Use your own common sense if it’s been more than a year and it tastes off or you see any mold growing in the bottle.  Then it’s more than likely time to toss it and make a fresh batch!  I have no intention of letting mine last that long.

Are you on Facebook?  You might be interested in the things I may not devote an entire blog post to: recipes, food facts, nutritional information, photos and other things that make my mouth water. I may not write a blog post every day, but there are daily updates to my This Girl Loves To Eat community at: https://www.facebook.com/ThisGirlLovesHerFood

Blood Orange Mojito

My backyard garden has always just been okay, but this year my trees are full of ripening fruit, my herbs are healthy and I have been looking for more ways to use my bounty.

I was able to use a few of the Meyer lemons in yesterday’s Chicken Under Pressure “Mamba Style” and Lemon Artichoke Risotto, as well as in a recipe for Sauteed Shrimp in Buttery Lemon Pepper Sauce that I have on deck for tomorrow.

The blood oranges are a little bit tougher challenge.

I was cleaning up the mess from the enthusiastic toasts after Kobe Bryant’s triumphant 60 point final game performance that included the game winning shot and, as I went to put away the bourbon, the tall white bottle of Malibu Rum caught my eye.  AHA MOMENT.

Malibu Mojitos, with the hint of coconut, are my favorite poolside treat and the sweetness would offset the tart bite of the blood oranges!

  • In a highball glass, muddle 5 mint leaves with a splash of simple syrup
  • Fill glass 2/3 full of ice
  • Fill a cocktail shaker half way with ice
  • Squeeze juice from 1 Ripe Blood Orange into the shaker then add
  • 1 TBLS Rose’s Sweetened Lime Juice
  • 1 TBLS Simple Syrup
  • 1 1/2 ounces Malibu Coconut Rum

Put the top on the cocktail shaker and shake the drink vigorously for about 15 seconds until drink is well mixed and chilled.

  • Strain into the highball glass
  • Garnish with 3 fresh or frozen raspberries, 1/4 slice of blood orange and mint leaves
  • Top with club soda and give a quick stir

Are you on Facebook?  You might be interested in the things I may not devote an entire blog post to: recipes, food facts, nutritional information, photos and other things that make my mouth water. I may not write a blog post every day, but there are daily updates to my This Girl Loves To Eat community at: https://www.facebook.com/ThisGirlLovesHerFood


Chicken Under Pressure “Mamba Style”

I’m not feeling a lot of inspiration to create today, but have some chicken in the freezer, plenty of citrus on the trees, dry goods and spices in the cupboards, so dinner shouldn’t be a big ordeal.

I’m employing my handy dandy pressure cooker so I can make dinner ahead and not have to worry about it during all of the pre-final game Laker festivities honoring The Black Mamba,  Kobe Bryant that I’ll be glued to tonight, tissues close at hand.

Chicken Under Pressure “Mamba Style”

  • 6 Frozen Boneless-Skinless Chicken Thighs
  • 2 TBLS Extra Virgin Oil
  • 1 Chicken Bullion Cube
  • 1 tsp Garlic Powder
  • 1 tsp Onion Powder
  • 1/2 tsp Ground Black Pepper
  • 1/2 tsp Ground Allspice
  • 2 tsp Dried Tarragon Leaves
  • Juice of 2 Small Ripe Lemons (About 1/4 Cup)
  • Zest of 2 Small Lemons
  • 1 Cup Water
  1. Turn the pressure cooker on to “Brown” setting
  2. Pour 1 TBLS of the Olive Oil into the bottom of pan
  3. Put frozen chicken into pan to begin defrosting
  4. Add the bullion cube then sprinkle 1/2 tsp of the garlic powder & onion powder, 1/4 tsp of the pepper and allspice, and 1 tsp of the tarragon over the top of the chicken
  5. After 3 minutes turn the chicken over
  6. Sprinkle the remaining 1/2 tsp of the garlic powder & onion powder, 1/4 tsp of the pepper and allspice, and 1 tsp of the tarragon over the other side of the chicken
  7. Brown for another 3 minutes then turn chicken over one more time
  8. Grate the lemon zest into the pan (on top of the chicken)
  9. Squeeze the juice from the zested lemons into the pan
  10. Add the Water and close & lock the pressure cooker
  11. Set to medium – high setting and, when pressure cooker reaches temperature, set time to cook for 10 minutes
  12. When cooking is completed unplug the pressure cooker and allow to sit, without releasing pressure, for 10 minutes.
  13. After rest time, release the pressure and remove the chicken to a covered dish

 Lemon Artichoke Risotto

  1. Add enough water to the reserved liquid in the pressure cooker to equal 3 cups.
  2. Add 2 Cups Dry Arborio Rice
  3. Set pressure cooker to Rice setting
  4. When cooker reaches desired temperature/pressure, cook rice for 9 minutes
  5. When cycle is complete unplug and release most of the pressure but do not unlock or open machine
  6. After 10 minutes finish releasing pressure and unlock/open pressure cooker
  7. Add 1 jar quartered Artichoke Hearts in Water (drained)
  8. Grate the zest from one medium lemon into the rice
  9. Stir in 1/2 Stick Butter
  10. Stir in 1/4 to 1/2 Cup grated Parmesan Cheese
  11. If desired, add more heated chicken broth to make the rice creamier
  12. Keep covered until ready to serve with the chicken

Are you on Facebook?  You might be interested in the things I may not devote an entire blog post to: recipes, food facts, nutritional information, photos and other things that make my mouth water. I may not write a blog post every day, but there are daily updates to my This Girl Loves To Eat community at: https://www.facebook.com/ThisGirlLovesHerFood

Bloody Angry Baby Back Ribs

ribssweetpotatoEnticing name, don’t you think?  I’m not English and spouting a profanity, nor am I intending to butcher and cook ribs while they’re still bloody, I’m too big a wuss for that! 😉

What I did do though, is combine the flavors of the blood oranges ripening on my tree with BBQ sauce & hard cider and put it all into the pressure cooker to see what would happen!

What happened was a tender, tasty rib that absorbed the sweetness of the orange slices, the ginger-apple crispness of the cider before finishing with the smoky-spicy BBQ sauce!  I don’t usually enjoy pork ribs, but these I ate with gusto.  So much so that I only grudgingly encouraged my husband to eat the last slab on the serving plate.  I wanted the ribs to be the star of the show, so I served them beside baked sweet potatoes.

About an hour and 30 minutes before you’re ready to eat dinner:

  1. Preheat your oven to 400 degrees.
  2. Wash and prick the skins of 2 medium sweet potatoes with a fork and place them on a baking sheet.
  3. Bake for 50 minutes then remove from the oven, place them in a bowl and tent with foil to keep them warm while you’re finishing the ribs.

Bloody Angry Baby Back Ribs

  • 2 Medium Ripe Blood Oranges
  • 1 – 12 oz Bottle Angry Orchard Apple Ginger Hard Cider
  • 2 Lbs Pork Loin Back Ribs
  • BBQ Sauce (whatever brand you prefer)
  1. Slice the oranges and place into the bottom of the pressure cooker pan.
  2. Cut your ribs apart into 3-4 pieces and stand them around the perimeter of the pan.
  3. Pour the bottle of Hard Cider into the middle of the ribs, over the top of the oranges.
  4. Immediately close and lock the lid and set the pressure cooker to Medium for 15 minutes and hit the start button.
  5. When the timer goes off, release the pressure and open the top.
  6. Remove the ribs from the pressure cooker pan and place them (bone side down) on a baking sheet lined with foil.
  7. Brush your favorite BBQ sauce on them as lightly or generously as you desire.
  8. Place the baking sheet back into the 400 degree oven you used for your sweet potatoes and cook the ribs another 15 – 20 minutes to bake the sauce in.

Serve with the baked sweet potatoes (with plenty of butter and brown sugar) and, if you’ve prepared some (or bought it) ahead of time, some crisp cold coleslaw.  If you don’t have a recipe for coleslaw, you might want to give my recipe from September 2015 a try: Lisa’s Kicked Up Memphis Coleslaw. Enjoy!

Are you on Facebook?  You might be interested in the things I may not devote an entire blog post to: recipes, food facts, nutritional information, photos and other things that make my mouth water. I may not write a blog post every day, but there are daily updates to my This Girl Loves To Eat community at: https://www.facebook.com/ThisGirlLovesHerFood

UG! I Cut My Avocado Too Soon

I have a 20 year old, beautiful and quite prolific avocado tree in my backyard.  It has survived being broken in half by a dog tie-out (Courtesy of our beloved Husky Whitney), uprooted when the swimming pool was being dug, and being eaten by the tree boring termites that took out it’s neighboring peach and plum trees.  It easily gives me more than 100 large, meaty, delicious avocados that stay good for me to eat and share with friends and family twice a year.

bacon-wrapped-fries-17-140x140January has come, Christmas “Shoeboxes of Love” have been distributed and I still have about 3 dozen on the tree.  I’ve been patiently watching for them to be ready to pick so I can finally try the recipe I pinned months ago for Bacon Wrapped Avocado Slices.  With Super Bowl just a week and a half away, I thought it was a perfect time to give it a try, so I pulled 6 off the tree.

I sent 2 home with my girlfriend and left the other 4 on the counter to slowly ripen.  The great part about picking them fresh is that I often have a good 2 weeks to let them become perfectly soft and ready to eat, unlike those at the store that have to be used as soon as you get them home.

If you don’t have ready-ripe store bought avocados to satisfy your craving, or the patience to wait that long, the following methods are rumored to be effective for ripening rock-hard avocados:

  • Put it in a brown paper bag overnight with a ripe banana or apple, which releases the ripening gas, ethylene (this is what I do)
  • Put it in a jar of rice
  • Bury it in flour
  • Wrap it in a piece of newspaper

3 remained yesterday and 1 was just reaching it’s perfect degree of softness.  My mouth watered anticipating a trial run of crisp salty bacon wrapped around velvety Haas Avocado dipped in a perfectly spiced fiesta ranch dip.  Then I got a massive migraine!

Off to bed I went so my husband was on his own for dinner.  He offered me a grilled cheese sandwich (one of my favorite things) but I was just not hungry.  I smelled his dinner cooking and was glad that he was self sufficient (at least last night).

I woke up this morning feeling a whole lot better and ventured into the kitchen to clean up the mess I knew would await, only to discover that HE ATE MY RIPE AVOCADO!

avocadoripe_guide

I cautiously felt the other two and, maybe it was my wishful thinking, but I determined that one of them was ready.  Into it I dove with my butcher’s knife only to hit rather firm flesh.  OH NO!  My avocado was ruined.

Instead of doing what I might have done in the past, i.e. throw the avocado out (GASP!), I went to my trusty friend, the internet in search of any way to save the prized green flesh!

A post on Hubpages.com may have just saved my cut too soon avocado after all!

If you have only opened, but not yet sliced the flesh and removed it from the shell, you can try to ripen the whole fruit:

  • Firmly fit the avocado halves back around the pit
  • Wrap the entire fruit with Saran Wrap, Masking Tape, Rubber Bands, Yarn, Twine, or anything that will hold the fruit firmly closed without allowing dust, bugs or moisture to get inside
  • Place fruit back on counter (do not refrigerate) and poke it gently every 12 hours until the flesh starts to give but doesn’t yet hold an indentation

An unripe, already sliced avocado can be prepared in ways that will cut the bitterness and hard texture so that it can still be enjoyed, albeit, not as much as if it were buttery and naturally softened, but nonetheless it can still be eaten.

  1. Make avocado patties by baking the cubed flesh 10-15 minutes at 300 degrees, until soft.  Mash and combine with panko, an egg and Cajun spice.  Spray a hot frying pan with olive or coconut oil spray and fry until brown on both sides.  Would be great with a fiesta ranch type dip.
  2. Make a creamy, cheesy hot avocado dip to serve with crusty bread or crackers.  Dice the avocado and place the cubes in a baking dish. Make a simple white sauce (béchamel), pour it over the avocado and sprinkle some grated cheese on top. Bake until golden and bubbly.
  3. Dip slices of the avocado in tempura batter and fry until crisp.

If you, like me, tend to share the foods you eat with your pets, you might have heard that avocados are poisonous to dogs and cats.  Avocado contains a molecule called persin that can cause illness or even death, but according to the Pet Poison Helpline, it is not poisonous for dogs or cats.  I’m really glad to know that because my dogs (1 Husky and 5 English Labs I’ve owned in the past 25 years) have always knocked the avocados (peaches, plums, citrus, tomatoes, berries and apricots) off the low branches or grabbed them off the ground and eaten them skin and all with no adverse reactions.  Thankfully I didn’t know that they were said to be harmful or I’d be worrying that they somehow harmed them.  Do be aware that the seeds do pose a choking risk and could cause a blockage in the digestive tract if swallowed whole, so it’s probably a good idea to keep the seeds away from them.

Are you on Facebook?  You might be interested in the things I may not devote an entire blog post to: recipes, food facts, nutritional information, photos and other things that make my mouth water. I may not write a blog post every day, but there are daily updates to my This Girl Loves To Eat community at:  https://www.facebook.com/ThisGirlLovesHerFood

Roasted Jalapeno Avocado Bacon Pie

Because Thursday is the slowest day at my “real job” I usually have time to fool around in the kitchen to try to create a new dish to serve for dinner.  This week was no different except that I needed to come up with something healthy because I am (BOO – HISSdieting i.e., not eating anything that even resembles Halloween candy or that I can pick up at a drive-thru window, have delivered to my front door, or comes out of a can or box.  No Bueno!

jabpieings Determined to stay on track, into the kitchen I went to make a healthy meal that would taste good, keep me full and make my digestion work hard (and burn calories) all night long.

aha-cartoonHappily I found some of my favorite spicy, salty, satisfying flavors there!  Bacon, fresh jalapenos, a forgotten Roma tomato (thankfully still firm), some ripe avocados from my backyard, green onions, eggs, and a wedge of aged gouda.  AHA Moment: I’d eat breakfast for dinner!

Roasted Jalapeno Avocado Bacon Tortilla Pie

  • 4 Large Eggs
  • 1 1/4 Cups Sour Cream
  • 4 Slices of Bacon (cooked crisp, drained, cooled and chopped)
  • 3 Green Onions
  • 1/2 of 1 Large Roma Tomato
  • 7 Corn Tortillas
  • 1 Medium Avocado
  • 1 Cup Shredded Aged Gouda Cheese
  • 1 Cup Shredded Parmesan Cheese
  • Olive Oil Spray
  • Freshly Ground Salt & Pepper

Preheat the oven to 350 degrees.  Lightly spray the bottom and sides of a 9.5″ Pyrex pie plate with the Olive Oil Spray.

In a small non-stick frying pan heat each of the tortillas until just lightly browned on both sides.  Lay one in the center on the bottom and then layer the rest around the pan overlapping to make sure there is a “crust like” coverage.

In the same pan roast the whole jalapenos until the skin bubbles and begins to blacken.  If you want a bit less spice, remove the seeds and stem first.  Combine both of the cheeses: sprinkle 1/4 of the cheese over the bottom of the tortilla crust.  When peppers are roasted, chop them and scatter over the first cheese layer.

Chop and quickly dry saute’ the whites only of the green onions (chop the greens and set aside) and the Roma tomato with a bit of salt & pepper.  Distribute the onion/tomato mixture over the jalapenos then cover with 1/2 of the remaining cheese.

Chop the avocado then layer it with the bacon over the second cheese layer.

Mix the 4 eggs and the sour cream until well combined and beginning to thicken.  Add cracked salt and pepper then pour carefully over the pie surface taking care not to overflow the edges of the exposed tortillas on the sides. Sprinkle remaining cheese over the top and put pie pan in the center of the pre-heated oven.  Bake 40-45 minutes, or until cheese begins to brown and a knife inserted into the center of the pie comes out with no egg mixture on it and center is cooked through.  Remove from the oven and allow to sit for 10-15 minutes before slicing into wedges to serve.  Top each wedge with the reserved chopped green onions.

jabpie2     jabpie3     jabpie4

To make this a complete meal serve with a salad of Romaine, the reserved 1/2 of the tomato, and any other fresh produce you’d like (I chop a green apple, some jicama, and add a shredded carrot) then dress lightly with olive oil, combined with salt, pepper and some lemon juice to keep it healthy.

Are you on Facebook?  You might be interested in the things I may not devote an entire blog post to:  recipes, food facts, nutritional information, photos and other things that make my mouth water. If so, visit my This Girl Loves To Eat community at:  https://www.facebook.com/ThisGirlLovesHerFood