Baked Jameson Cherry Brie Bites

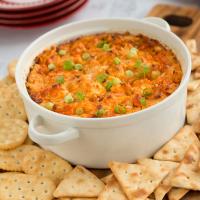
I went looking for something simple but spectacular that would pair equally well with both cocktails and wine before dinner and came across this amazing photo by Spencer Burton for Las Vegas Weekly:

scaled-cherry_baked_brie_by_spencer_burton_h_t1000

It turns out that these are one of the most popular items on the appetizer menu at one of my favorite Las Vegas watering holes: Nine Fine Irishmen, located in the center of the casino at New York New York.

I pulled the dinner menu up on the internet and had to search for it.  I was looking for Baked Jameson Cherry Brie Bites but couldn’t find it.  Now that I’ve seen where they have it hidden at the bottom of the appetizers, it’s easy to see how I missed it the last time I stopped in for a pint of #Guinness and a splash of whiskey.

They list it simply as “Baked Brie” with an unimaginative description of: “Brie Cheese, Whiskey Marinated Cherries, Puff Pastry, Balsamic Reduction, Toasted Baguettes” and they don’t show the mouth watering picture.  Not a great sales job at all!

I’m much more intrigued by the glowing description that Brock Radke gave in his November 2013 article describing the, then new item as, “the perfect bite-sized delight for the holiday season. Bonus: Irish whiskey is involved.

I’m sold.  Point me to the kitchen!

Jameson Cherry Baked Brie Bites

  • 5-7 squares of puff pastry (5×5 inch, cut into four pieces)
  • 1½ lb. Brie cheese (cut into 1-inch cubes)
  • 1 cup dried tart cherries
  • ½ cup Jameson Irish Whiskey
  • 2 tbsp. light corn syrup
  • 2 eggs, beaten well
  • fresh ground pepper (to taste)

Now it’s time to prep the cherries:

  1. Soak cherries in Jameson overnight.
  2. Cook cherry-whiskey mixture in a small pot on low heat until fruit softens, then add corn syrup and mix well.
  3. Use a hand-mixer or blender to purée the mixture, then chill and let sit for 2 hours.

When your cherry mixture has finished chilling it’s time to assemble the bites:

  1. Heat oven to 425°F.
  2. Gently separate one square of puff pastry dough and spread a fingernail-sized portion of Brie in the middle.
  3. Add a small dollop of cherry purée and season with pepper.
  4. Fold dough so all corners are sealed.
  5. Spray a baking tray with nonstick cooking spray and place bites on tray in rows.
  6. Brush the top of each pasty pocket with egg.
  7. Bake for approximately 10 minutes or until golden brown.
  8. Let sit for two minutes before serving.

The part I’m missing in this recipe is that they don’t mention the balsamic reduction. Based on the picture it appears that they reserve some of the whiskey-cherry purée to add to the top for presentation with a couple of sprout leaves.

Helpful tip:  You can cut the preparation time by buying whiskey soaked cherries online or at your local Total Wine or Bevmo if they carry them.  I keep a jar on hand that are soaked in my favorite bourbon-whiskey, Maker’s Mark, and I’m sure that you can prepare the same a few days ahead and keep them well sealed in your refrigerator so that you can shorten the prep time.

If you’re on Facebook and are interested in the things I may not devote an entire blog post to: my favorite recipes, drinks, food facts, nutritional information, photos and other things that make my mouth water, I have a page on Facebook you can visit too:  https://www.facebook.com/ThisGirlLovesHerFood

Easy Turkey Day Appetizer

mb1One of the things I am in charge of this Thanksgiving is an appetizer.  I was going to get fancy and knock myself out with something that would be difficult to keep warm and wouldn’t likely taste that great cold, but I’ve decided to take another tack.

Instead of going in a direction that is completely opposite of the main meal, I thought instead that I would create something that would compliment and whet the appetites of the rest of the guests for the main event, plus I’d be able to incorporate one of my favorite Thanksgiving side dishes from last year, Zinful Cran-blueberry Sauce!

Turkey Meatballs with Zinful Cran-Blueberry Sauce

Zinful Cran-Blueberry Sauce

  • 1 & 1/3 Cups Granulated Sugar
  • 1 Cup Zinfandel Wine (Best Quality you can afford – if you wouldn’t drink it, don’t cook with it)
  • 1 – 12 oz Package Ocean Spray Fresh Whole Cranberries
  • 1 Cup Frozen Blueberries
  • 1 Whole Cinnamon Stick
  • 1/4 tsp Nutmeg
  • 1/2 tsp Vanilla
  • Orange or Tangerine Zest

Bring sugar, wine and cinnamon stick to a boil in a medium saucepan.  Add remaining ingredients and return to a boil, stirring constantly.  Reduce heat to low and simmer 15-20 minutes.  You may want to use a splatter shield to avoid splashing when cranberries pop. Remove and discard cinnamon stick. Set aside to pour over cooked meatballs.

Make the Meatballs

  • Canola Oil Spray or PAM
  • 4 Pounds Ground Turkey
  • 2 Cups Bread Crumbs or Panko
  • 4 Eggs
  • 4 Cloves Garlic Chopped
  • 1 Large Granny Smith Apple Grated
  • 1 tsp Crushed Fennel Seeds
  • 8 tsp Chopped Fresh Sage
  • 3 tsp Freshly Ground Salt
  • 1 1/2 tsp Freshly Ground Pepper

Preheat oven to 450°F and spray 2 large baking sheets with non stick spray

  1. Combine turkey, breadcrumbs, eggs, garlic, grated apple, fennel seeds, chopped sage, salt and pepper on a large mixing bowl
  2. Using a 1″ cookie scoop, portion out the meat into balls, roll and put as many as you can on both baking sheets
  3. Bake for 15 minutes until meatballs begin to brown
  4. Remove meatballs from baking sheet and place into serving dish, chafing dish or crock pot (set to low or warm setting) and pour cran-blueberry sauce over until all are well coated.
  5. Garnish with whole sage leaves if desired.

If you are on Facebook and are interested in the things I may not devote an entire blog post to, recipes, food facts, nutritional information, photos and other things that make my mouth water, I have a page on Facebook you can visit too:  https://www.facebook.com/ThisGirlLovesHerFood

Crab Stuffed Mushrooms & Wine

New-turkeysWe all know that the turkey and sides are the stars of Thanksgiving, but there needs to be a little something to nibble on before the feast so people don’t knock each other over like ravenous fiends when the buffet is ready.

Inevitably I end up making too many snacks, but my excuse is that I never know if I’ll have a few people “helping out in the kitchen” for the hours leading up to dinner, or if the entire crowd will be at the house hanging out for drinks and watching football.

I like to assign Thanksgiving appetizers to someone else when I can and ask them to keepturkey-cheese-ball-8 them fairly simple: some type of tray with fruit, veggies, crackers and sliced cheese or a cheese ball.  This year I am not hosting, we get to be the guests, but I’ll be taking a few dishes to add to the spread.

My main goal was to find something that wouldn’t appeal to the kids so they’d be less likely to eat so much that they ruin their dinner.  I’d rather they eat fruit, if that’s there to snack on.  An added bonus: just by saying the word mushroom the kids will come nowhere near them, so their grubby little hands won’t be picking them up and down!

Crab Stuffed Mushroom Caps

  • ¼ teaspoon ground cayenne pepper
  • ¼ teaspoon onion powder
  • ¼ teaspoon ground black pepper
  • ¼ cup grated parmesan cheese
  • 1 – 8oz package softened cream cheese
  • 1 tablespoon minced garlic
  • 1 tablespoon olive oil
  • pinch of salt
  • 24 – 30 fresh whole white mushrooms
  • 1/8 cup finely chopped celery
  • 1 can lump crab meat
  • fresh arugula (if desired)
  • fresh rosemary (if desired)

Preheat oven to 375°F

  • Line a baking sheet with a silicone liner or parchment paper
  • Using a fine mesh colander or a regular colander lined with cheesecloth, break up the crab to make sure no shell remains and leave it to drain
  • Clean and dry mushrooms
  • Remove stems, trim rough edges, then chop stems and set aside
  • Place caps (empty cavity up) on the baking sheet
  • Heat oil in a small pan.  Stir in chopped stems, celery, garlic and a pinch of salt. Cook until moisture disappears.  Remove from heat
  • Stir in crab, cayenne pepper, onion powder, black pepper, parmesan cheese, and cream cheese.
  • Use a spoon to fill each of the mushroom caps and return them to baking sheet
  • Bake in pre-heated oven 20 minutes

crabstuffedmushroomsServe immediately on a platter lined with fresh arugula and sprigs of rosemary if desired.

Another great thing about this crab stuffed mushroom recipe is that it is easily matched with the wines you are already likely to be serving with your Thanksgiving feast:

  • Pinot Grigio
  • Champagne
  • Sauvignon Blanc
  • Soave
  • Pinot Noir

If you are on Facebook and are interested in the things I may not devote an entire blog post to, recipes, food facts, nutritional information, photos and other things that make my mouth water, I have a page on Facebook you can visit too:  https://www.facebook.com/ThisGirlLovesHerFood


Healthier Potato Chips

potato-chipsIt’s debate night and a few girlfriends and I are throwing together a spread so we can drink wine and yell at the combatants on the television screen.  All was fine until I realized my son ate all of the chips and Amazon Prime Now had already made their second trip to my house of the day.  UG!

I remembered I had a 5 pound bag of potatoes in the cabinet so bravely I took on baking homemade potato chips.  How hard could it be?  Truth be told, the whole first batch ended up in the trash…I baked them WAY too long and they were black.  Oops!

This is the recipe that finally worked:

  • 3 Large Russet Potatoes
  • 1/4 Cup Light Extra Virgin Olive Oil
  • 1 -2 TBLS Sea Salt, Black Pepper, Cajun Spice Blend, Ranch Dressing Mix, Mrs. Dash, or any other seasoning blend you’d prefer
  1. Pre-heat oven to 400°
  2. Wash the potatoes thoroughly
  3. Using a mandolin type slicer, slice the potatoes into thin slices, rinse in cold water and pat dry
  4. Pour the olive oil into a medium sized mixing bowl, add the potato slices and the spice(s) you prefer
  5. Using tongs to separate, toss the potato slices making sure that they are thoroughly coated on both sides
  6. Place slices on baking sheets and put into preheated oven.
  7. Cook 12-15 minutes or until chips are brown (but not too dark)
  8. Remove from pans to paper towel lined drying racks so excess oil can be soaked up.
  9. Store in sealed container lined with paper towel between layers.

Serve with sour cream, any dip you choose or ketchup!

donaldripspageAfter drinking enough wine for a much larger party than just the 4 of us, emptying the bowl of chips, downing a pizza, tweeting until our nails were breaking, and screaming obscenities at the screen for 90 minutes, we were treated to this scene at the end of the debate when a television camera caught an angry Donald Trump angrily ripping a page out of his notebook while grinding his teeth. 😉

If you are on Facebook and are interested in the things I may not devote an entire blog post to, recipes, food facts, nutritional information, photos and other things that make my mouth water, I have a page on Facebook you can visit too:  https://www.facebook.com/ThisGirlLovesHerFood


Ceviche Style Shrimp Cocktail

cevstyshrcockIt may be starting to look like fall in the East, but here in Southern California, we’re getting ready for another 80°+ weekend.  It’s late September, and I’m not complaining.

With any luck, I’ll be out of my cast (fingers crossed), my stitches will come out of the four incisions on my foot, and I’ll be able to spend all day Sunday floating in my pool, catching some rays and we’ll BBQ a steak, some fresh asparagus, and some sweet potatoes for dinner.

Well before dinner though, I’m absolutely going to have a couple of these shrimp cocktails (thanks for the recipe Pampered Chef) prepared and ready to have for lunch while I’m lounging!

Ceviche Style Shrimp Cocktail

Ingredients

  • 1 pound shelled, deveined, large cooked shrimp, diced (21-25 per pound)
  • 1/2 medium seedless cucumber, diced
  • 2 plum tomatoes, seeded and diced
  • 1/4 cup thinly sliced and quartered red onion
  • 1/4 cup snipped fresh cilantro
  • 1/4 cup lime juice
  • 1/2 teaspoon salt
  • 1 medium avocado
  • Coarse salt, lime slices and whole shrimp (optional)
  • 1 jalapeño pepper, seeded and finely chopped
 Directions
  1. Combine shrimp, cucumber, tomatoes, onion, cilantro, lime juice, jalapeño pepper and salt in mixing bowl; toss to coat. Cover; refrigerate up to 1 hour before serving.
  2. Immediately before serving, dice avocado and fold gently into shrimp mixture. If desired, rub the rims of four margarita glasses with one lime slice, then dip into shallow dish of coarse salt; spoon salad into glasses. Garnish with lime slices and whole shrimp.

Tip:

 For the best texture, do not prepare this recipe more than 1 hour in advance. Once combined with the acidic lime juice, the shrimp will begin to firm up and eventually become tough and rubbery.

Nutrients per serving:

Calories 200, Total Fat 8 g, Saturated Fat 1.5 g, Cholesterol 220 mg, Carbohydrate 8 g, Protein 26 g, Sodium 550 mg, Fiber 5 g

If you are on Facebook and are interested in the things I may not devote an entire blog post to, recipes, food facts, nutritional information, photos and other things that make my mouth water, I have a page on Facebook you can visit too:  https://www.facebook.com/ThisGirlLovesHerFood

Handy Guide To Chili Peppers

chile-primer-various-peppersMy husband and some of my friends see peppers as a challenge.  The hotter the better.  They love to burn the heck out of their mouths and sweat & suffer afterward.

Not me.  I like my food spicy, but I still like the ability to taste and enjoy my food after I feel the burn.  Not the “Bern” that Bernie Sanders supporters feel 😉 , but the burn that a zip of spicy pepper adds to a dish.

Peppers, like salt, acid and fat, are essential flavor building blocks upon which dishes are built.  In an article at www.bonappetit.com, Amiel Stanek encourages readers to “tease out” the subtle nuances of spice in the season’s crop of peppers using some very specific techniques.  As someone who likes the taste, but not necessarily the need for a fire extinguisher after a bite, I appreciate the guidance.

Stanek reminds home cooks that peppers aren’t just spicy.  They’re also flavor bombs hiding hints of fruitiness, floral notes, earthiness, and “funk.”  To begin to experiment with these hidden flavors, a cook must first work on mellowing the pepper’s spice a bit:

  1. Remove the seeds – Using a paring knife or the edge of a spoon, remove the seed pod beneath the stem and white membranes that hold the rest of the seeds within.
  2. Char – You can do this whole on the grill, under the broiler, or directly on a stovetop gas burner and peel off the burnt layer before seeding them.
  3. Soak – Capsaicin, the compound that makes a pepper hot, is alcohol soluble. When using the hottest peppers, remove membranes and seeds, muddle, and soak in vodka for anywhere from a few hours up to a couple of days.

For a great, printable reference of the varied types of peppers and their levels of spiciness, from mild to “grab a fire extinguisher,” click on this link.

A recipe I shared earlier this year was for one of my favorite cocktail hour snacks on steak and salad night:  Blistered Shishito Peppers.  Take my advice and make a double batch!  These suckers are addicting and one batch is never enough.  If you have any left, put them in a re-sealable container or zip bag and toss in the refrigerator.  These are easily revived in a hot pan with a splash of olive oil a day or two later.

Are you on Facebook?  You might be interested in the things I may not devote an entire blog post to: recipes, food facts, nutritional information, photos and other things that make my mouth water. I may not write a blog post every day, but there are daily updates to my This Girl Loves To Eat community at: https://www.facebook.com/ThisGirlLovesHerFood

No fail Deviled Eggs

FullSizeRender_1According to Wikipedia, “Deviled eggs (US) or devilled eggs (UK), also known as stuffed eggs, angel eggs, eggs mimosa, Russian eggs, dressed eggs, picnic eggs are hard boiled eggs shelled, cut in half, and filled with the hard-boiled egg’s yolk mixed with other ingredients such as mustard and mayonnaise, but many other variants exist internationally. Deviled eggs are usually served cold. They are served as a side dish, appetizer, or a main course, and are a common holiday or party food.”

I couldn’t come up with a better description than theirs,  but I’d add that every chef, chef wannabe and home cook adds their own touches that make their deviled eggs anything but ordinary.

Some of the exotic ingredients I’ve seen included in other recipes for deviled eggs:

  • Greek Yogurt
  • Sour Cream
  • Cream Cheese
  • Sweet Pickle Relish
  • Horseradish
  • Wasabi Powder
  • Dill Pickle
  • Sugar
  • Cayenne Pepper
  • Jalapeno/Habanero Chilies
  • Chipotle Chilies
  • Turmeric
  • Green Olives
  • Black Olives
  • Shredded Cheddar or Mexican Blend Cheese
  • Pimentos
  • Poppy Seed
  • Thyme
  • Cilantro
  • Parsley
  • Salsa
  • Minced Onion
  • Caviar
  • Cream
  • Capers

The ingredients that people top their deviled eggs with are as diverse as the ones they put inside, but those most commonly found include:

  • Old Bay Seasoning
  • Paprika
  • Curry Powder
  • Cayenne Pepper
  • Chopped Chives
  • Dill
  • Caviar
  • Anchovy
  • Bacon Bits
  • Shrimp
  • Herring

I prefer mine as simple as can be:

Lisa’s Basic Deviled Eggs

  1. In a medium saucepan, in about 1 quart of cold water, place fresh eggs (I do 6-12 large or extra large)
  2. Over medium-high heat, bring pan of eggs & water to a boil
  3. When you reach a boil, set timer for 20 minutes and reduce heat to medium
  4. When timer goes off, immediately remove eggs and place into a bowl filled with ice water to stop the cooking process
  5. Peel the eggs, cut each in half lengthwise and place the yolks in a bowl
  6. Mash the yolks with a fork then add approximately 1 TBLS Spicy Creole Mustard (I like Zatarain’s)
  7. Add approximately (to your taste) 2 TBLS (1 TBLS per 6 eggs give or take) Mayonnaise (I like the taste and consistency of Best Foods) and stir with a fork until well blended and you have enough volume to fill all of the halves
  8. I use a pair of spoons to mound the egg yolk mixture into the empty egg white halves, but you can also put the mixture into a plastic bag (to pipe out with the end snipped off) or a pastry bag with a star tip attached for a neater presentation

I add a turn or two of freshly ground pepper and nothing else, but will occasionally sprinkle a little bit of paprika on the egg white halves BEFORE I fill them with the yolk mixture if I’m feeling fancy.

The temperature deviled eggs are served at is as varied as the ingredients people use to make them.  I prefer to loosely cover the eggs and quick chill them in the freezer, if I am short for time, or in the refrigerator for at least an hour before serving.

snapwareeggstorageChilling Tip:  If you don’t have a covered, locking storage/ transportation dish made specifically for deviled eggs, here is a simple way to protect your refrigerator (or freezer) and the food inside from absorbing the overpowering smell of egg:  Put a plate inside a gallon sized zip bag then place the eggs on the plate in the bag and close securely before chilling.

Picnic or tailgate tip: Prepare filling and transfer to a plastic zip bag.  Carry whites and yolk mixture separately in cooler.  Fill eggs on the spot, pressing filling out of snipped corner of bag.

Are you on Facebook?  You might be interested in the things I may not devote an entire blog post to: recipes, food facts, nutritional information, photos and other things that make my mouth water. I may not write a blog post every day, but there are daily updates to my This Girl Loves To Eat community at: https://www.facebook.com/ThisGirlLovesHerFood


Meatless Monday Treat

It was a rough weekend.

First we had a two day basketball tournament that started early both days, meaning no sleeping in for me, and then we had a party we needed to go to Saturday night that turned into the proverbial shit show:

lamborghini_aventador_lp_720_yellow-800x600While standing around watching the rest of the party goers drinking themselves into oblivion and admiring the host’s new bright yellow half million dollar Lamborghini Aventador, the host, who’s a very tall, very large man, lost his tenuous hold on his balance and began sliding down the rear fender with only me (I’m not a big girl) between him and the hard concrete floor & wall.  I did my best to break his fall without breaking myself but he ended up landing on me in a very awkward position and, in the fiasco of the fall, I threw my red wine all over the back end of his gorgeous car.  In my defense, I kept him from hitting his head on the floor or the wall so there was that…LOL

Suffice it to say that I was in some pain and thus, in no mood to make dinner Sunday night.  I was very glad to remember that we had a leftover pizza in the refrigerator to reheat.  Tonight, due to the second day of pain being even worse, from my neck all the way down my right side, I wasn’t anxious to roll out a gourmet dinner either.  Thank God my husband is pretty easy to feed.

shishito1I can usually dress up a grilled cheese sandwich in a way to satisfy him and tonight was no different.  Real butter, a loaf of sourdough, some bacon that was already cooked & chilling in the meat drawer combined with some pepper jack cheese and we had a winner.  I didn’t want to just let him eat the Cheetos he favors with it, and he didn’t want any of the leftover coleslaw from the other night, so I threw together another quick side he loves:

Blistered Shishito Peppers

  1. Heat 1 TBLS olive oil in a large frying pan over medium-high heat.
  2. Add 1 pkg of fresh Shishito peppers to the hot oil and cook, tossing them every minute or so, for 5 minutes or until the skins are blackened and blistered.
  3. Remove from heat and serve immediately.

shishito2Trader Joe’s sells Shishito peppers pre-bagged, you can get them at your local Asian grocery store (they are beloved in Japan), or your grocery store may have them in your produce section.

Shishito peppers are generally mild, but it seems like one in every batch will light you up! 😉

Are you on Facebook?  You might be interested in the things I may not devote an entire blog post to: recipes, food facts, nutritional information, photos and other things that make my mouth water. I may not write a blog post every day, but there are daily updates to my This Girl Loves To Eat community at: https://www.facebook.com/ThisGirlLovesHerFood


UG! I Cut My Avocado Too Soon

I have a 20 year old, beautiful and quite prolific avocado tree in my backyard.  It has survived being broken in half by a dog tie-out (Courtesy of our beloved Husky Whitney), uprooted when the swimming pool was being dug, and being eaten by the tree boring termites that took out it’s neighboring peach and plum trees.  It easily gives me more than 100 large, meaty, delicious avocados that stay good for me to eat and share with friends and family twice a year.

bacon-wrapped-fries-17-140x140January has come, Christmas “Shoeboxes of Love” have been distributed and I still have about 3 dozen on the tree.  I’ve been patiently watching for them to be ready to pick so I can finally try the recipe I pinned months ago for Bacon Wrapped Avocado Slices.  With Super Bowl just a week and a half away, I thought it was a perfect time to give it a try, so I pulled 6 off the tree.

I sent 2 home with my girlfriend and left the other 4 on the counter to slowly ripen.  The great part about picking them fresh is that I often have a good 2 weeks to let them become perfectly soft and ready to eat, unlike those at the store that have to be used as soon as you get them home.

If you don’t have ready-ripe store bought avocados to satisfy your craving, or the patience to wait that long, the following methods are rumored to be effective for ripening rock-hard avocados:

  • Put it in a brown paper bag overnight with a ripe banana or apple, which releases the ripening gas, ethylene (this is what I do)
  • Put it in a jar of rice
  • Bury it in flour
  • Wrap it in a piece of newspaper

3 remained yesterday and 1 was just reaching it’s perfect degree of softness.  My mouth watered anticipating a trial run of crisp salty bacon wrapped around velvety Haas Avocado dipped in a perfectly spiced fiesta ranch dip.  Then I got a massive migraine!

Off to bed I went so my husband was on his own for dinner.  He offered me a grilled cheese sandwich (one of my favorite things) but I was just not hungry.  I smelled his dinner cooking and was glad that he was self sufficient (at least last night).

I woke up this morning feeling a whole lot better and ventured into the kitchen to clean up the mess I knew would await, only to discover that HE ATE MY RIPE AVOCADO!

avocadoripe_guide

I cautiously felt the other two and, maybe it was my wishful thinking, but I determined that one of them was ready.  Into it I dove with my butcher’s knife only to hit rather firm flesh.  OH NO!  My avocado was ruined.

Instead of doing what I might have done in the past, i.e. throw the avocado out (GASP!), I went to my trusty friend, the internet in search of any way to save the prized green flesh!

A post on Hubpages.com may have just saved my cut too soon avocado after all!

If you have only opened, but not yet sliced the flesh and removed it from the shell, you can try to ripen the whole fruit:

  • Firmly fit the avocado halves back around the pit
  • Wrap the entire fruit with Saran Wrap, Masking Tape, Rubber Bands, Yarn, Twine, or anything that will hold the fruit firmly closed without allowing dust, bugs or moisture to get inside
  • Place fruit back on counter (do not refrigerate) and poke it gently every 12 hours until the flesh starts to give but doesn’t yet hold an indentation

An unripe, already sliced avocado can be prepared in ways that will cut the bitterness and hard texture so that it can still be enjoyed, albeit, not as much as if it were buttery and naturally softened, but nonetheless it can still be eaten.

  1. Make avocado patties by baking the cubed flesh 10-15 minutes at 300 degrees, until soft.  Mash and combine with panko, an egg and Cajun spice.  Spray a hot frying pan with olive or coconut oil spray and fry until brown on both sides.  Would be great with a fiesta ranch type dip.
  2. Make a creamy, cheesy hot avocado dip to serve with crusty bread or crackers.  Dice the avocado and place the cubes in a baking dish. Make a simple white sauce (béchamel), pour it over the avocado and sprinkle some grated cheese on top. Bake until golden and bubbly.
  3. Dip slices of the avocado in tempura batter and fry until crisp.

If you, like me, tend to share the foods you eat with your pets, you might have heard that avocados are poisonous to dogs and cats.  Avocado contains a molecule called persin that can cause illness or even death, but according to the Pet Poison Helpline, it is not poisonous for dogs or cats.  I’m really glad to know that because my dogs (1 Husky and 5 English Labs I’ve owned in the past 25 years) have always knocked the avocados (peaches, plums, citrus, tomatoes, berries and apricots) off the low branches or grabbed them off the ground and eaten them skin and all with no adverse reactions.  Thankfully I didn’t know that they were said to be harmful or I’d be worrying that they somehow harmed them.  Do be aware that the seeds do pose a choking risk and could cause a blockage in the digestive tract if swallowed whole, so it’s probably a good idea to keep the seeds away from them.

Are you on Facebook?  You might be interested in the things I may not devote an entire blog post to: recipes, food facts, nutritional information, photos and other things that make my mouth water. I may not write a blog post every day, but there are daily updates to my This Girl Loves To Eat community at:  https://www.facebook.com/ThisGirlLovesHerFood

Cooking and Blogging in a Wrist Brace

cervicalnervesIt is amazing how much of your body is controlled by the nerves in the small part of your spine in your neck.

C5 – controls the Deltoids (the rounded part of the shoulder) and the Biceps (flexion of the elbow and rotation of the forearm);  C6 – controls the muscles that make up the wrist extensors and enable wrist extension and hyper extension and the movements that are tied to the Biceps (front of the upper arm);  C7 – controls the Triceps (muscles in the back of the upper arm that allow the elbow to straighten);  C8 – controls the hands

Either by hauling 40 lb bags of rocks to create a dry riverbed in the backyard, moving heavy plants and outdoor furniture around or moving furniture to clean places the housekeepers have been ignoring for months, I have managed to cause myself indescribable pain and numbness that has persisted for well over a week – thus my blogging absence. Typing puts my wrists in the wrong position and sends shooting pains up my arm & directly across my shoulders to my neck…

buffchikdipI threw a 16th birthday party for my friend’s son this weekend and the honoree requested chocolate cake (which French’s Bakery did a fabulous job on) and Buffalo Chicken Dip.

Who am I to turn a 16 year old boy down?

Only minimum movement was required, I didn’t have to do much stirring or carrying, and it only takes a few minutes to make, so I was able to grant his request!

Buffalo Chicken Dip

  • 2 Large Boneless / Skinless Chicken Breasts
  • 2/3 Cup Hidden Valley Original Ranch Dressing
  • 2/3 – 1 Cup (depending how spicy you like it) Frank’s Red Hot Sauce
  • 1 – 8 oz Block Cream Cheese
  • 1/2 Cup Shredded Cheese – Cheddar, Sharp Cheddar or my personal favorite: Aged Gouda
  • 1/4 Cup Crumbled Blue Cheese (I am not a fan, this is entirely optional)
  • 1/4 Cup Chopped Green Onion (optional but pretty)

Bring enough water to cover your chicken breasts to a boil.  I leave the breasts whole to preserve the moisture and cook them for 20-30 minutes.  When the chicken is done, I remove the breasts to the bowl of my stand mixer and using the paddle attachment, turn the mixer on to low then medium while the chicken shreds.

Put the whole block of cream cheese into the center of an 8 or 9 inch square Pyrex dish.  Pour the dressing and the hot sauce over the top of the cream cheese and microwave on high for 2 to 3 minutes.  Remove from the microwave and stir until well combined.

Add the shredded chicken to the dish and stir until all of the chicken is well coated.  Sprinkle the shredded cheese over the top and bake in a preheated 350 degree oven 20-30 minutes (until bubbling along the edges).

Remove from oven and top with the blue cheese crumbles and chopped green onions.

I serve with carrot chips, celery sticks and jicama sticks.  You could also use sturdy crackers (like Triscuit) or French bread chunks.

If it’s not going to be immediately inhaled, you can keep the dip warm in a small crock pot type warmer or, like I do, use your fondue pot to keep it bubbling hot.

To be honest, I forgot to take a picture, so yours (and mine) may come out looking different than the picture I found on the internet, but I’m sure it’ll look great!

If you are on Facebook and are interested in the things I may not devote an entire blog post to: recipes, food facts, nutritional information, photos and other things that make my mouth water, I have a Facebook page you can visit too https://www.facebook.com/ThisGirlLovesHerFood