

 Since this New Year’s Day is “Upside Down,” you know, all of the official festivities happening on Monday, January 2, what better way to kick-off (no pun intended) our entire day of parade and football watching than with this upside down take on my favorite overripe fruit concoction?
Our whole holiday week between Christmas and New Year’s Day has been spent at home, except for an escape on Wednesday for my birthday dinner WITH a 102°F temperature, so I did no baking, we did no entertaining, and I’ve really done nothing but sleep and drink hot tea. I’m trying to rally, despite being sick, and make some kind of effort for tomorrow, yet another day of being sick at home, but at least there will be something I might want to eat.
My husband (he who is Twitter challenged) managed to send this Buzzfeed video to me in a message a couple of months ago as a hint, then I saw it again last night. It looks easy enough so why not? I’ll give it a try.
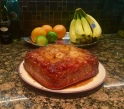
Upside Down Banana Bread
4-5 ripe bananas
3 eggs
½ cup oil
½ cup granulated sugar
1 Tbsp. ground cinnamon
2 cups flour
½ cup butter
1 cup brown sugar
2-3 bananas, sliced
Vanilla ice cream
- Preheat oven to 350°F/175°C.
- In a large bowl, mash the ripe bananas.
- Add the eggs, oil, sugar, and cinnamon, mixing until evenly incorporated.
- Add the flour and mix until the batter has no large pockets of flour. Set aside.
- In a pot over low heat, melt the butter, then mix in the brown sugar until dissolved.
- Bring up the heat to medium, cooking until the mixture starts bubbling.
- Remove the caramel from heat and pour into a greased 9×9 baking pan.
- Lay the banana slices evenly on top of the caramel.
- Spread the banana bread batter on top.
- Bake 40-50 minutes.
- Cool until the bottom is barely warm.
- Use a knife to loosen the edges from the pan.
- Place a plate upside-down on top of the pan, then invert the pan, flipping the banana bread onto the plate.
- Slice, then serve with vanilla ice cream.
TIP** It’s important to make sure you are using a 9 x 9 pan. If you use an 8 x 8 pan, like I did my first try, you need to increase the baking time by about 10 minutes and be prepared, you’ll be cleaning up the brown sugar that will bubble up and spill over the sides and burn onto the bottom of your oven. Trust me, the smoke alarms blaring, dogs running around barking and the cleanup weren’t worth not following the exact directions. UG!
It’s very sweet, so you might want to start with a small square and go back for seconds. Who am I kidding? Put it in a bowl and pile the ice cream on! And, before you ask, “Yes, I do intend to start my day with glorified cake and ice cream!” #TheDietStartsTuesday
If you’re on Facebook and are interested in the things I may not devote an entire blog post to: my favorite recipes, drinks, food facts, nutritional information, photos and other things that make my mouth water, I have a page on Facebook you can visit too:https://www.facebook.com/ThisGirlLovesHerFood

 There are many foods I didn’t know could be frozen, saving me from the inevitable time when I need something like buttermilk, which I never have on hand when I come across a recipe that calls for it. Learning this led me on an internet search to see what other seldomly stocked foods can be frozen for use later.
 What’s the best part about the day after a barbecue? Leftovers of course!


